Brasara™ Polyphonic Synthesizer documentation
Welcome to Brasara™
Brasara™ is an eight-voice polyphonic synthesizer in the grand style of a particular late 1970s classic. Every voice is two complete synthesizer channels, I and II, played from a panel of sliders, levers and slide switches, with a ribbon for pitch bends and per-note pressure. Around that classic heart it adds a key split, an arpeggiator on each channel, a 64-step chord sequencer, voice character, a second LFO per channel, two effect slots and a reverb, and a preset browser.
You can use Brasara in two ways:
As a plug-in instrument in your DAW (digital audio workstation): VST®3 on macOS, Windows and Linux, Audio Unit (AU) on macOS, and AAX for Pro Tools on macOS and Windows.
As a standalone app, with your own audio interface and MIDI keyboard, or the keybed and ribbon on Brasara's own panel. You don't need a DAW for this.
All of them use the same sound engine and the same editor, so presets, sounds and everything in this guide apply to each.
Who this guide is for
This guide is written for two kinds of reader at once. If you've never programmed a synthesizer, you'll find each part of Brasara explained in plain words: what it is, why you'd use it, and what you'll hear as you move each control. Each section ends with a short Try this recipe that starts from the Init sound, so you can learn by ear. If you already know your way around subtractive synthesis, the control lists give you the exact ranges and behavior, and the tips point out where Brasara differs from what you might expect.
Words with a special meaning in synthesis, such as envelope, resonance or aftertouch, are linked to our glossary of synthesizer terms the first time they appear in a section. Follow a link whenever a word is new to you.
How this guide is organized
This guide covers installing and activating Brasara, the standalone app, the Audio Unit, the AAX plug-in for Pro Tools and the editor. Your first sounds then walks you through building five sounds from scratch. After that, the guide goes through the sound in the order of the panel: the two channels, the common controls, the tone selector and the performance controls. Then come the arpeggiators and the sequencer, the extras, the effects, presets, MIDI, MPE and MIDI Learn. It ends with more sound design recipes, suggestions for where to go next, and troubleshooting.
Installing
System requirements
macOS: Apple silicon or Intel (one universal installer).
Windows: 64-bit.
Linux: 64-bit x86_64. There's a .deb package for Debian, Ubuntu and their relatives, and a .tar.gz for other distributions.
To use Brasara as a plug-in, you need a VST3 host (macOS, Windows or Linux), an Audio Unit host (macOS), such as Logic Pro or GarageBand, or Pro Tools (AAX, macOS and Windows). The standalone app needs nothing else.
Download the installer for your system from the Brasara product page on our website (you need to be signed in, with a license). Each installer installs the standalone app and the plug-in formats for your system: VST3, Audio Unit and AAX on macOS, VST3 and AAX on Windows, and VST3 on Linux. The macOS and Windows installers show the license agreement, which you must accept. Brasara is installed for all users of the computer.
macOS
Open the .pkg file and follow the steps.
The app goes in Applications/Brasara, the VST3 plug-in in /Library/Audio/Plug-Ins/VST3, the Audio Unit in /Library/Audio/Plug-Ins/Components, and the AAX plug-in in /Library/Application Support/Avid/Audio/Plug-Ins.
Windows
Run the setup .exe and follow the steps.
The app goes in C:\Program Files\Tristar Advanced Software\Brasara (you can change this), the VST3 plug-in in C:\Program Files\Common Files\VST3, and the AAX plug-in in C:\Program Files\Common Files\Avid\Audio\Plug-Ins.
A Start menu shortcut opens the standalone app.
Linux
Debian, Ubuntu and similar: run sudo apt install ./Brasara-…-setup-linux-x64.deb, which also installs anything Brasara needs. The app goes in /opt/tristar-advanced-software/brasara, the plug-in in /usr/lib/vst3, and brasara starts the app.
Other distributions: unpack the .tar.gz and run sudo ./install.sh. The app goes in /opt/tristar-advanced-software/brasara and the plug-in in /usr/local/lib/vst3. The app also runs straight from the unpacked folder.
Installing on Linux means you agree to the license agreement, which is included with the package.
Updating
When a new version is out, an UPDATE button appears in the editor's header. It opens the version's download page. Run the new installer over the old one: it replaces the installed version, and your presets and settings stay.
The installers never replace a newer version with an older one.
Uninstalling
Deactivate Brasara first (see Activating your license). Uninstalling doesn't free your license's seat on this computer by itself.
macOS: run Uninstall Brasara in Applications/Brasara.
Windows: use Settings > Apps, as for any app.
Linux: run sudo apt remove brasara. If you installed from the .tar.gz, run sudo sh uninstall.sh in the install folder.
Uninstalling removes the app, the plug-ins (every format), the activation and the standalone app's settings. Your user presets are kept.
Activating your license
Brasara is activated per computer with a license key. You can find your keys on the My licenses page of your account.
Open Brasara, in your DAW or as the standalone app.
Click UNREGISTERED: ACTIVATE in the header, under the version number.
Enter your license key, and activate. This needs an internet connection.
You only need to do this once per computer. Your license is activated per computer, not per format, so activating Brasara in any one of the plug-in formats or the standalone app activates all of them.
Seats
A license can be active on two computers at a time.
You can make up to five new activations in any 12 months. Activating a computer that already holds a seat, for example after reinstalling the operating system, reuses its seat and doesn't count.
Replacing a disk or graphics card doesn't affect activation. Replacing the motherboard (logic board on a Mac) does, and so does reinstalling Linux.
Working offline
After activation, Brasara checks its license on your computer, without going online. It renews the activation in the background whenever it's online, and it keeps working for 30 days without a connection. If you take a laptop to a gig or a studio without internet, connect it once in the days before so the 30 days start fresh.
Moving to another computer
To free a seat, click DEACTIVATE THIS COMPUTER in the license dialog (click the version number in the header to open it). If you can no longer use a computer (it was lost, stolen or wiped), free its seat from the My licenses page of your account instead.
Demo mode
Until it's activated, Brasara runs as a demo. It inserts one second of silence once a minute, or every 10 seconds when your DAW renders offline. Nothing else is limited, so projects and presets you make in the demo keep working once you activate.
Quick start
In your DAW
Rescan your plug-ins if your DAW doesn't find Brasara on its own. It's listed under Tristar Advanced Software.
Add Brasara to an instrument track, and open its editor. On macOS, choose either the VST3 or the Audio Unit version if your DAW offers both. In Logic Pro and GarageBand, it's under AU Instruments > Tristar Advanced Software > Brasara. In Pro Tools, insert it on an instrument track. It's in the Instrument category of the insert menu.
Click the PRESETS tab to browse the factory sounds, or step through them with ‹ and › beside the preset name.
Play. Try pressing into the keys after you strike them: many sounds open up or gain vibrato under pressure.
As the standalone app
Open Brasara from your Applications folder, the Start menu or your app launcher.
Open Settings (from the status line, or press Cmd+, on macOS or Ctrl+, elsewhere). Choose your audio output, and tick your MIDI keyboard.
Play your keyboard, or click the keybed at the bottom of Brasara's window.
Five presets to try first
If you're not sure where to start, these factory presets show off different sides of Brasara. Type each name into the search box on the PRESETS page.
Rain Fanfare (Brass): each note swells up from below its pitch, and pressing into the keys brightens it.
Glass Strings (Strings): a shimmering, chorused string section to hold chords on.
Berlin Bass (Sequences): hold one key and a sequence plays; play other keys to transpose it.
Crystal Bells (Bells & Plucks): clear bells from the ring modulator, ringing into a long hall.
Lead Over Pad (Splits): a different sound in each hand. Its description tells you where the split is.
Your first sounds
The best way to learn a synthesizer is to build a few sounds yourself. Each walkthrough below starts from Init, Brasara's blank starting point, and tells you exactly which controls to move. You don't need to understand every control yet: the later sections explain them all. Take your time, play a few notes after each step, and listen to what changed.
Before you start
Loading Init: click the preset display in the header (the box that shows the current preset's name). The preset browser opens. Choose the Init category on the left (or search for Init), and click Init. Then click the preset display again, or the PANEL tab, to go back to the panel.
What Init sounds like: a plain, bright sawtooth on both channels, with the filters partly open, an organ-like on/off level, and every extra (effects, modulation, voice character) off. It's deliberately plain, so that everything you hear afterwards is something you added.
Setting a value: drag a slider's cap, and watch the value shown above it as you drag. Times under a second are shown in milliseconds (ms), longer ones in seconds (s). The values below don't have to be exact: close is fine.
Hearing one channel at a time: the MIX slider in the strip below the channels balances channel I against channel II. At 0 you hear only channel I, at 10 only channel II, and at 5 (where Init has it) both at full level. Several walkthroughs use this to let you build one channel at a time.
Saving: when you like a sound, click SAVE in the header and give it a name, so you can come back to it.
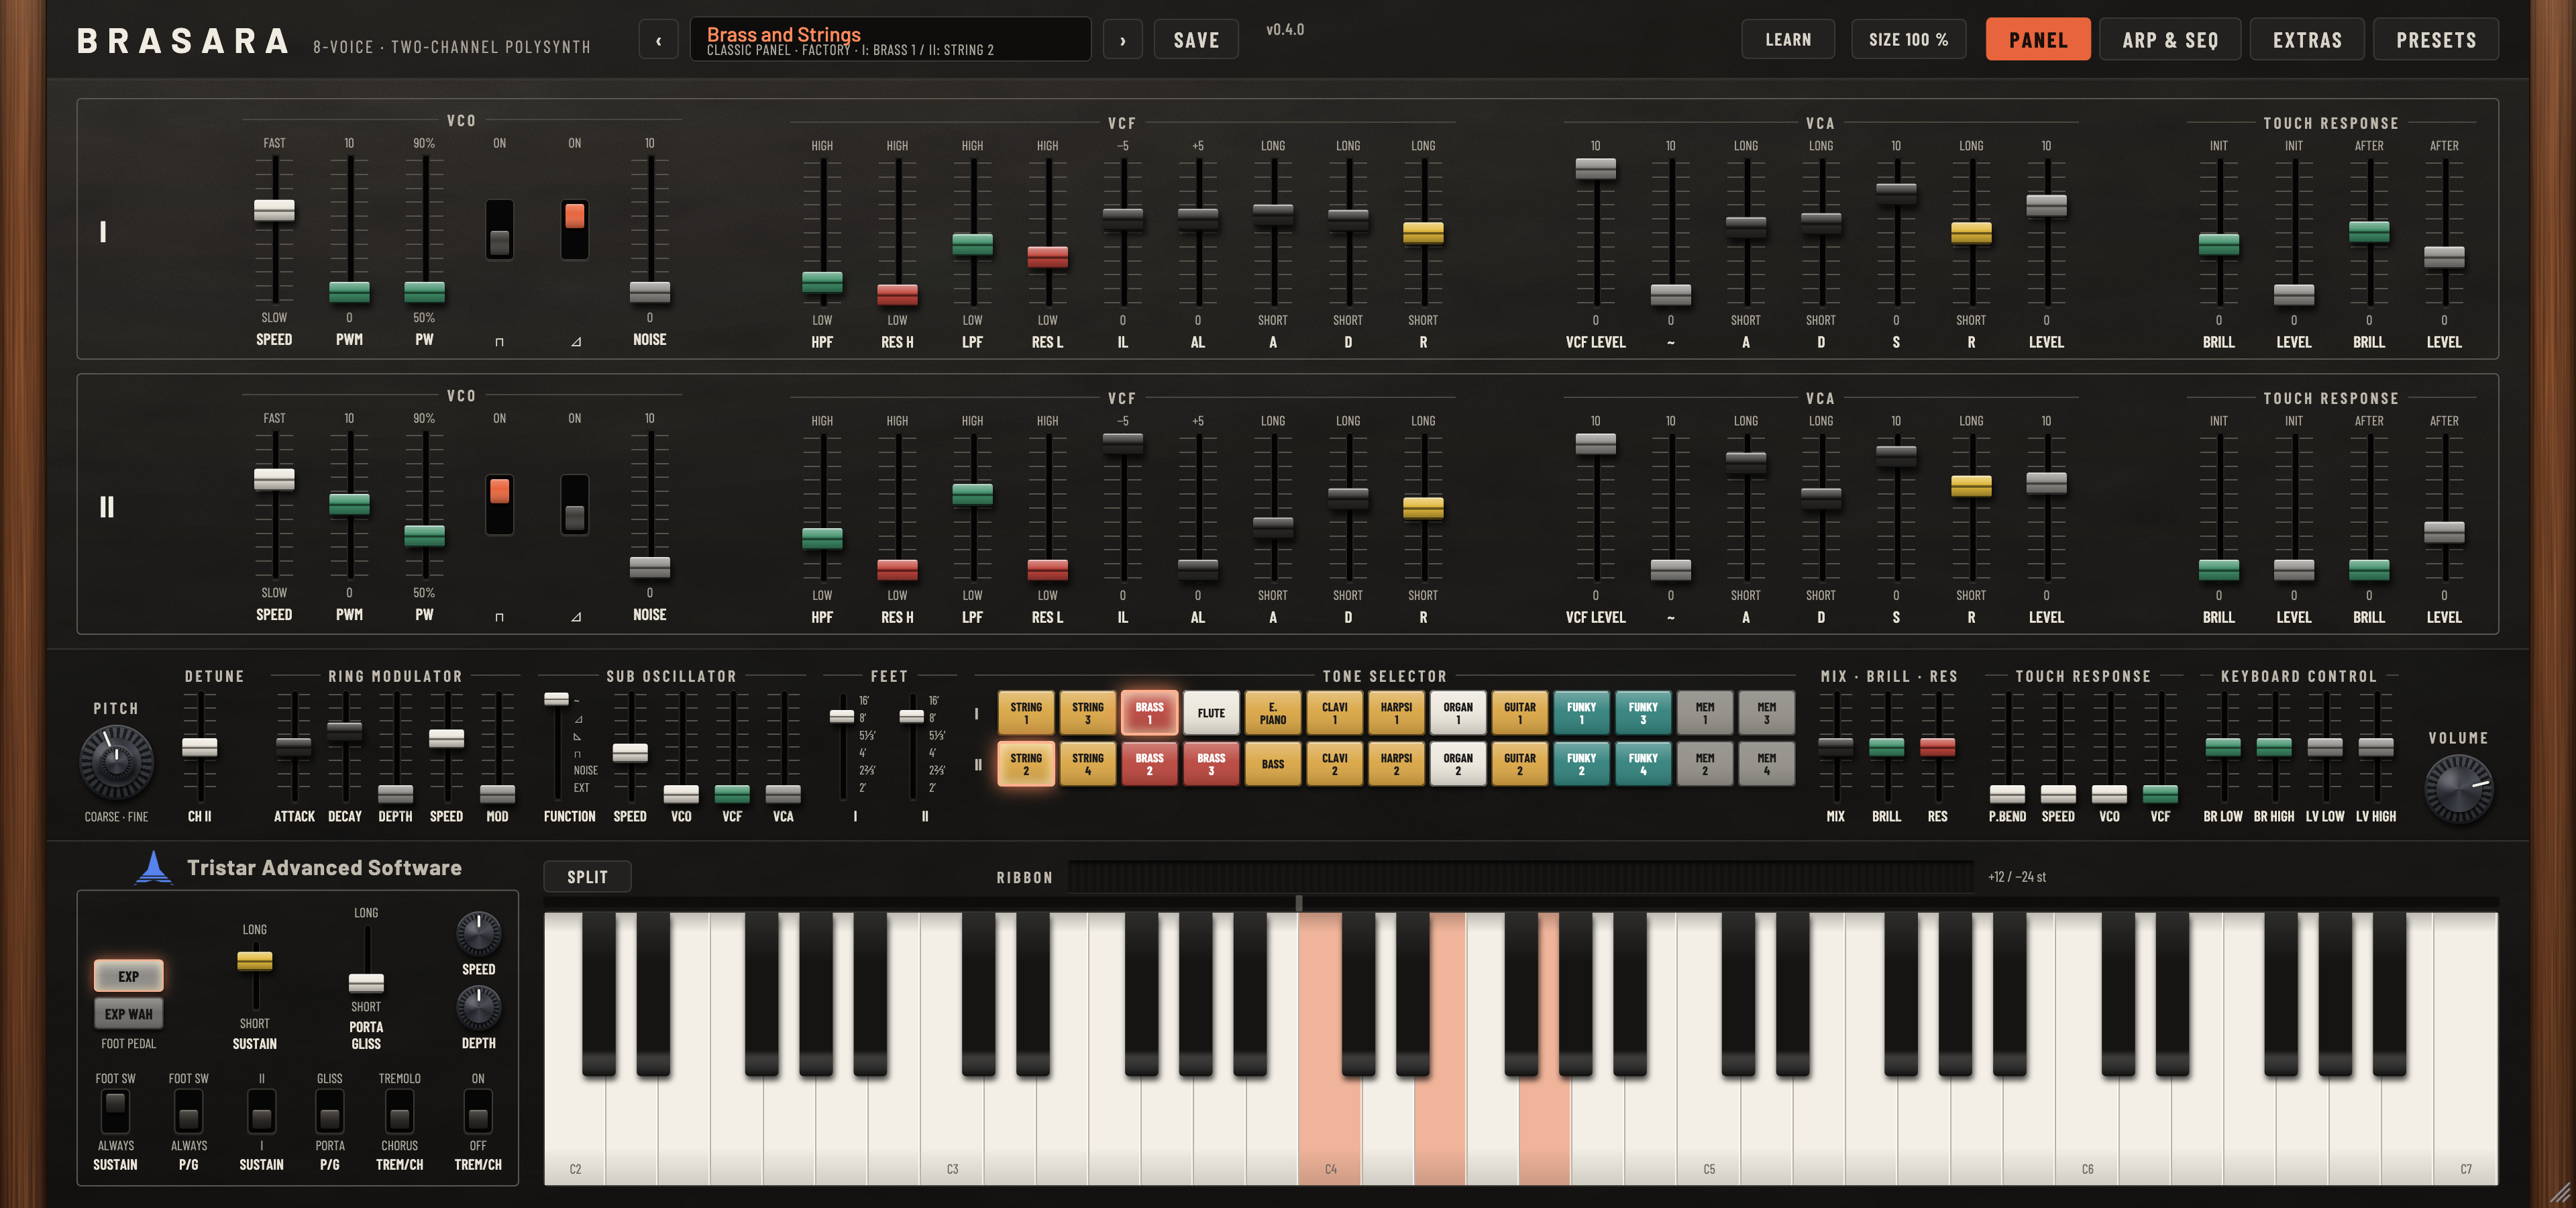
A brass section
Brass sounds get their character from a filter that opens quickly as each note starts, then settles. Here you'll shape that with the filter envelope.
Load Init, and set MIX to 0, so you hear channel I alone.
In channel I's VCF section, set LPF to 4 and RES L to 3. The sound gets darker and slightly nasal.
Now the filter envelope, also in channel I's VCF section: set IL to −2, AL to 3, A to 80 ms and D to 600 ms. Play a chord. Each note now starts muffled, opens up to a bright "blare" over a fraction of a second, and settles back. That's the core of a brass sound.
In channel I's VCA section, set A to 40 ms and S to 8. The notes now fade in slightly, like a breath, instead of clicking on.
In channel I's TOUCH RESPONSE section, set INIT BRILL to 4. Play some notes softly and some hard: the harder you play, the brighter each note starts. If your keyboard sends aftertouch, also set AFTER BRILL to 5 and press into a held chord: it gets brighter as you push.
Now the second channel. In the tone selector's bottom row (channel II), press BRASS 2. Channel II's sliders all move to a square-wave brass voicing. Set MIX back to 5 to hear both channels together.
Set DETUNE (CH II) a little above the middle, to about +6 ct. The two channels now beat slightly against each other, and the sound becomes a wider section rather than one player.
To finish, set P.BEND in the common TOUCH RESPONSE section to 3. Each note now starts slightly flat and slides up to pitch, more so when you play harder, just as a brass player's notes do.
What you should hear: a warm, full brass section that blares when you play hard and stays mellow when you play softly. Compare it with the factory presets in the Brass category.
A string pad
String and pad sounds come from slow fades and gentle, constant movement. Here you'll use pulse-width modulation, a second detuned channel and the chorus.
Load Init, and set MIX to 0.
In channel I's VCF section, set HPF to 2 and LPF to 6.5. The low end thins a little, which keeps pads from getting muddy.
In channel I's VCA section, set A to 600 ms, S to 9 and R to 1.50 s. Notes now swell in and fade away slowly after you let go.
Set MIX to 10, to hear channel II alone. In channel II's VCO section, turn the ⊿ (sawtooth) switch off and the ⊓ (pulse) switch on. Set PW to 60%, PWM to 5 and SPEED to about 5 Hz. The pulse wave now shimmers as its width moves.
Give channel II the same slow envelope: in its VCA section, A 600 ms, S 9, R 1.50 s. Set its LPF to 6.
Set MIX back to 5 and DETUNE (CH II) to about +10 ct. Hold a chord: the two channels drift against each other slowly.
In the performance controls at the bottom left, switch the TREM/CH switch marked ON and OFF to ON, and the other TREM/CH switch to CHORUS. Set the SPEED knob a little below the middle and DEPTH a little above it.
On the EXTRAS page, switch the reverb's ENABLE on and set its MIX to about a third.
What you should hear: a soft string ensemble that swells in, moves gently from side to side, and fades into the reverb when you let go. Hold long chords and change them slowly.
A bass
A good synth bass is short, punchy and solid in the low end. Here you'll use the octave switch, a fast filter envelope and the sine wave for weight.
Load Init, and set MIX to 0.
In the common strip, set the FEET lever for I to 16′. Channel I now plays an octave lower.
In channel I's VCO section, turn the ⊓ (pulse) switch on as well as the sawtooth. The sound gets thicker.
In channel I's VCF section, set LPF to 3.5, RES L to 3, AL to 3, A all the way down (1 ms) and D to 300 ms. Each note now starts with a quick bright "pluck" that closes down fast.
In channel I's VCA section, set A all the way down, D to 800 ms, S to 6 and R to 100 ms. Notes start instantly, settle a little, and stop quickly when you let go, so bass lines stay tight.
Set INIT BRILL in channel I's TOUCH RESPONSE to 3, so harder notes bite more.
Now a sub layer on channel II. Set FEET for II to 16′ too. In channel II's VCO section, turn the sawtooth off. In its VCA section, set VCF LEVEL to 0, ~ (the sine) to 6, A all the way down, D 800 ms, S 6 and R 100 ms.
Set MIX back to 5. Channel II adds a pure, round sine underneath, which you'll feel more than hear on small speakers.
For one note at a time, as many bass players want: on the EXTRAS page, set the Voices section's MODE to MONO. Hold one key and play another: the newest key plays, and letting it go returns to the one you're still holding.
What you should hear: a punchy, round bass that plucks when you play hard. Try it on low notes, from C2 to C3.
A bell with the ring modulator
Bells have overtones that aren't in tune with the note, which is what makes them sound metallic. The ring modulator adds exactly that kind of overtone.
Load Init.
On both channels, turn the sawtooth (⊿) off, set VCF LEVEL to 0 and ~ (the sine) to 8. You now hear two pure sine waves, very soft and round.
On both channels, in the VCA section, set A all the way down, S to 0 and R to 2.00 s. Set channel I's D to 3.00 s and channel II's D to 1.50 s. Notes now strike and die away, like a struck bar.
Set FEET for II to 2⅔′. Channel II now plays an octave and a fifth above channel I, adding a bright, glassy partial that fades sooner than the fundamental.
In the RING MODULATOR section of the common strip, set MOD to about 6, then drag SPEED while you play, watching its value: try somewhere between 200 and 400 Hz. The sound turns clangorous and bell-like. Each key sounds slightly different, because the modulator stays at the same frequency whichever key you play.
Set the ring modulator's DEPTH to 4, ATTACK all the way down and DECAY to about 2 s. Let go of all the keys and play again: the clang now starts higher and falls as the note rings. The ring modulator's envelope only starts again once you've let go of every key, so play detached notes to hear it each time.
On the EXTRAS page, switch the reverb's ENABLE on, and set its SIZE towards HALL and MIX to about a third.
What you should hear: a metallic bell or gong that rings into a large space. Lower MOD for a gentler, more tuned bell; raise SPEED for a harsher clang.
A split: bass on the left, strings on the right
The key split lets each hand play a different sound: channel I on the keys to the left of the split point, channel II on the keys from it up.
Load Init.
Click SPLIT, at the left end of the strip above the keybed. Then click on the thin rail just above the keys, over the key G3 (the G below middle C). The display beside SPLIT shows I · G3 · II. Play a few keys on each side: so far both sides sound the same, but they now come from different channels.
Build a bass on channel I, the left hand: set FEET for I to 16′, turn channel I's ⊓ on, and set its LPF to 3.5, RES L to 3, AL to 3 and filter D to 300 ms. In its VCA section, set D to 800 ms, S to 6 and R to 100 ms.
For the right hand, press STRING 2 in the tone selector's bottom row. Channel II becomes a string sound, and only the keys from G3 up play it.
Play a bass line with your left hand and chords with your right. If one side is too loud, move MIX: towards 0 turns channel II (the right hand) down, towards 10 turns channel I (the left hand) down.
For extra movement, open the ARP & SEQ page and set channel II's CHANNEL switch to ARP. Now chords you hold with your right hand play as an arpeggio, while your left hand still plays the bass normally.
What you should hear: two instruments under your two hands. The twenty factory presets in the Splits category are good examples of what else you can do with a split.
Using the Audio Unit (macOS)
On macOS, Brasara is also an Audio Unit (AUv2) instrument, for Logic Pro, GarageBand and other hosts that load Audio Units. The macOS installer installs it next to the VST3. It has the same sound engine and editor as the VST3, so everything in this guide applies to it too.
Activation
Your license is activated per computer, not per format. Once you've activated Brasara in the Audio Unit, the VST3 and the standalone app are activated too, and the other way round.
Presets
Choose factory presets and your own from Brasara's PRESETS page.
Presets you save with SAVE in Brasara's editor go in the same folder as the VST3's (see Saving your own), so the VST3, the Audio Unit and the standalone app all share them.
Settings you save with your host's own preset menu (for example, Save As… in the plug-in window header in Logic Pro) belong to the host. They're listed in the host's menu, not in Brasara's preset browser.
Automation and tempo
Every sound control can be automated, and moving a slider in Brasara's editor records automation as usual. The ribbon, the mod wheel and the other playing controls come from MIDI, as in the VST3. The arpeggiators, the sequencer and synced LFOs and delays follow your host's tempo and transport.
VST3 and Audio Unit in the same DAW
If your DAW loads both formats, it treats them as two different plug-ins. A project made with one keeps using that one. To move a sound to the other format, save it as a preset with SAVE, then load it from Brasara's preset browser.
Using the AAX plug-in (Pro Tools)
On macOS and Windows, Brasara is also an AAX instrument for Pro Tools. The installer installs it next to the other formats. It has the same sound engine and editor as the VST3, so everything in this guide applies to it too.
Activation
As with the Audio Unit, your license is activated per computer, not per format. Activating Brasara in Pro Tools also activates the other formats and the standalone app, and the other way round.
Presets
Choose factory presets and your own from Brasara's PRESETS page.
Presets you save with SAVE in Brasara's editor are shared with the VST3, the Audio Unit and the standalone app (see Saving your own).
Settings you save with the Pro Tools preset menu belong to Pro Tools. They're listed in its menu, not in Brasara's preset browser.
Automation and tempo
Every sound control can be automated in Pro Tools, and moving a slider in Brasara's editor records automation as usual. The ribbon, the mod wheel and the other playing controls come from MIDI. The arpeggiators, the sequencer and synced LFOs and delays follow the tempo and transport in Pro Tools.
The standalone app
The standalone app is a small host that loads the same Brasara plug-in, so it sounds and behaves exactly as it does in a DAW. It's handy for practicing, for sound design away from a project, and for playing live without a DAW.
The window
The window has two parts:
the Brasara editor, with its own keybed and ribbon along the bottom;
a status line, showing the sample rate, buffer size and recording time, with SETTINGS in the middle.
Use the editor's SIZE menu, or drag the corner, to resize the window. The app remembers the size. If that size doesn't fit the screen when the app opens, for example on a smaller display, the app opens smaller, with the whole window on screen.
Playing without a MIDI keyboard
Click a key on the keybed to play it. The lower on the key you click, the harder the note is played. Drag across the keys to play each in turn.
Click the arrows either side of the range display (C2 – C7) left of the ribbon to shift the keybed down or up an octave, to reach lower or higher notes (see The keybed's range).
Drag along the ribbon above the keybed to bend the pitch. It bends from where you first touch it and springs back when you let go.
Click or drag along the thin rail just above the keys to split the keybed between the two channels (see The key split).
Notes you play on a MIDI keyboard light up on the keybed too.
Settings
Open the settings page in any of these ways:
choose File > Settings… (on macOS, Brasara > Settings…);
press Cmd+, on macOS, or Ctrl+, elsewhere;
click SETTINGS in the status line.
The page replaces the editor in the same window. Changes apply at once and are remembered. Click DONE to go back to the editor.
Driver (Windows): WASAPI, Windows' own audio, or ASIO®, the driver your audio interface's maker supplies, for the lowest latency. With ASIO, CONTROL PANEL opens the driver's own settings; if you change its buffer size there, the app picks the change up.
Audio output: System default (follows your system's choice), or a specific device. With ASIO, the list shows your ASIO drivers.
Outputs: for a device with more than two outputs, the pair Brasara plays through (for example outputs 3 + 4 of an audio interface). The other outputs stay silent.
Sample rate: 44.1, 48, 88.2 or 96 kHz.
Buffer size: 64 to 1024 samples, with the latency each gives. Smaller buffers respond faster but need more processing power. Choose a larger one if you hear clicks. With ASIO, the sizes are the ones your driver allows; many drivers set it only in their control panel.
MIDI inputs: a checkbox for each input. All are on the first time you open the app. If you connect a device later, click RESCAN.
A good starting point is 48 kHz with a buffer of 256 samples. If notes feel late when you play, try 128; if you hear crackles, try 512.
ASIO is a registered trademark of Steinberg Media Technologies GmbH.
Tempo
Without a DAW, the arpeggiators and the sequencer follow Brasara's own tempo. Set it on the ARP & SEQ page: drag the tempo display in the header up or down, or double-click it to go back to 120 BPM. It goes from 40 to 240 BPM.
Recording
Choose File > Record to WAV… to record what you play to a 24-bit WAV file, and File > Stop Recording when you're done. The status line shows the recording time.
When you reopen the app
The app restores your settings and the last sound you played. The ribbon, the mod wheel, pressure, the expression pedal and the sustain pedal are reset, so nothing comes back bent, stuck on or modulated.
The editor
Brasara's editor has four pages, chosen with the tabs in the header: PANEL, ARP & SEQ, EXTRAS and PRESETS. The keybed, the ribbon, the key split and the performance controls beside them stay at the bottom of every page.
PANEL: the classic instrument: both channels' sliders, the common strip and the tone selector. Most sound design happens here.
ARP & SEQ: each channel's arpeggiator, and the chord sequencer.
EXTRAS: what goes beyond the classic panel: voices and unison, voice character, the effects, the channel LFOs and the play settings.
PRESETS: the preset browser.
The header
The preset bar (on every page but ARP & SEQ, where the tempo display takes its place): ‹ and › step through the presets the browser shows, the display shows the current preset (with (edited) once you change it) and which tone buttons are lit, and SAVE saves the sound as a preset. Click the display to open the preset browser, and click it again to go back to the page you were on. To start a sound from scratch, load Init from the browser.
The version, and UNREGISTERED: ACTIVATE until Brasara is activated. Click either to open the license dialog.
UPDATE, when a newer version is out.
LEARN: assigns your MIDI controller's knobs and sliders to Brasara's controls (see MIDI Learn).
SIZE: the editor's size, from 50% to 150%. It opens at 75%, which fits most laptop screens. You can also drag the corner.
Working the controls
Sliders: drag the cap, or click anywhere along the slot to bring the cap there. Double-click to return a slider to its Init position.
Levers (FEET, the sub oscillator's FUNCTION, and others): drag them to a detent. The chosen setting is lit beside the lever.
Switches: click to move the switch up or down. The label above a switch says what it does up, and the label below what it does down. Where a switch has only ON above it, up is on.
Knobs: drag up or down. Double-click to reset.
While you drag a control, its name and value are shown above it. Times under a second are shown in milliseconds and longer ones in seconds; tuning is shown in cents (ct), rates in hertz (Hz). The mouse wheel doesn't move sliders or levers, so scrolling past them never changes a sound.
Tip: double-clicking is the quickest way to undo an experiment on one control. If a sound has gone somewhere you don't like, double-click the sliders you've changed, or load the preset again.
How Brasara™ makes sound
If you're new to synthesizers, this section is worth reading slowly: everything else in the guide builds on it.
Subtractive synthesis in one minute
Brasara is a subtractive synthesizer. It starts with a waveform that's rich in harmonics (a bright, buzzy tone), then takes some of them away with filters to shape the tone, then shapes the level of each note over time with an amplifier. Three building blocks, in that order:
The oscillator (VCO) makes a sawtooth, a pulse wave and noise, which go into the filters, and a sine, which goes straight to the amplifier.
The filters (VCF), a high-pass and then a low-pass, each with resonance, shape the tone. A filter envelope moves both of them together as each note plays.
The amplifier (VCA) shapes the level with its own envelope: how a note starts, holds and dies away.
The letters VCO, VCF and VCA come from the analog circuits these blocks were built from: voltage-controlled oscillator, filter and amplifier.
Two channels in every voice
What makes Brasara unusual is that each voice has two of these complete chains, called channel I and channel II. Think of it as two synthesizers in one, each with its own oscillator, filters and amplifier, built into every voice and played from the same keys.
The panel's top row of sliders is channel I, and the row under it is channel II. They have exactly the same controls.
Normally, every key you play sounds on both channels at once, so you hear both sounds layered. Unless you split the keys between them (see The key split), there's no way to play one without the other, except by turning one down.
The two channels are then mixed. MIX sets the balance: at 5 both are at full level, at 0 only channel I is heard, and at 10 only channel II.
The strip beneath the channels holds the controls both share: tuning and octave, the sub oscillator's modulation, the ring modulator, the mix, the tone selector and more. After the mix come the tremolo or chorus and the effects.
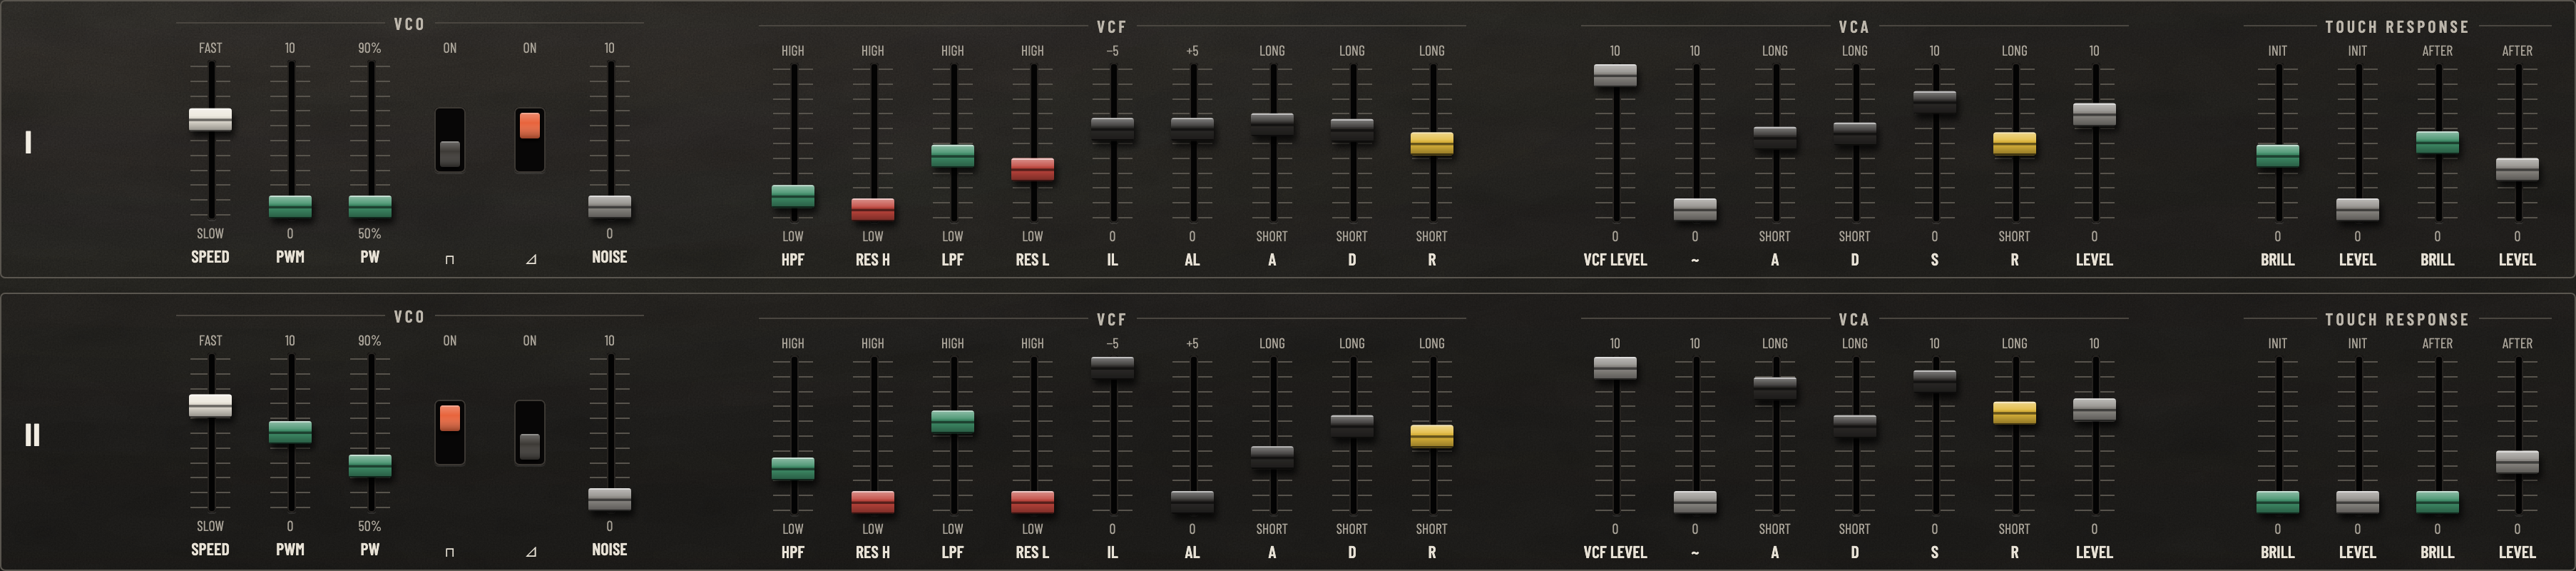
Why two channels?
Layering two different sounds is one of the oldest tricks in synthesizer programming, and Brasara builds it in. Some ways you'll use it:
Thickness: the same sound on both channels, with channel II slightly detuned, sounds wider and richer than either alone.
Contrast: a bright, fast brass on channel I over a slow, soft string on channel II, so a chord starts with a bite and blooms into a pad.
Octaves and fifths: channel II an octave or a fifth above channel I, for organ-like or bell-like tones.
Two instruments: with the key split on, a bass on the left hand and a lead or chords on the right.
Two parts: on the ARP & SEQ page, one channel can play an arpeggio or the sequence while the other plays your chords.
Each channel has its own touch response too, so one channel can respond to how hard you play while the other responds to pressure.
Voices
Brasara has 8 voices, or 16 if you choose (see Extras). Each voice plays one note on both channels, so with 8 voices you can hold an 8-note chord. Each voice is slightly different from the others when voice character is on, as on an analog instrument.
The channels
This section describes one channel. Channel I and channel II have exactly the same controls, laid out in the same order from left to right: VCO, VCF, VCA and TOUCH RESPONSE. Everything here applies to both, and each channel's settings affect only that channel.
VCO
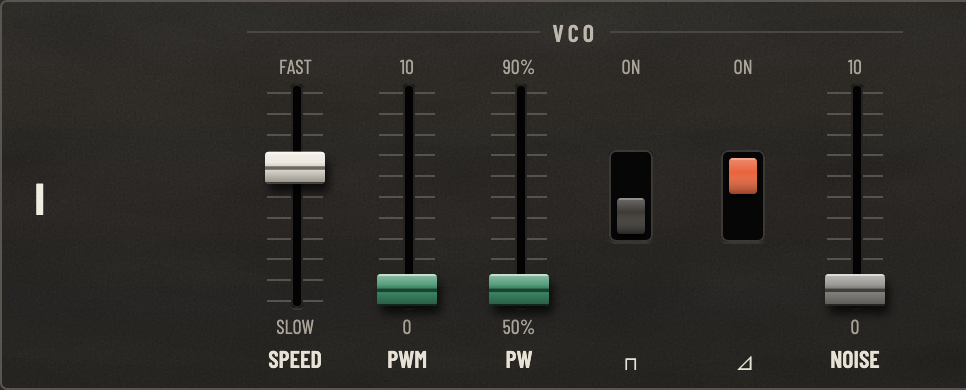
The VCO (voltage-controlled oscillator) makes the raw sound. Its pitch follows the keys you play, and its waveforms set the basic color: the sawtooth is bright and buzzy, good for brass and strings; the pulse is hollow, good for woodwinds, organs and clavinets; noise is a hiss, for breath, wind and percussive effects. You can mix them freely.
⊿ (sawtooth) and ⊓ (pulse): switches that turn each waveform on (up) or off. Use either, both or neither. Init has the sawtooth on and the pulse off. Both together give a thicker, fuller tone.
PW: the pulse's width, from 50% (a square, hollow and woody) to 90% (thin and nasal). It changes the sound only while the pulse is on. As you raise it, you'll hear the tone go from round to reedy.
PWM and SPEED: pulse-width modulation, the channel's own movement of the pulse's width. PWM (0 to 10) sets how far the width swings, and SPEED how fast, from 0.2 Hz (SLOW) to 20 Hz (FAST). Slow, moderate PWM gives the shimmering, chorus-like movement of classic synth strings; fast PWM sounds more like a rough, buzzing vibrato. Like PW, it acts only on the pulse.
NOISE: white noise into the filters, from 0 to 10. It isn't pitched, so FEET doesn't change it. A little noise adds breath to a flute or air to a pad; more, through a resonant filter, makes wind and surf.
The VCO also makes a sine wave, but its level is set in the VCA section, because it skips the filters (see VCA). The channel's pitch is set in the common strip, with PITCH, DETUNE CH II and FEET.
Tips
Sawtooth for brass, strings and most leads; pulse for woodwinds, organs, clavinets and hollow basses; both for thick basses and big leads.
To hear PW and PWM, the pulse switch must be on. If moving them does nothing, check ⊓.
Set the two channels' PWM SPEED slightly differently, and their movements drift in and out of step, which sounds richer than either alone.
Try this: hear the waveforms
Load Init and set MIX to 0, so you hear channel I alone. Hold a note around middle C.
Switch channel I's ⊿ off and ⊓ on. The bright buzz becomes a hollow, woody square.
Slowly raise PW from 50% to 90%. The square narrows into a thin, nasal reed.
Set PW back to about 60% and raise PWM to 4. The tone starts to shimmer as the width moves. Move SPEED up and down to hear the movement speed up and slow down.
Turn ⊿ back on as well, and raise NOISE to 3. You'll hear a breathy hiss under the tone.
VCF
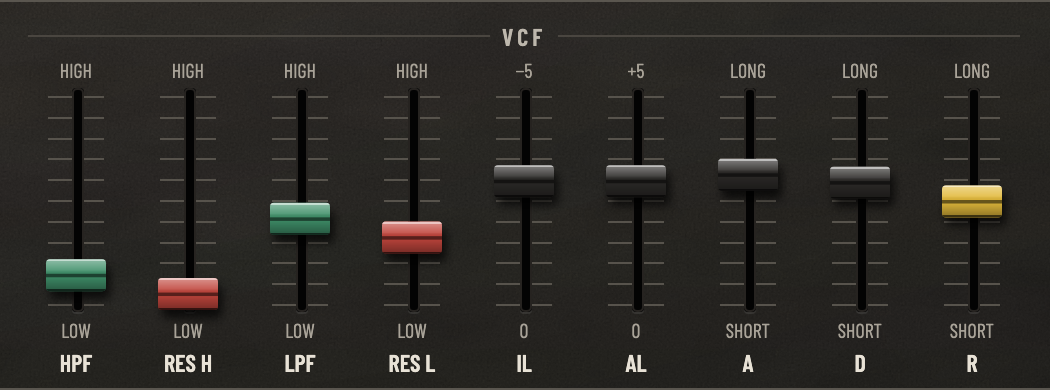
The VCF section is where most of a sound's character comes from. Each channel has two filters, one after the other, and an envelope that moves them both as each note plays.
A low-pass filter (LPF) lets the low frequencies through and cuts the high ones above its cutoff. Lower the cutoff and the sound gets darker and softer; raise it and the sound gets brighter. This is the filter you'll use most.
A high-pass filter (HPF) does the opposite: it cuts the low frequencies below its cutoff. Raise it to thin a sound out, make room for a bass, or get a nasal, telephone-like tone.
Resonance boosts the frequencies right at a filter's cutoff, giving it an edge, a vocal "wah" quality when the cutoff moves, or a squelch.
The controls:
HPF and RES H: the high-pass filter's cutoff and resonance, each from LOW to HIGH. At LOW, the high-pass lets everything through; towards HIGH, more and more of the low end is cut away.
LPF and RES L: the low-pass filter's cutoff and resonance. Towards LOW it's darker; towards HIGH it's brighter. Each step of the slider (from one number to the next) moves the cutoff about an octave. Init has LPF at 6.
IL, AL, A, D, R: the filter envelope, which moves both cutoffs together. Each note starts at the initial level IL (below the sliders' cutoffs), rises over A to the attack level AL (above them), falls back over D to the sliders' cutoffs and stays there while you hold the key. When you let go, it returns over R to IL. With IL and AL both at 0, the envelope does nothing.
The envelope's sliders in more detail:
IL (initial level), from 0 to −5: how far below the cutoff sliders each note starts. Its scale has −5 at the top, so pushing it up starts notes darker. Use it for sounds that open up from a muffled start.
AL (attack level), from 0 to +5: how far above the cutoff sliders the envelope peaks. This is the "bite" or "blare" at the start of a note.
A (attack time), from 1 ms to 1 s: how long the rise from IL to AL takes. Short for plucks and stabs, around 50 to 150 ms for brass, longer for slow swells.
D (decay time), from 10 ms to 10 s: how long the fall from AL back to the sliders' cutoffs takes.
R (release time), from 10 ms to 10 s: how long the return to IL takes after you let go.
The cutoffs follow the keyboard (key tracking), so a sound keeps its brightness all the way up the keys.
As on the classic instruments, the resonance gives the sound an edge without ever whistling. For more, turn on EXT RES on the EXTRAS page: the top of each resonance slider then reaches much further, until the filters ring hard.
Tips
The filter envelope sets how the tone changes over time, and the VCA envelope how the level changes. Many sounds use a fast filter envelope with a slower VCA envelope, or the other way round.
Because the envelope moves both filters, a large AL also sweeps the high-pass up. If a bass loses its low end at the start of each note, lower HPF or AL.
The cutoff sliders set where the envelope settles. If a brass sound is too bright while held, lower LPF rather than AL.
The common BRILL and RES sliders move both channels' filters at once, which is quicker when you want to darken or sharpen the whole sound.
Try this: a filter sweep and a pluck
Load Init and set MIX to 0. Hold a chord.
Drag channel I's LPF slowly from HIGH to LOW and back. The sound goes from bright to dark and muffled. That's the low-pass filter.
Set LPF to 4 and raise RES L to 8. Move LPF again: now there's a vocal "wah" as it moves.
Set RES L back to 2, LPF to 3, AL to 4, A all the way down and D to 250 ms. Play short notes: each one starts with a bright pluck that closes down quickly.
Raise HPF to 5. The pluck loses its body and turns thin and twangy.
VCA
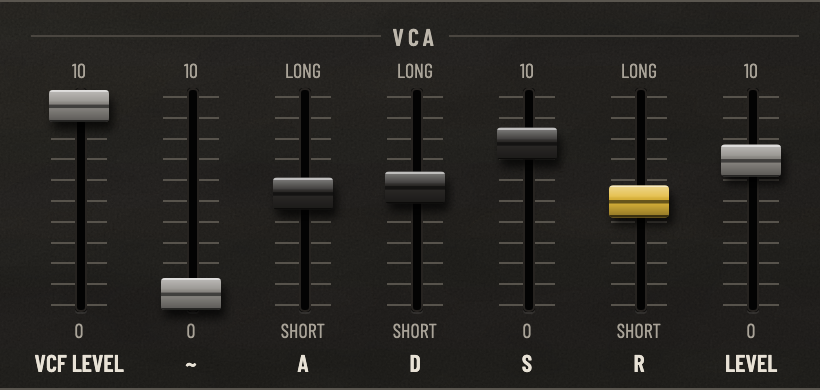
The VCA (voltage-controlled amplifier) sets how loud the channel is, and how each note's level changes over time with its ADSR envelope. A piano's notes start loud and fade away; an organ's start and stop instantly; a string section swells in. The VCA envelope is how you make those shapes.
VCF LEVEL (0 to 10): how much of the filtered sound (the sawtooth, pulse and noise, after the filters) you hear. Init has it at 10.
~ (sine), 0 to 10: the sine's level. It bypasses the filters, so it stays pure and round however the filters are set. Use it for flutes and organs, to add a solid fundamental under a bright sound, or alone (with VCF LEVEL at 0) for a pure tone.
A (attack), 1 ms to 1 s: how long a note takes to reach full level after you press the key.
D (decay), 10 ms to 10 s: how long it then takes to fall to the sustain level.
S (sustain), 0 to 10: the level it holds at while you keep the key down. At 10 there's no decay; at 0 the note dies away even while held, like a piano or a bell.
R (release), 10 ms to 10 s: how long the note takes to die away after you let go.
LEVEL (0 to 10): the channel's level. Init has it at 4.5.
Tips
Envelope shapes to start from: organ A shortest, S 10, R short; pluck or piano A shortest, D 1 to 2 s, S 0, R a few hundred ms; pad A 500 ms or more, S 9, R 1 s or more; brass A 30 to 80 ms, S 7 to 8.
Use the two channels' LEVEL sliders to balance them within the sound, and MIX to fade between them.
A long release with many notes can use up all the voices. If notes start to drop out, shorten R (see Troubleshooting).
The SUSTAIN slider and switches in the performance controls can lengthen the release of every note (see Sustain and portamento).
Try this: from organ to piano to pad
Load Init and set MIX to 0. Play a few notes: they start and stop instantly, like an organ.
Set channel I's VCA S to 0 and D to 1.50 s. Hold a key: the note now fades away even while you hold it, like a struck string.
Set S back to 9, A to 800 ms and R to 2.00 s. Hold a chord and let go: it swells in slowly and fades out slowly, like a pad.
Set VCF LEVEL to 0 and ~ to 7. The swell is now a pure, flute-like sine.
Touch response
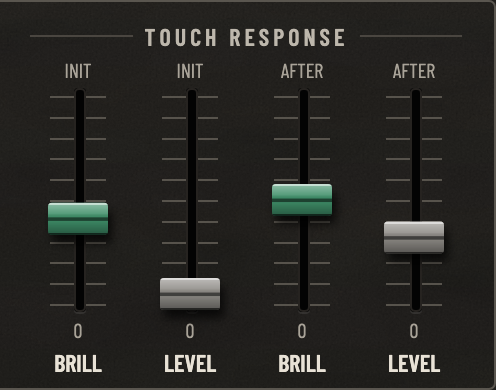
Touch response makes a sound react to the way you play. Each channel responds on its own, with four sliders from 0 to 10. INIT responds to velocity, how hard you strike a key. AFTER responds to aftertouch, how hard you press into a key you're already holding.
INIT BRILL and INIT LEVEL: velocity. A harder strike makes the start of the note brighter or louder. The effect is strongest as the note starts and fades over a fraction of a second, so it shapes each note's attack rather than the whole note.
AFTER BRILL and AFTER LEVEL: pressure. Pressing into a key brightens it or makes it louder, for as long as you press. At 10, full pressure doubles the level or opens the filters about three octaves.
With a keyboard that sends polyphonic aftertouch, each key's pressure reaches only its own note, so one note of a chord can open up while the others stay as they are. With channel pressure, every held note responds together.
Tips
If your keyboard doesn't send aftertouch, the AFTER sliders do nothing. INIT always works.
Give the two channels different touch response for a sound that changes character with your playing: for example, INIT BRILL on channel I and AFTER LEVEL on channel II, so hard notes bite and pressing in brings in the second layer.
How strongly velocity responds overall is set by VELOCITY (SOFT, LINEAR or HARD) on the EXTRAS page.
The common strip has more touch response: P.BEND, and pressure to the sub oscillator's speed, vibrato and wah (see The common controls).
Try this: a sound that follows your hands
Load Init. On both channels, set LPF to 3.
On channel I, set INIT BRILL to 6. Play soft notes, then hard ones: hard notes start with a bright snap.
On channel II, set AFTER BRILL to 7. If your keyboard sends aftertouch, hold a chord and press in: it brightens as you press and darkens as you ease off.
On channel II, set AFTER LEVEL to 5 and LEVEL to 2. Now channel II is quiet until you press in, and then swells up.
The common controls
The strip under the two channel rows holds the controls both channels share. From left to right: PITCH, DETUNE, the RING MODULATOR, the SUB OSCILLATOR, FEET, the TONE SELECTOR, MIX · BRILL · RES, TOUCH RESPONSE, KEYBOARD CONTROL and VOLUME. The tone selector has a section of its own, after this one.

Pitch and detune
These set the tuning of the whole instrument and of each channel. Tuning one channel against the other is one of the simplest ways to make a sound bigger.
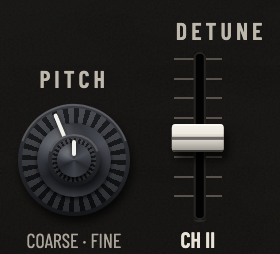
PITCH: two knobs in one. The outer knob tunes the whole instrument from 5 semitones down to 7 up; the inner one fine-tunes by up to a semitone (100 cents) either way. Use it to match a recording that isn't at standard pitch, or to transpose.
DETUNE CH II: detunes channel II against channel I by up to a semitone (100 cents) either way. A few cents makes the two channels beat slowly, which sounds wider and warmer; more makes the beating faster and more out of tune.
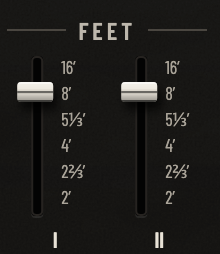
FEET I and FEET II: each channel's octave or fifth, named in organ footages: 16′ (an octave down), 8′ (normal), 5⅓′ (a fifth up), 4′ (an octave up), 2⅔′ (an octave and a fifth up) and 2′ (two octaves up). They're the two levers between the sub oscillator and the tone selector.
Tips
For a thick unison sound, set DETUNE between about 5 and 15 cents. Beyond 20 or so, the sound starts to sound out of tune rather than wide.
Channel II at 4′ over channel I at 8′ gives an organ-like octave; 5⅓′ gives a fifth, for a hollow, powerful lead; 2⅔′ adds a glassy overtone for bells.
With a fifth between the channels, every note you play is a two-note chord. Play single lines rather than full chords, or the result gets muddy.
Try this: octaves and fifths
Load Init. Play a note: both channels are at 8′, in unison.
Set FEET II to 4′. Channel II now sounds an octave above channel I: brighter and more organ-like.
Set FEET II to 5⅓′. You now hear a fifth: play a slow melody with one finger.
Set FEET II back to 8′ and drag DETUNE up a little, to about +8 ct. The two channels beat against each other and the sound widens.
Ring modulator
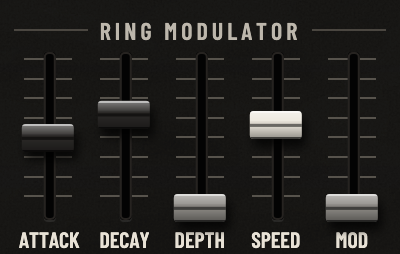
A ring modulator multiplies the sound by a second tone, the modulator. The result has new frequencies that aren't in tune with the notes you play, which is what makes bells, gongs and metallic or robotic tones. At slow speeds it makes a throbbing tremolo instead. Brasara's ring modulator works on the mixed sound of both channels.
MOD (0 to 10): the amount, from the plain sound (0) to full ring modulation (10). In between, you hear a blend of the two.
SPEED: the modulator's frequency, from 0.5 Hz to 500 Hz. Below about 20 Hz you hear a pulsing tremolo; above it, the tone itself changes, from a growl to a bright clang. The modulator stays at the same frequency whatever you play, so each key sounds a little different.
ATTACK and DECAY: an envelope that sweeps the speed up and back down. ATTACK goes from 5 ms to 2 s and DECAY from 10 ms to 10 s.
DEPTH (0 to 10): how far the envelope sweeps the speed. At 10, it sweeps up about three octaves at its peak. At 0, the envelope does nothing.
The envelope starts again only once you've let go of every key. While you hold any key, new notes don't restart it, so it works like one sweep per phrase.
Tips
Pure sounds (the sine, or a dark filter) give cleaner bells. Bright sawtooths give harsher, noisier results.
Use a little MOD (2 to 4) to add a metallic sheen without losing the pitch.
There's a second ring modulator among the effects (see Effects), whose TRACK setting can make its frequency follow the notes you play.
Try this: from tremolo to clang
Load Init. Set MOD to 10 and SPEED to about 5 Hz. Hold a chord: it pulses.
Slowly raise SPEED past 30 Hz. The pulsing turns into a rough growl, then a metallic, out-of-tune clang.
Set SPEED to about 100 Hz, DEPTH to 6, ATTACK all the way down and DECAY to about 1.5 s. Let go of all the keys and play a chord: the clang swoops down as each phrase starts.
Sub oscillator
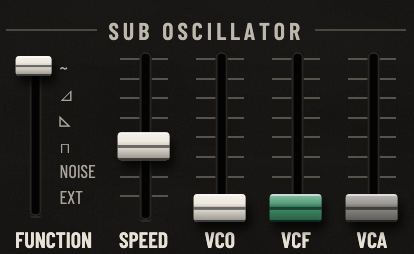
Despite its name, the sub oscillator doesn't add a low tone. It's a slow modulation source, like an LFO, shared by every voice and both channels. It moves the pitch for vibrato, the filters for wah, or the level for tremolo.
FUNCTION: its waveform: sine (~), sawtooth, inverted sawtooth, square (⊓) or NOISE (smooth random movement). The sine gives smooth vibrato; the sawtooths give rising or falling ramps; the square jumps between two values, for trills; NOISE wanders randomly. EXT, an external input on the classic panels, isn't used.
SPEED: its rate, from 0.7 to 60 Hz. Init has it at 5 Hz, a natural vibrato speed. It doesn't affect NOISE.
VCO (0 to 10): vibrato, up to a semitone either way. With the square, it's a trill.
VCF (0 to 10): wah, a sweep of the cutoffs, up to two octaves either way.
VCA (0 to 10): tremolo, a pulsing of the level.
The mod wheel adds vibrato on top of the VCO setting, unless the sound sends it elsewhere (see The mod wheel). Pressure on the keys can speed the sub oscillator up and add its vibrato and wah to the notes you press (see Touch response below).
Tips
For natural vibrato, keep VCO low (1 to 2) and SPEED around 5 to 6 Hz. Higher settings sound more like a siren.
Leave VCO at 0 and use the mod wheel, or pressure through Touch Response VCO, so vibrato comes in only when you want it.
Because it's shared, the sub oscillator moves every note together. For movement that differs between channels, use the channel LFOs on the EXTRAS page.
Try this: vibrato, trill and wah
Load Init. Set the sub oscillator's VCO to 2. Hold a note: gentle vibrato.
Move FUNCTION to the square (⊓), raise VCO to 10 and lower SPEED to about 3 Hz. The note now trills between two pitches.
Set VCO back to 0. Move FUNCTION to the sine, set both channels' LPF to 4 and RES L to 5, and raise the sub oscillator's VCF to 6. The filters now sweep up and down: a steady wah.
Move FUNCTION to NOISE. The wah becomes a random, bubbling movement.
Mix, brilliance and resonance
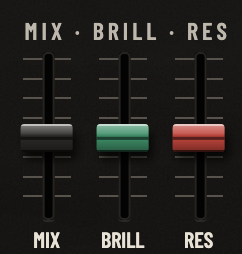
MIX: the balance between channel I and channel II. At 5, the middle, both play at full level. Towards 0, channel II fades out until only channel I is heard; towards 10, channel I fades out until only channel II is heard. It's a quick way to hear either channel alone while you work on it.
BRILL and RES: brighten or darken both channels' filters at once, and add or take away resonance, without touching each channel's sliders. In the middle they do nothing. BRILL moves both channels' cutoffs up to about three octaves either way.
Tip: BRILL is the control to reach for when a whole sound, or a preset, is a little too bright or too dull for your mix. It's also a good one to assign to a knob with MIDI Learn and play live.
Try this: load the factory preset Brass and Strings (Classic Panel). Move MIX to 0 to hear its brass alone, then to 10 to hear its strings alone, then back to 5. Then move BRILL down and up to darken and brighten both together.
Touch response
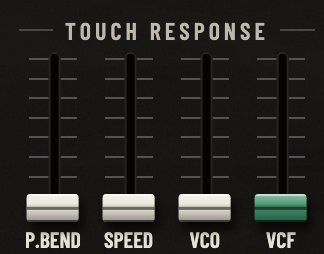
These act on every note, in both channels, and add to each channel's own touch response:
P.BEND (0 to 10): each note starts flat and slides up to pitch as you strike it; the harder you play, the further it slides, up to about two semitones at 10. It gives brass and voices a natural "scoop".
SPEED, VCO and VCF (0 to 10 each): pressure on a key speeds up the sub oscillator (up to four times as fast), and adds vibrato and wah to that note. These work only with a keyboard that sends aftertouch.
Try this: load Init and set P.BEND to 4. Play softly, then hard: hard notes scoop up into pitch. If your keyboard sends aftertouch, set VCO to 4 as well, hold a note and press in: vibrato appears only while you press.
Keyboard control
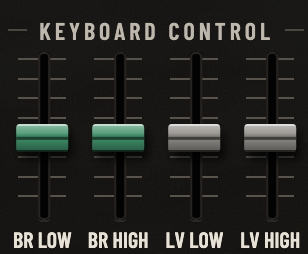
Real instruments change character across their range: a cello's low notes are darker than a violin's high ones. Keyboard control lets you shape that.
BR LOW and BR HIGH make the low and high ends of the keyboard brighter or darker.
LV LOW and LV HIGH make them louder or quieter, by up to 12 dB at the ends.
Each slider does nothing in the middle of its travel; above the middle it brightens or raises, below it darkens or lowers. The effect is nothing at the middle of the keyboard and grows smoothly towards its end.
Tip: for a pad or strings that don't get shrill at the top, lower BR HIGH a little. For a bass that's tight at the bottom, lower LV LOW a touch.
Try this: load Init and set BR HIGH all the way down and BR LOW all the way up. Play a scale from the bottom of the keyboard to the top: the low notes are bright and the high notes mellow, the opposite of Init.
Volume
The VOLUME knob, at the right end of the strip, sets the overall level. The factory presets are level-matched to play at similar volumes, so you'll rarely need it, except to balance a sound of your own against them.
The tone selector
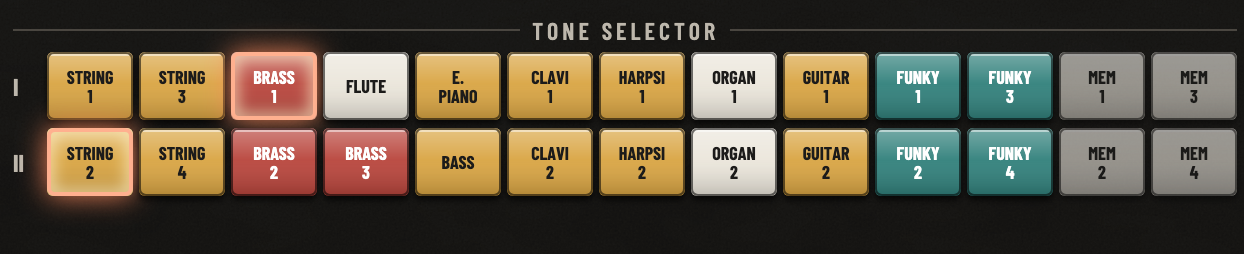
The tone selector has two rows of buttons: the top row for channel I and the bottom row for channel II. Each row has eleven voicings and two MEM buttons. It's the fastest way to get a sound: press one button in each row, and you have a layered two-channel sound in two clicks.
The voicings
Press a voicing and that row's channel moves to it: all of the channel's sliders and switches take their positions, and the button lights. The other channel keeps its sound, so you can layer, for example, BRASS 1 on channel I over STRING 2 on channel II. Change any slider afterwards to make the sound your own.
The voicings in each row:
Channel I (top row): STRING 1, STRING 3, BRASS 1, FLUTE, E. PIANO, CLAVI 1, HARPSI 1, ORGAN 1, GUITAR 1, FUNKY 1, FUNKY 3.
Channel II (bottom row): STRING 2, STRING 4, BRASS 2, BRASS 3, BASS, CLAVI 2, HARPSI 2, ORGAN 2, GUITAR 2, FUNKY 2, FUNKY 4.
A voicing sets only its channel's own sliders and switches (VCO, VCF, VCA, touch response, and that channel's LFO). It doesn't change the common controls, such as FEET, MIX, the sub oscillator or the effects.
Tips
The voicings are good starting points for your own sounds. Press one, then study its sliders: they show you how that kind of sound is built.
Use FEET to move a voicing up or down an octave, and DETUNE to thicken a layer.
The factory presets in the Classic Panel category are layers made this way.
Try this: layer two voicings
Load Init.
Press BRASS 1 in the top row. Channel I's sliders move. Play a chord: you hear brass on channel I layered with Init's sawtooth on channel II.
Press STRING 2 in the bottom row. Now it's brass over strings.
Set FEET II to 16′ to put the strings an octave below, and move MIX to balance them.
Press ORGAN 2 in the bottom row instead: same brass, different layer.
MEM hot-keys
The MEM buttons are hot-keys for presets: MEM 1 and 3 on channel I's row, MEM 2 and 4 on channel II's. They work like the voicings, but with your own sounds: press one, and its channel takes that channel's settings from a preset you've linked to it.
To link one: load a preset, then hold a MEM button for two seconds. It fills up as you hold it; when it's full, it's linked and its lamp lights.
To use it: press it. Its row's channel takes that channel's settings from the linked preset. MEM 1 gives channel I the preset's channel I, MEM 2 gives channel II its channel II, and so on.
A MEM follows its preset if you rename or move it, and plays your latest changes once you've saved them. If you delete the preset, the MEM shows a red X; hold it to link another one.
MEM links are yours, not the project's: they're the same in every project and every format on your computer. The PRESETS page lists what each MEM is linked to.
Try this: load the factory preset Rain Fanfare and hold MEM 1 for two seconds until it lights. Load Glass Strings and hold MEM 2. Now load Init, and press MEM 1 and then MEM 2: you get Rain Fanfare's channel I layered over Glass Strings' channel II.
Performance controls
The performance controls are the ones you play with, rather than the ones that set up a sound: the ribbon, the mod wheel, the key split, the pedals, sustain and portamento, and the tremolo and chorus. The ribbon, the split, the keybed's range and the controls at the bottom left of the editor stay on screen on every page.
The ribbon

The ribbon is Brasara's pitch bend: the long strip above the keybed. It bends from wherever you first touch it, so there's no jump, and springs back to pitch when you let go. A MIDI keyboard's pitch-bend wheel moves it too. It bends an octave up and two octaves down at first; the range is shown at its right end. Set the range with BEND UP and BEND DN on the EXTRAS page.
Which notes it bends depends on the SUSTAIN switch marked II and I, as on the classic instruments:
I: the ribbon bends only the notes whose keys you're holding. A note you've let go of keeps the pitch it had, so if you let go of a key and then the ribbon, the note rings on bent.
II: notes ringing on after you've let go bend with the ribbon too.
Tips
For expressive playing, a smaller range such as +2 and −2 makes small bends easier to control. The wide default range is for dramatic swoops and dives.
The SUSTAIN I behavior is a playing technique: hold a chord, bend one of its notes, let go of that key, then let go of the ribbon, and the note stays bent against the others.
Try this: load a lead from the Leads category, such as Ribbon Solo. Touch the ribbon in the middle and slide right to bend up, left to bend down, then let go: the pitch springs back. On the EXTRAS page, set BEND UP to +2 and BEND DN to −2, and try again: the same movement now gives a gentle, guitar-like bend.
The mod wheel
The mod wheel on your MIDI keyboard (MIDI CC 1) adds movement while you play. Each sound decides what it does, with WHEEL TO and DEPTH on the EXTRAS page:
SUB VCO: vibrato from the sub oscillator, on top of its VCO setting. This is where Init and most presets send it.
SUB VCF: wah or growl, the sub oscillator sweeping the filters.
SUB VCA: tremolo from the sub oscillator.
BRILL: opens both channels' filters, brightening the sound.
LFO: adds to both channel LFOs' depth, so a sound whose LFOs are at 0 gets their movement from the wheel alone.
DEPTH (0 to 10) sets how far the wheel goes at the top of its travel. Both are part of the sound, so presets save them.
Tips
If full wheel is too much, lower DEPTH rather than learning to move the wheel less: you then get finer control over the whole travel of the wheel.
The SUB settings use the sub oscillator's FUNCTION and SPEED. Change those to change what the wheel's movement sounds like, for example the square for a trill on the wheel.
Try this: load Init and push the mod wheel up while holding a note: vibrato. On the EXTRAS page, set WHEEL TO to BRILL, set both channels' LPF to 2 on the PANEL page, and move the wheel again: now it opens the filters, from dark to bright.
The keybed's range
The keybed on the editor has 61 keys, from C2 to C7. To play notes below or above them with the mouse, shift it by octaves with the control left of the RIBBON label:
◀ and ▶ shift the keybed down or up an octave, as far as two octaves either way: from C0 – C5 to C4 – C9. An arrow dims when the keybed can't go further that way.
The range display between them shows the keys' range, for example C1 – C6. Click it to put the keybed back at C2 – C7.
The keys play, and light up for, the notes they show, and the names on the C keys follow the shift. The shift only changes the keybed on screen: notes from your MIDI keyboard are played as they are, and they light up on the keybed when they're in its range. It isn't part of the sound, so presets don't save it; your DAW project (or the standalone app) remembers it, along with the editor's size.
Tips
Shift down for basses and up for bells and leads, to hear a sound where it's meant to be played without a MIDI keyboard.
The rail above the keys sets the split at the key under the mouse, as the keys are shifted. The split point stays between C2 and C7: if it's off the shifted keybed, its handle waits at the keybed's end.
Try this: load a bass from the Bass category, such as Deep Sub Bass, and click ◀ once: the keybed now runs from C1 to C6, so the lowest keys reach down to the bottom octave. Click the range display to put it back.
The key split

Normally both channels play every key. With the key split on, the keybed is divided between them: the keys below the split point play channel I, and the keys from the split point up play channel II. Put a bass on channel I and a lead on channel II, or pad chords under a solo.
SPLIT, left of the ribbon, turns it on and off. Beside it, the split point is shown as a key name, for example I · G3 · II.
The rail, the thin strip between the ribbon and the keys, sets the split point: click or drag along it to put the split at the key under the mouse. Using the rail also turns the split on. The handle marks the split point, which is the lowest key of channel II, and channel I's side of the rail is tinted.
The split point can be any key from C2 to C7, whatever the keybed's range; it starts at C4. Each side keeps everything else of its own: with a channel set to ARP, the keys on its side feed its arpeggiator, and the sequence takes the keys on the side of the channel set to SEQ (see Arpeggiators and the sequencer). If you move the split point while holding a key, the key still lets go on the channel it played. The split is part of the sound, so presets save it.
Tips
Use FEET to put each side in a comfortable range: channel I at 16′ for a bass, channel II at 4′ for a high lead.
The common controls (the sub oscillator, the ring modulator, the effects, the voice MODE) still apply to both sides. If you set MODE to MONO, both sides play one note at a time.
Use MIX to balance the two hands: towards 0 for more left hand, towards 10 for more right hand.
Try this: load Init, click SPLIT, and press BASS in the tone selector's bottom row. Play keys above and below C4: only the keys from C4 up play the bass. Now drag along the rail to move the split down to C3, and set FEET II to 16′. For a full walkthrough, see A split: bass on the left, strings on the right in Your first sounds.
The foot pedal
An expression pedal (MIDI CC 11) controls the volume, for swells and fades with your foot. With EXP WAH instead of EXP, it also sweeps the filters, for a wah: with the pedal back (heel down), the cutoffs are about four octaves lower than the panel's; with it forward (toe down), they're where the panel has them.
Choose between them with the two buttons marked EXP and EXP WAH at the bottom left. If you don't have an expression pedal, nothing changes: Brasara plays at full volume.
Try this: with an expression pedal connected, load the Classic Panel preset Funky Pair, choose EXP WAH, and rock the pedal while you play short chords.
Sustain and portamento
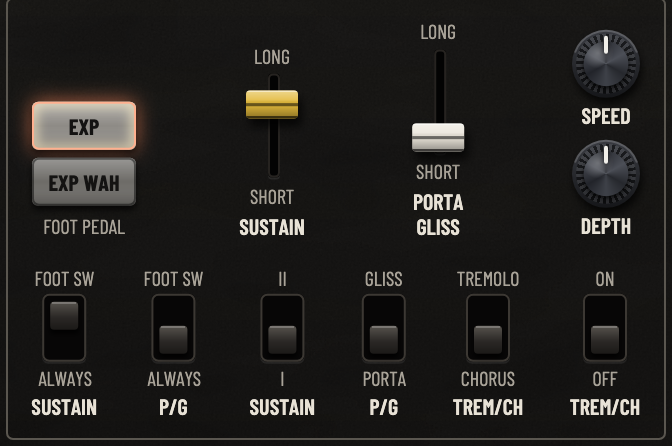
These are the sliders and switches at the bottom left of the editor. Sustain lets notes ring on after you let go. Portamento makes each note glide in pitch from the one before, as a singer or a trombone does.
SUSTAIN (slider): how long notes ring on after you let go, up to about 10 seconds. It lengthens the release of both envelopes. Init has it at 5 seconds, switched on by the sustain pedal.
The SUSTAIN switch marked II and I chooses how: at I, each note dies away on its own; at II, the last note or chord rings on until you play the next one. It also chooses which notes the ribbon bends (see The ribbon).
PORTA GLISS (slider): how slowly notes glide from one to the next. The glide moves at a steady speed, so wide leaps take longer than small steps: at the top of the slider, a glide across the whole five-octave keybed takes about 10 seconds. At the bottom, there's no glide.
The P/G switch marked GLISS and PORTA chooses a glide in semitone steps (glissando) or a smooth one (portamento).
The SUSTAIN and P/G switches marked FOOT SW and ALWAYS: at FOOT SW, the sustain pedal switches sustain or portamento on while it's down; at ALWAYS, sustain or portamento is always on.
In POLY mode, each new note glides from the last key you played. In MONO and UNISON, the voice glides on from wherever it is, which is the classic lead-synth slide.
Tips
Init's portamento is set to ALWAYS but with the slider at the bottom, so there's no glide until you raise the slider.
With P/G at FOOT SW, you can glide only on the notes you choose, by pressing the sustain pedal (which then works portamento as well as sustain, if SUSTAIN is also at FOOT SW).
SUSTAIN II with a long SUSTAIN time is useful for pads: each chord rings until the next one replaces it, so you can lift your hands between chords.
Try this: a gliding lead
Load Init. On the EXTRAS page, set the voices' MODE to MONO.
Back on the PANEL page, raise PORTA GLISS a little, about a quarter of the way. Play a melody: each note slides into the next.
Flip the P/G switch to GLISS. The slides now step through each semitone, like a finger running along piano keys.
Set the SUSTAIN switch marked II and I to II and the one marked FOOT SW and ALWAYS to ALWAYS. Play a note and let go: it rings on until you play the next.
Tremolo and chorus
A stereo tremolo or chorus, with the left and right moving in opposite directions, like a rotating speaker. The chorus gives a slow, wide shimmer, good for strings, pads and electric pianos; the tremolo a faster, pulsing throb, good for organs and electric pianos.
The TREM/CH switch marked ON and OFF switches it on.
The other TREM/CH switch chooses TREMOLO (up) or CHORUS (down).
SPEED (knob): the rate, about 0.5 to 5 Hz for the chorus and 5 to 20 Hz for the tremolo.
DEPTH (knob): how strong the movement is.
The output drops slightly when it's on, as on the classic instruments. It comes before the effects, and its stage in the effect chain on the EXTRAS page lights when it's on.
Try this: load the tone selector's E. PIANO on channel I (with MIX at 0 to hear it alone). Switch TREM/CH ON with CHORUS, and play chords. Then switch to TREMOLO and turn SPEED up and down: the classic electric piano throb.
Arpeggiators and the sequencer
An arpeggiator takes the chord you hold and plays its notes one after another, in a pattern, in time. A chord sequencer plays a pattern of chords or notes you've programmed in advance, step by step. Both are ways to get rhythmic, moving parts from simple playing.
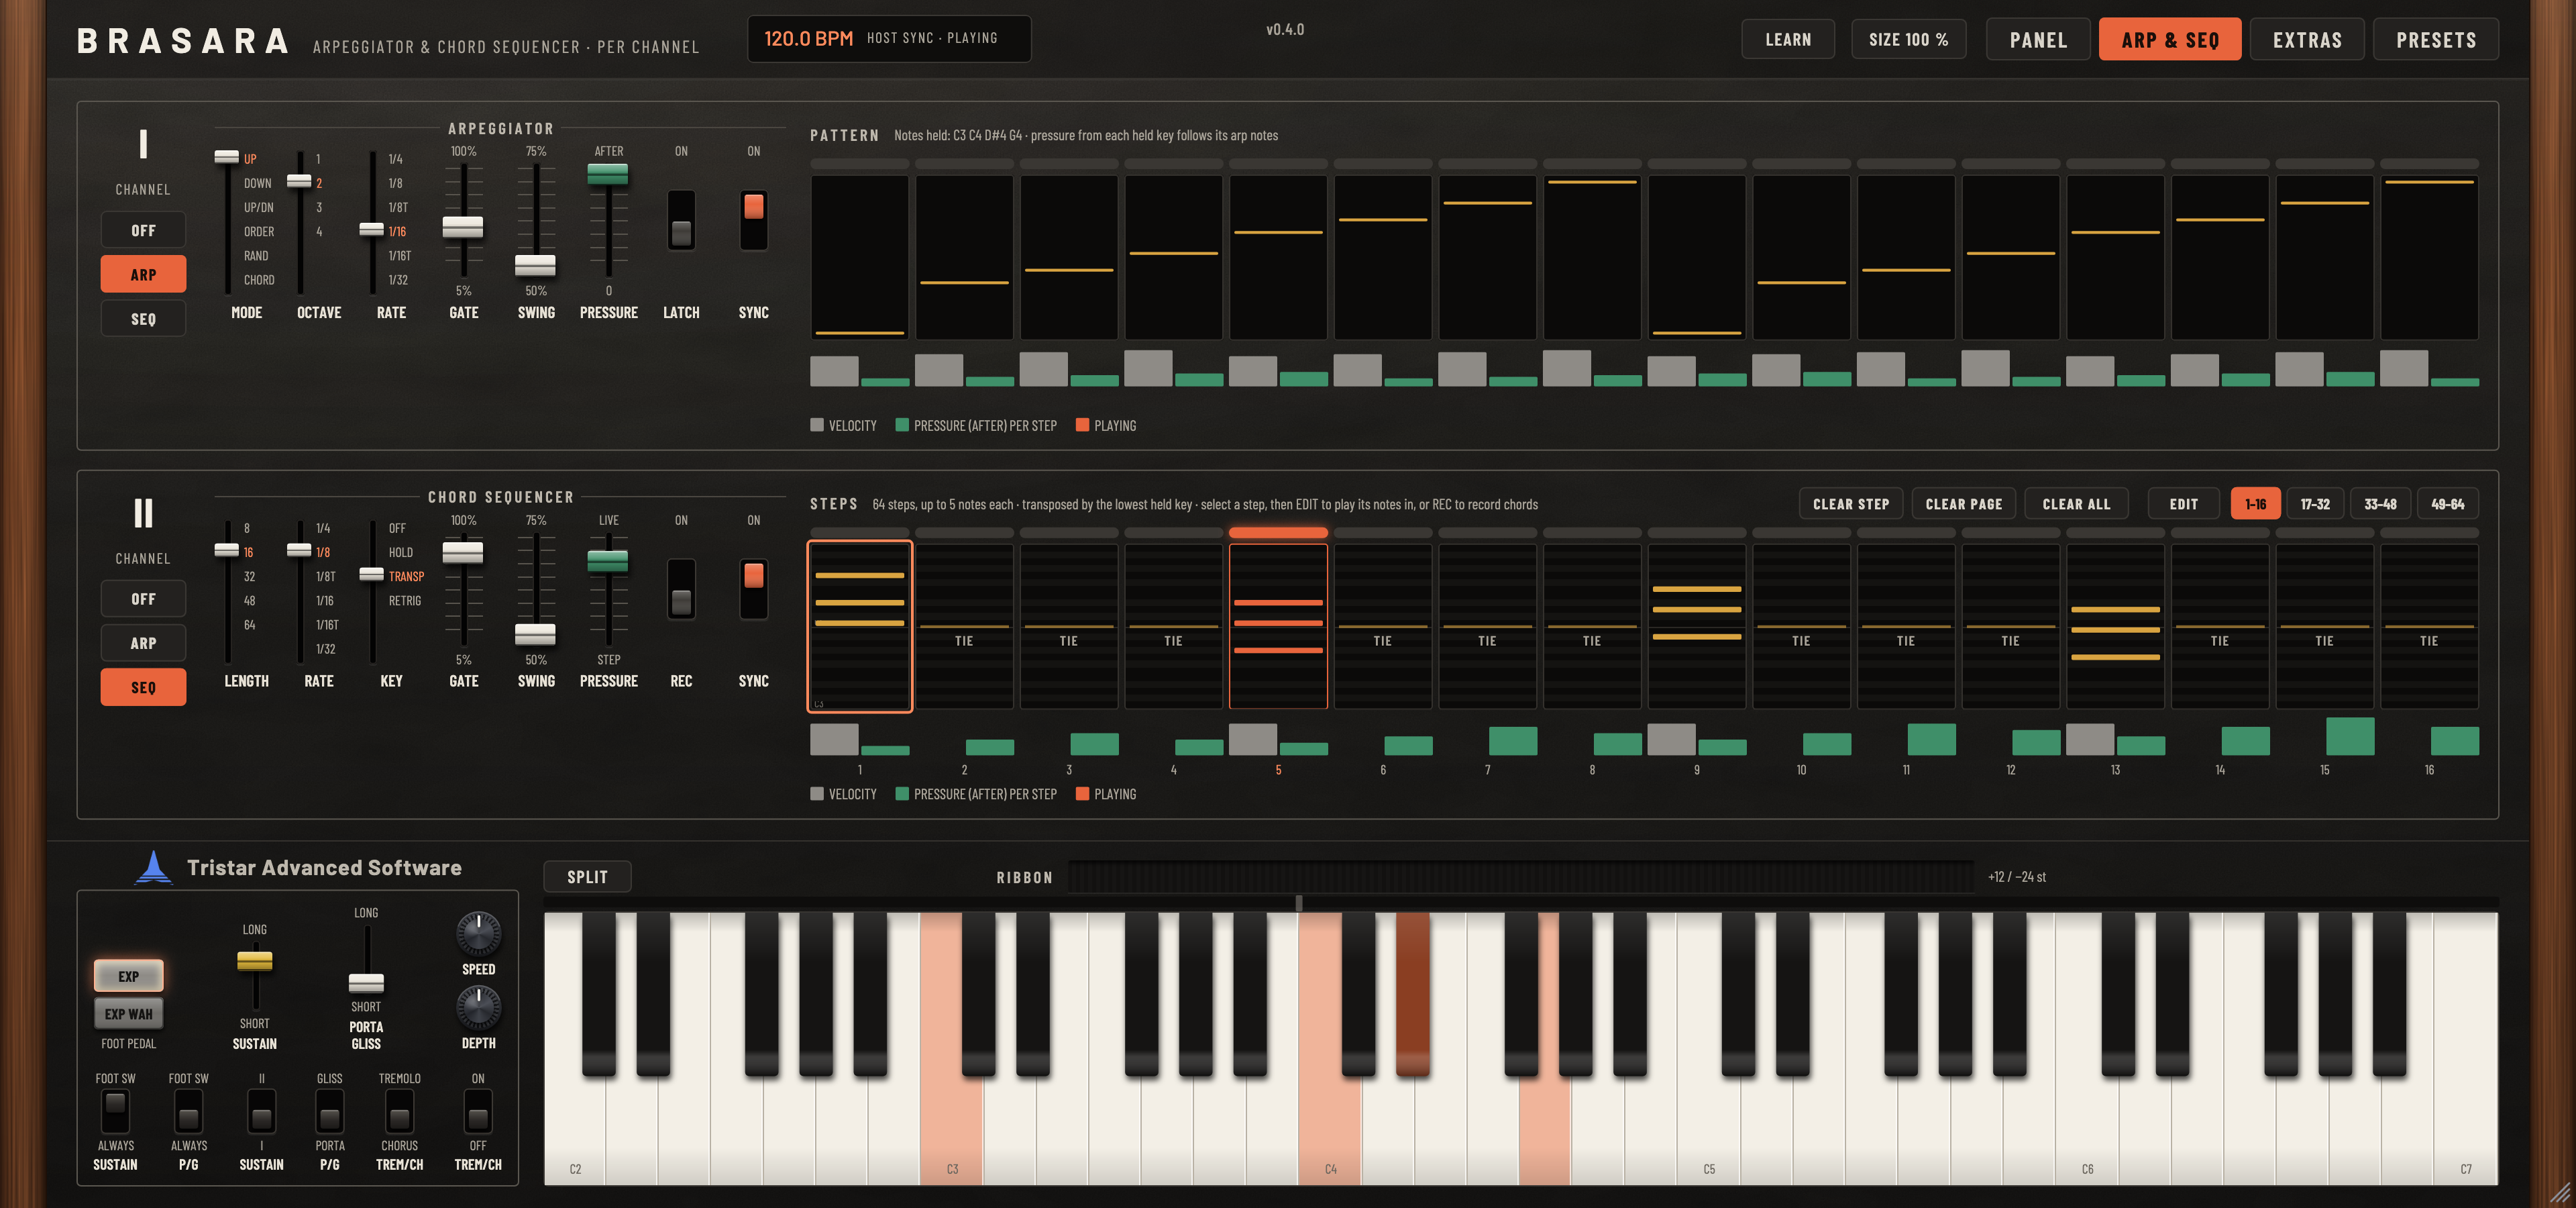
The ARP & SEQ page has a row for each channel: channel I's at the top, channel II's below. Each row's CHANNEL switch chooses what the channel plays:
OFF: the keys, as usual.
ARP: the channel's own arpeggiator, from the keys you hold (with the key split on, the keys on its side).
SEQ: the chord sequence.
So one channel can arpeggiate while the other plays the sequence, or both can play the sequence, or both can arpeggiate in different ways. The row shows the arpeggiator's controls when its CHANNEL switch is at OFF or ARP, and the sequencer's when it's at SEQ. There's one sequence, shared by any channel set to SEQ, and an arpeggiator for each channel.
Remember that a channel at OFF still plays the keys. If channel I arpeggiates and channel II is at OFF, you hear the arpeggio and, on channel II, the chord you're holding. That's often what you want; if not, set MIX towards the arpeggiating channel, or set both channels to ARP.
Tempo and sync
On this page, the tempo display takes the place of the preset bar in the header. It shows the tempo and where it comes from: INTERNAL · DRAG TO SET when Brasara keeps its own time, or HOST TEMPO or HOST SYNC when it follows your DAW. In a DAW, the arpeggiators and the sequencer always run at your DAW's tempo, even while its transport is stopped. Each arpeggiator and the sequencer also has a SYNC switch: on (as it starts), the pattern locks to your DAW's bars and beats while its transport plays, so it stays in time with the rest of your project; off, it runs at the tempo but starts from whenever you play, without lining up with the DAW's beats. Without a DAW (in the standalone app), they follow Brasara's own tempo: drag the tempo display to set it, from 40 to 240 BPM, or double-click it for 120.
The arpeggiator

MODE: UP, DOWN, UP/DN, ORDER (the order you pressed the keys), RAND (random) or CHORD (all the held notes together, repeated).
OCTAVE: how many octaves it spans, from 1 to 4. At 2, the pattern plays your chord, then the same chord an octave up, and so on.
RATE: the step length: 1/4, 1/8, 1/8 triplets (1/8T), 1/16, 1/16 triplets (1/16T) or 1/32. Init's is 1/16.
GATE: how long each note sounds, from 5% to 100% of a step. Low settings give short, staccato notes; 100% joins them up. Init's is 50%.
SWING: delays every second step, from 50% (straight) to 75%, for a shuffle feel.
PRESSURE (0 to AFTER): how much the pressure on the keys you hold reaches the notes they play. At the top, pressing into a key affects its arpeggiated notes as if you were holding them yourself.
LATCH: the arpeggio keeps playing after you let go, until you play a new chord.
SYNC: locks the arpeggio to your DAW's beat grid while its transport plays (see Tempo and sync).
The PATTERN display shows the latest 16 steps as they play, with each note's velocity and pressure as bars below it, and lists the notes you're holding.
Tips
Short, plucky sounds (a fast VCA decay with low sustain) make arpeggios clearer. Long releases blur them into a wash, which can also be lovely.
Set the two channels to ARP with different RATE or MODE settings, for interlocking patterns from one chord.
A delay effect synced to the tempo (see Effects) adds echoes in time with the arpeggio.
Try this: your first arpeggio
Load Init and set MIX to 0, so you hear only channel I.
On channel I, make the sound short: in its VCA, set D to 200 ms and S to 2.
Open the ARP & SEQ page and set channel I's CHANNEL switch to ARP. Hold a chord, C, E and G: the notes play one after another, going up.
Set OCTAVE to 2: the pattern now climbs through two octaves. Try MODE UP/DN and then RAND.
Raise SWING to about 60% for a shuffle, and lower GATE to 20% for short, bouncy notes.
Turn on LATCH and let go of the keys: the arpeggio keeps playing. Play another chord to change it.
Set MIX back to 5. Now channel II plays your held chord under the arpeggio.
The chord sequencer

The sequence has up to 64 steps. Each step is a chord of up to five notes (or a single note, or a rest), with its own velocity and its own pressure. Some factory sequences also have steps marked TIE: a tied step holds the previous step's notes on through it, without playing them again.
LENGTH: 8, 16, 32, 48 or 64 steps. Init's is 16. Steps past the length are dimmed and don't play.
RATE, GATE, SWING and SYNC: as for the arpeggiator.
KEY: what the keys do to the sequence. OFF: it plays as written, while you hold a key. HOLD: it keeps playing after you let go, transposed by the lowest key. TRANSP (as Init has it): it's transposed by the lowest key you hold. RETRIG: transposed, and it starts again from step 1 at each new key.
PRESSURE (STEP to LIVE): how much your live pressure adds to the steps' own pressures. Towards STEP, the steps' pressures alone; towards LIVE, your playing counts fully.
REC: records chords into the steps (see Editing the sequence).
The sequence is transposed from C4: hold C4 to hear it as written. Hold D4 and it plays a whole step higher, and so on.
The steps' pressures work like pressing into the keys: they drive the AFTER sliders and the common touch response, so a sequence can brighten, swell or wobble step by step even if your keyboard has no aftertouch.
Editing the sequence
Each step shows its notes on a small two-octave piano roll; scroll over the steps to see other octaves. Below each step, drag the gray bar for its velocity and the green bar for its pressure. The buttons above the steps show steps 1–16, 17–32, 33–48 or 49–64. The line of text above the steps tells you what to do next.
To program a step: click it to select it, then turn on EDIT. Each key you play, on the keybed or your MIDI keyboard, adds that note to the step or takes it away. The keybed shows the step's notes in orange.
To record chords: turn on REC and play a chord for each step in turn. Letting go of all the keys moves on to the next step. Click a step to record there instead.
CLEAR STEP, CLEAR PAGE and CLEAR ALL make the selected step, the 16 on view or every step rests. CLEAR ALL asks first: click it again (it then reads CONFIRM) to confirm.
While EDIT or REC is on, the keys play only the channels set to SEQ, so you hear the notes you're entering.
The sequence is saved with each preset and with your project.
Tips
Write sequences in the key of C, around C4. Because they're transposed from C4, holding other keys then moves them into other keys naturally.
Leave some steps as rests: space makes a sequence groove.
Vary the velocity bars to accent the beats, and the pressure bars to make some steps open up (with AFTER BRILL raised on the channel playing the sequence).
To explore, load the Sequences presets and look at their steps.
Try this: a four-chord sequence
Load Init and set MIX to 0. On the ARP & SEQ page, set channel I's CHANNEL to SEQ, and its RATE to 1/8.
Turn on REC. Play a C major chord (C4, E4, G4) and let go; then A minor (A3, C4, E4); then F major (F3, A3, C4); then G major (G3, B3, D4). Each chord fills the next step.
Turn REC off. Hold C4: your four chords play, then twelve rests, as the sequence runs through its 16 steps.
Set LENGTH to 8, so there are only four rests. Hold F3 instead of C4: the whole sequence plays a fifth lower.
Set KEY to HOLD, tap a key and let go: the sequence keeps playing. Tap another key to transpose it.
Drag some steps' gray velocity bars down and listen to the accents change.
Extras
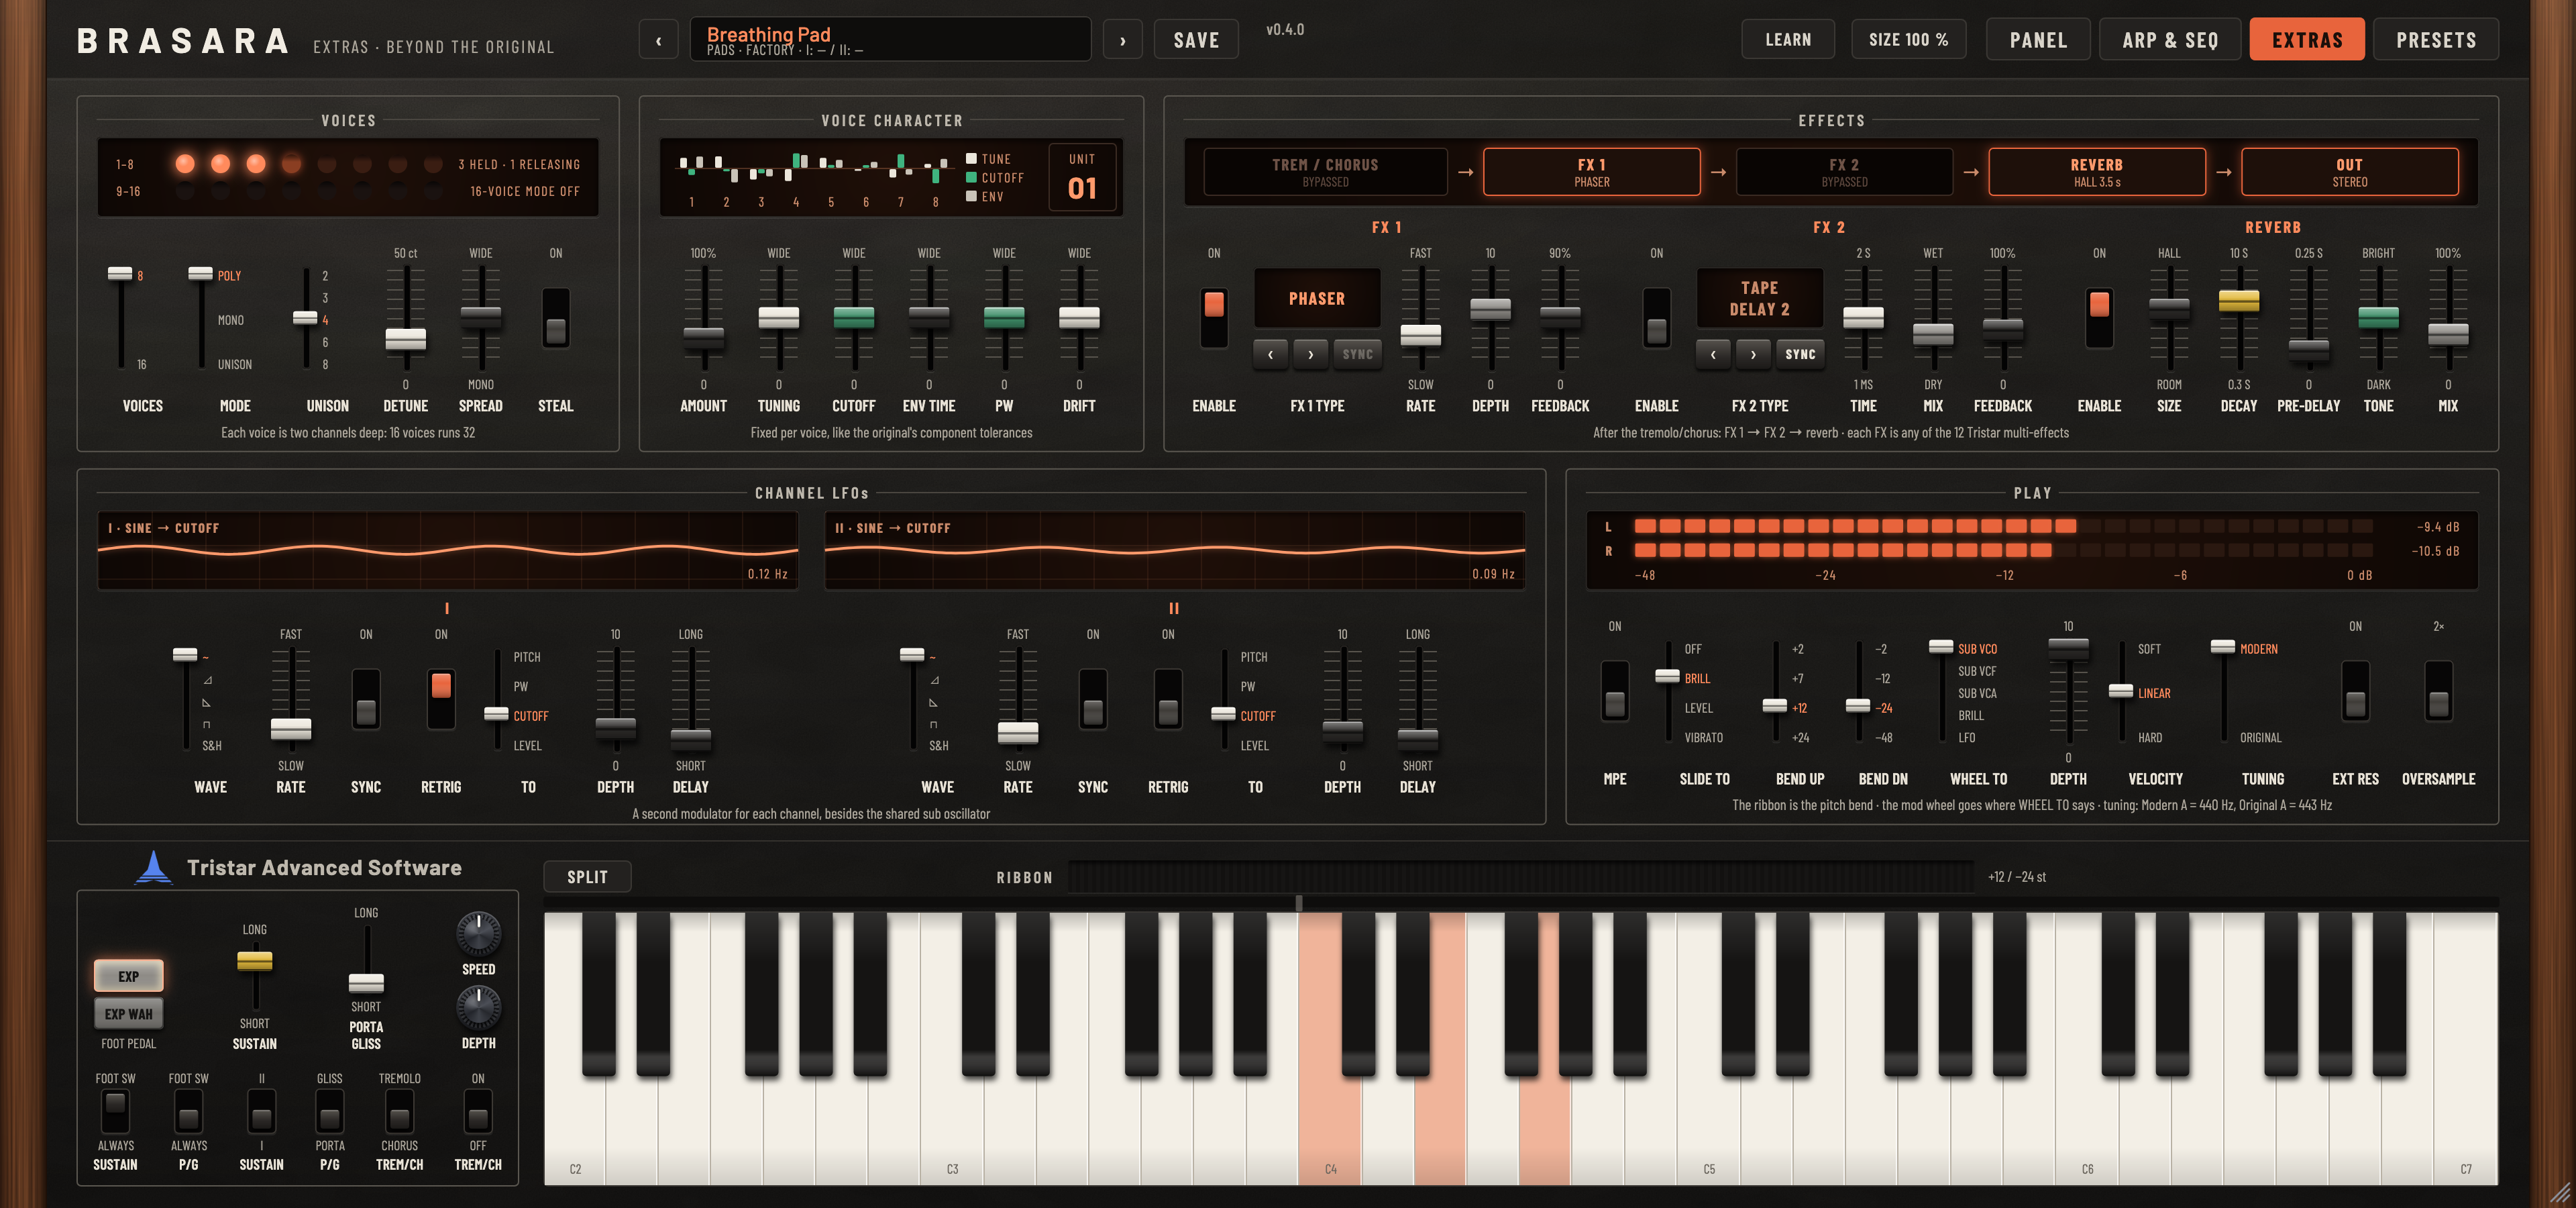
The EXTRAS page holds what goes beyond the classic panel. Its displays show what's happening: the voices playing, each voice's character, the effect chain, each channel LFO's movement, and the output level.
Voices
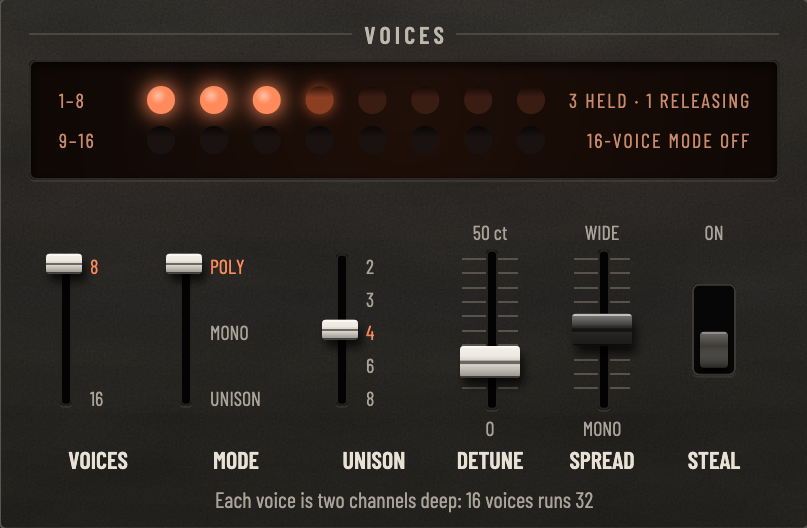
These set how many notes Brasara can play at once, and how it plays them.
VOICES: 8 or 16. Each voice is two channels, so 16 voices runs 32 channels. The lamps show which voices are held and which are still ringing.
MODE: POLY (a voice per note, polyphonic), MONO (one note at a time, monophonic, for leads and basses) or UNISON (several voices stacked on one note).
UNISON: how many voices stack in unison: 2, 3, 4, 6 or 8. DETUNE spreads their pitch, up to 50 cents, and SPREAD spreads them across the stereo field, from MONO to WIDE.
STEAL: what happens when every voice is busy. A new note always takes a voice that's only ringing on after its key was released. When every voice's key is still held, with STEAL on the new note takes over the oldest one; with it off, as on the classic instruments, the new key isn't played until you let go of one.
In MONO and UNISON, the newest key you hold plays; let go of it and the key you're still holding plays again. UNISON plays one note at a time, like MONO, but with a stack of detuned voices for a huge sound. The stack can't have more voices than VOICES allows. In POLY, each new note takes the next free voice in turn, so playing the same key repeatedly uses different voices, each with its own character.
Tips
16 voices are useful with long releases, sustain, or arpeggios and sequences over held chords. They need more processing power.
For a classic big lead, UNISON with 4 voices, DETUNE around 10 to 20 cents and SPREAD at the middle or wider.
Try this: a unison lead
Load Init. Set MODE to UNISON. Play a melody: each note is now a thick stack of four voices.
Raise DETUNE to about 25 cents: the stack beats and swirls. Lower it to 8 for a tighter sound.
Move SPREAD from MONO to WIDE, on headphones: the sound widens across the stereo field.
Set UNISON to 8 for the biggest stack.
Voice character
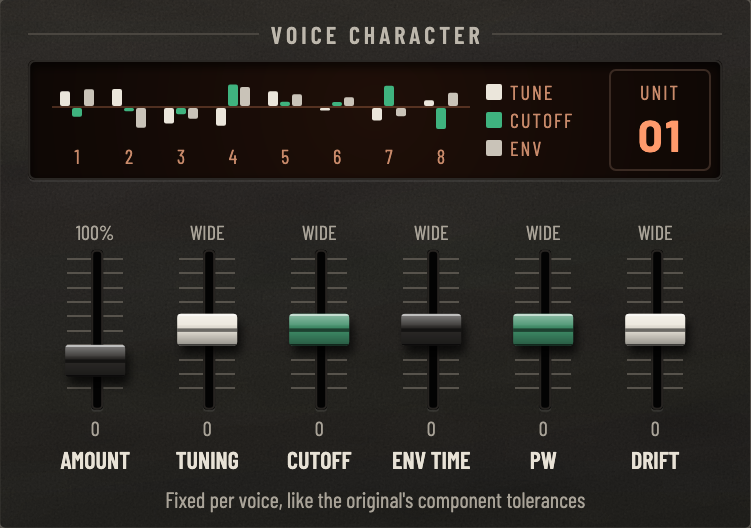
No two voices of an analog instrument are quite alike. Voice character gives each of Brasara's voices its own small differences, fixed for that voice like the tolerances of real components. With it, a chord sounds less sterile, and repeated notes vary slightly, as they do on vintage hardware.
AMOUNT (0 to 100%): how much character there is overall. At 0, every voice is identical. Init has it at 0.
TUNING, CUTOFF, ENV TIME and PW (0 to WIDE): how far each voice's tuning, cutoff, envelope times and pulse width differ. Even at their widest, the differences are small: a few cents of tuning, for example.
DRIFT (0 to WIDE): how far each voice's pitch wanders, slowly.
UNIT: which set of differences, from 1 to 99. Each unit is a different instrument; two instances on different units sound like two instruments. Drag the display up or down, or scroll over it.
The display draws voices 1 to 8 as bars: each voice's tuning, cutoff and envelope-time difference.
Tips
Start with AMOUNT around 30 to 50%. Most of the effect is felt rather than heard: chords sound warmer and more alive.
If you layer two Brasara instances in a project, set them to different UNIT numbers so they don't share their quirks.
If something sounds out of tune, check AMOUNT, TUNING and DRIFT first.
Try this: load Init and hold a chord. Raise AMOUNT to 100% and DRIFT to WIDE: the chord starts to move subtly, like an old instrument warming up. Play one key repeatedly: each repeat sounds very slightly different, because each uses a different voice. Set AMOUNT back to 0 and compare.
Channel LFOs
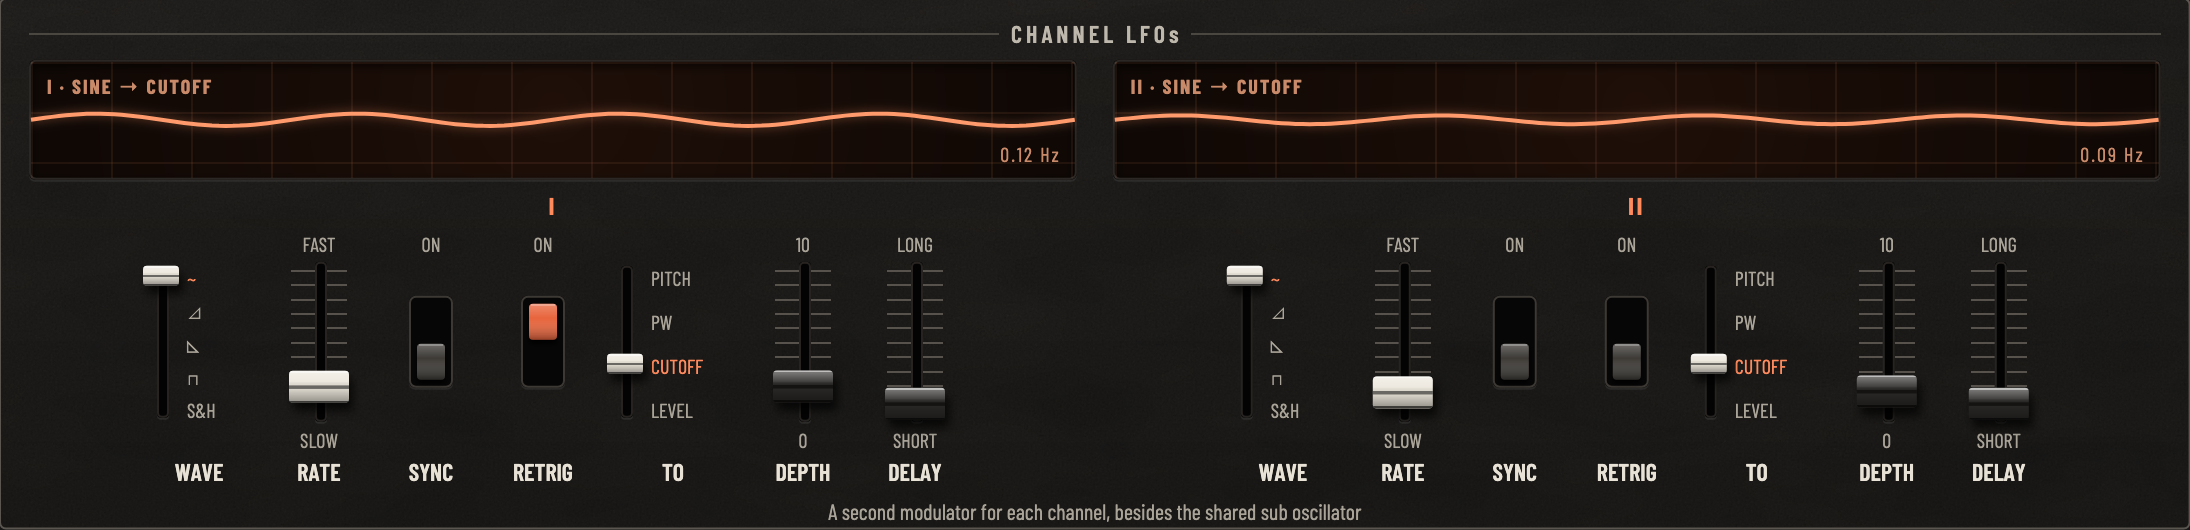
Each channel has a second modulator of its own, an LFO (low-frequency oscillator), besides the shared sub oscillator. Because each channel has its own, the two channels can move differently: channel I's filter can sweep slowly while channel II has vibrato, for example. And because each note runs its own LFO, they can start with each note.
WAVE: sine (~), sawtooth, inverted sawtooth, square (⊓) or S&H (sample and hold: a new random step each cycle).
RATE: its speed, from 0.05 Hz (SLOW, one cycle every 20 seconds) to 30 Hz (FAST). With SYNC on, the same slider chooses a note length, from four bars to 1/64, in time with the tempo.
RETRIG: each note starts the LFO from the beginning (as Init has it). With it off, the LFO runs freely.
TO: what it moves: PITCH (vibrato), PW (the pulse's width), CUTOFF (the filters) or LEVEL (tremolo).
DEPTH (0 to 10): how much. The slider is finer at the bottom, so low settings give subtle vibrato; at 10, PITCH swings a whole octave either way.
DELAY: how long it takes to fade in after each note starts, up to 5 seconds, for a vibrato that comes in late.
The scope above each channel's controls draws its LFO's wave, its destination and its rate.
Tips
A delayed vibrato (PITCH, DEPTH 1 to 2, DELAY around 500 ms) makes leads and strings sound played rather than programmed.
S&H to CUTOFF with some resonance gives the classic random, bubbling filter.
With WHEEL TO set to LFO, leave both DEPTHs at 0 and bring the movement in with the mod wheel.
Give the two channels slightly different RATEs for slow, evolving movement in pads.
Try this: a delayed vibrato and a random filter
Load Init and set MIX to 0.
On the EXTRAS page, set channel I's LFO TO to PITCH, DEPTH to 2 and DELAY to about a third of the way up. Hold a note: it starts steady, and vibrato fades in after a moment.
Now set TO to CUTOFF, WAVE to S&H, DEPTH to 6 and DELAY to the bottom. On the PANEL page, set channel I's LPF to 4 and RES L to 6. Hold a note: the tone jumps randomly.
Back on the EXTRAS page, turn SYNC on and move RATE until it shows 1/16: the random steps now land in time with the tempo.
Play settings
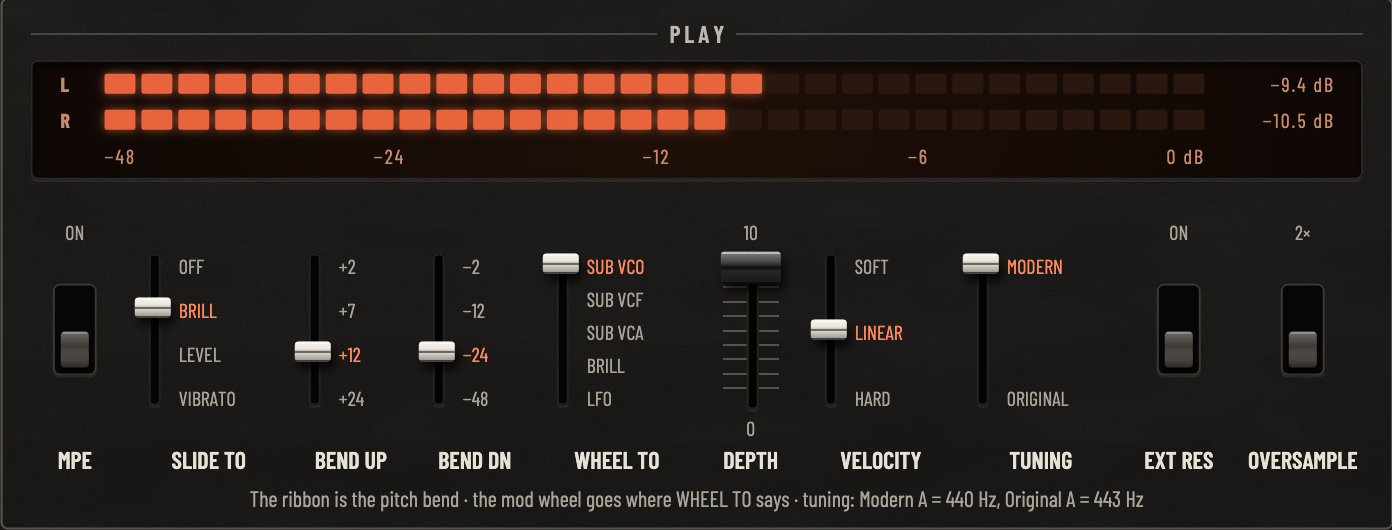
These belong to your project, not to a sound, so loading a preset doesn't change them:
BEND UP and BEND DN: the ribbon's range: +2, +7, +12 or +24 semitones up, and −2, −12, −24 or −48 down.
VELOCITY: how strongly velocity responds: SOFT, LINEAR or HARD. If you play lightly and can't reach the loud end, try SOFT; if everything sounds loud, try HARD.
TUNING: MODERN (A = 440 Hz) or ORIGINAL (A = 443 Hz, as the classic instruments were tuned at the factory).
MPE and SLIDE TO: for an MPE controller (see MPE).
OVERSAMPLE: with 2× up, the voices run at twice the sample rate, which smooths the top end of bright, high notes (it reduces aliasing). It needs about twice the processing power, so it's off at first. Turn it on if your computer has power to spare, or for a final mix.
The UNIT setting and the tempo also belong to the project.
Three of the row's controls are different: they're part of the sound, so presets save them. WHEEL TO and DEPTH choose what the mod wheel does (see The mod wheel), and EXT RES takes the filters' resonance past the classic range (see The channels).
The meter at the top of this section shows Brasara's output level.
Try this: extended resonance
Load Init. On the PANEL page, set both channels' LPF to 4 and RES L all the way up. Move LPF: an edgy sweep, but no whistle.
On the EXTRAS page, turn on EXT RES. Move LPF again: the filter now rings and squeals as it sweeps. Lower RES L to 7 or 8 for a strong but controllable resonance.
Be careful with your volume when you first try EXT RES with high resonance: the filters can ring loudly.
Effects
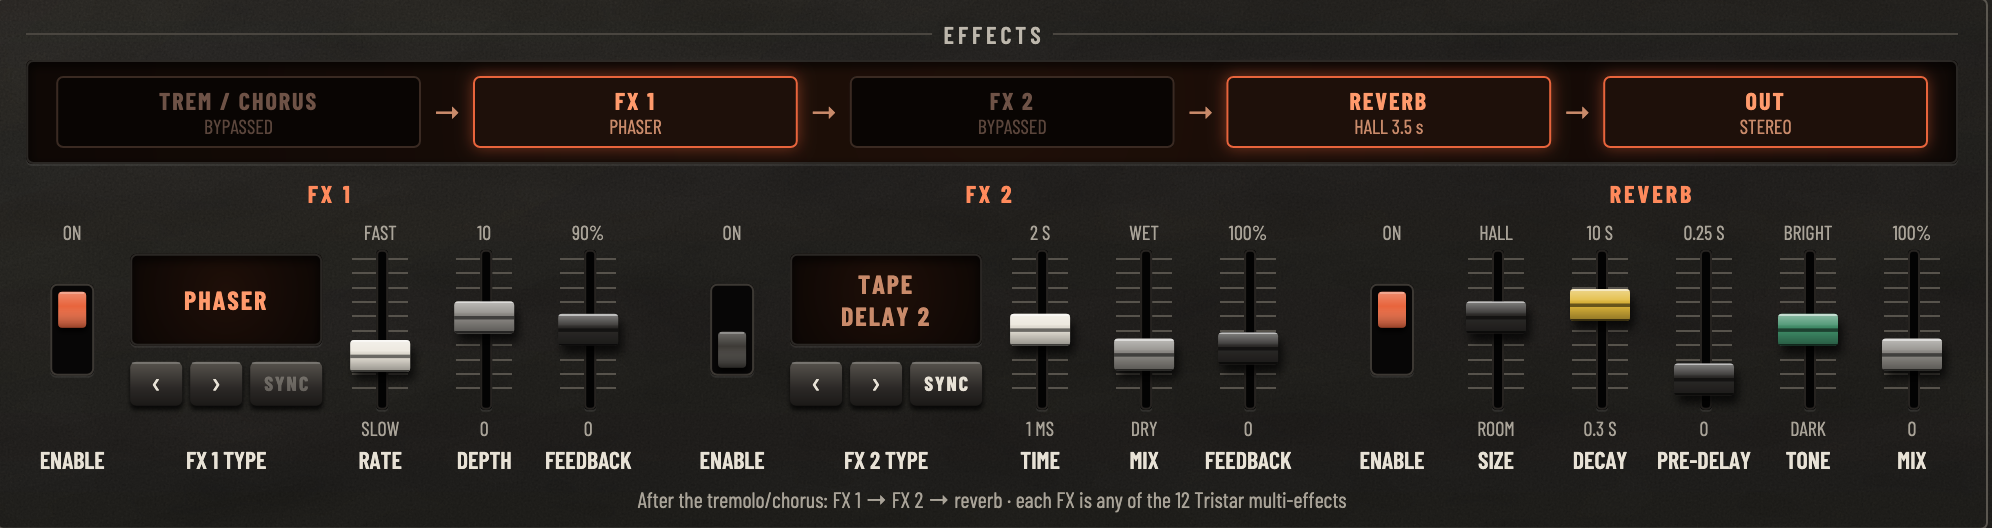
Effects process the finished sound: echoes, movement, distortion and space. After the tremolo and chorus, the sound goes through FX 1, then FX 2, then the REVERB. The chain at the top of the EXTRAS page's Effects section shows each stage, from TREM / CHORUS to OUT, lit when it's on and showing what it's set to; click a stage to switch it on or off.
FX 1 and FX 2
Each slot has an ENABLE switch (up is on) and can be any of twelve effects. Choose one with ‹ and › under the type display, or scroll over the display. Each effect has three sliders, named and marked for what they do in that effect:
Delay, BBD, Tape Delay 1 and Tape Delay 2: TIME (1 ms to 2 s), MIX (DRY to WET) and FEEDBACK (0 to 100%, how many times the echo repeats). A clean digital delay, a darker bucket-brigade delay, and two tape echoes. SYNC sets the time as a note length (four bars to 1/64), in time with the tempo. SYNC is available only for the delays.
Chorus, Flanger and Phaser: RATE (SLOW to FAST) and DEPTH, with LPF (1 kHz to 16 kHz, to darken the effect) for the chorus and FEEDBACK for the flanger (−90% to +90%) and phaser (0 to 90%).
HP Filter: FREQ (20 Hz to 10 kHz), MIX and RESO, a high-pass filter on the whole sound.
Distortion: GAIN (1× to 100×), OUTPUT and TONE (800 Hz to 18 kHz). See also distortion.
Ring Mod: PITCH (20 Hz to 5 kHz), MIX and TRACK (with TRACK on, the modulator follows the notes you play).
Rotary: a rotating speaker: SPEED (slow to fast), DRIVE and MIC DIST (near to far).
Lo-Fi: FREQ, WOW and DRIVE, for a worn, old-recording sound.
While you drag an effect's slider, its value is shown in real units: milliseconds, note lengths, hertz or percent.
Tips
Order matters: distortion in FX 1 followed by a delay in FX 2 gives clean echoes of a distorted sound; the other way round distorts the echoes too.
Keep delay MIX lower than you'd think, especially on pads; let the reverb add the space.
A synced delay at a dotted or triplet length against a straight arpeggio gives a busy, rolling rhythm.
FX 1 and FX 2 can be the same type, for example two different delays.
Try this: a synced echo and a phaser
Load Init. On channel I and channel II, shorten the VCA: D 300 ms, S 0.
On the EXTRAS page, set FX 1's type to Tape Delay 1 with ‹ and ›, and switch its ENABLE on. Click SYNC and set TIME to 1/8 (watch the value as you drag). Set MIX to about a third and FEEDBACK to about 40%. Play short notes: each one echoes in time.
Set FX 2's type to Phaser, switch its ENABLE on, and set RATE low and DEPTH high. The sound, echoes included, now swirls slowly.
Click the FX 1 and FX 2 stages in the chain to switch them off and on, and compare.
Reverb
A plate reverb, which places the sound in a space:
ENABLE: switches it on (up).
SIZE: from ROOM to HALL.
DECAY: how long the reverb rings, from 0.3 to 10 seconds.
PRE-DELAY: up to a quarter of a second before the reverb starts. A little pre-delay keeps the start of each note clear of the reverb.
TONE: from DARK to BRIGHT.
MIX: how much reverb you hear, from 0 to 100%.
The chain shows the reverb's size and decay, for example HALL 3.5 s.
Tips: in a DAW you may prefer to turn Brasara's reverb off and use a shared reverb on a send, so all your instruments sit in the same space. For playing on its own, Brasara's reverb makes even simple sounds feel finished.
Try this: load Init, shorten both channels' VCA (D 300 ms, S 0), and switch the reverb's ENABLE on. Play short notes and move SIZE and DECAY from small to large: the notes go from a small room to a cathedral. Raise PRE-DELAY to hear a gap open between each note and its reverb. Lower TONE for a warmer, darker space.
Presets
A preset is a saved sound. Brasara comes with a bank of factory presets, and you can save as many of your own as you like.
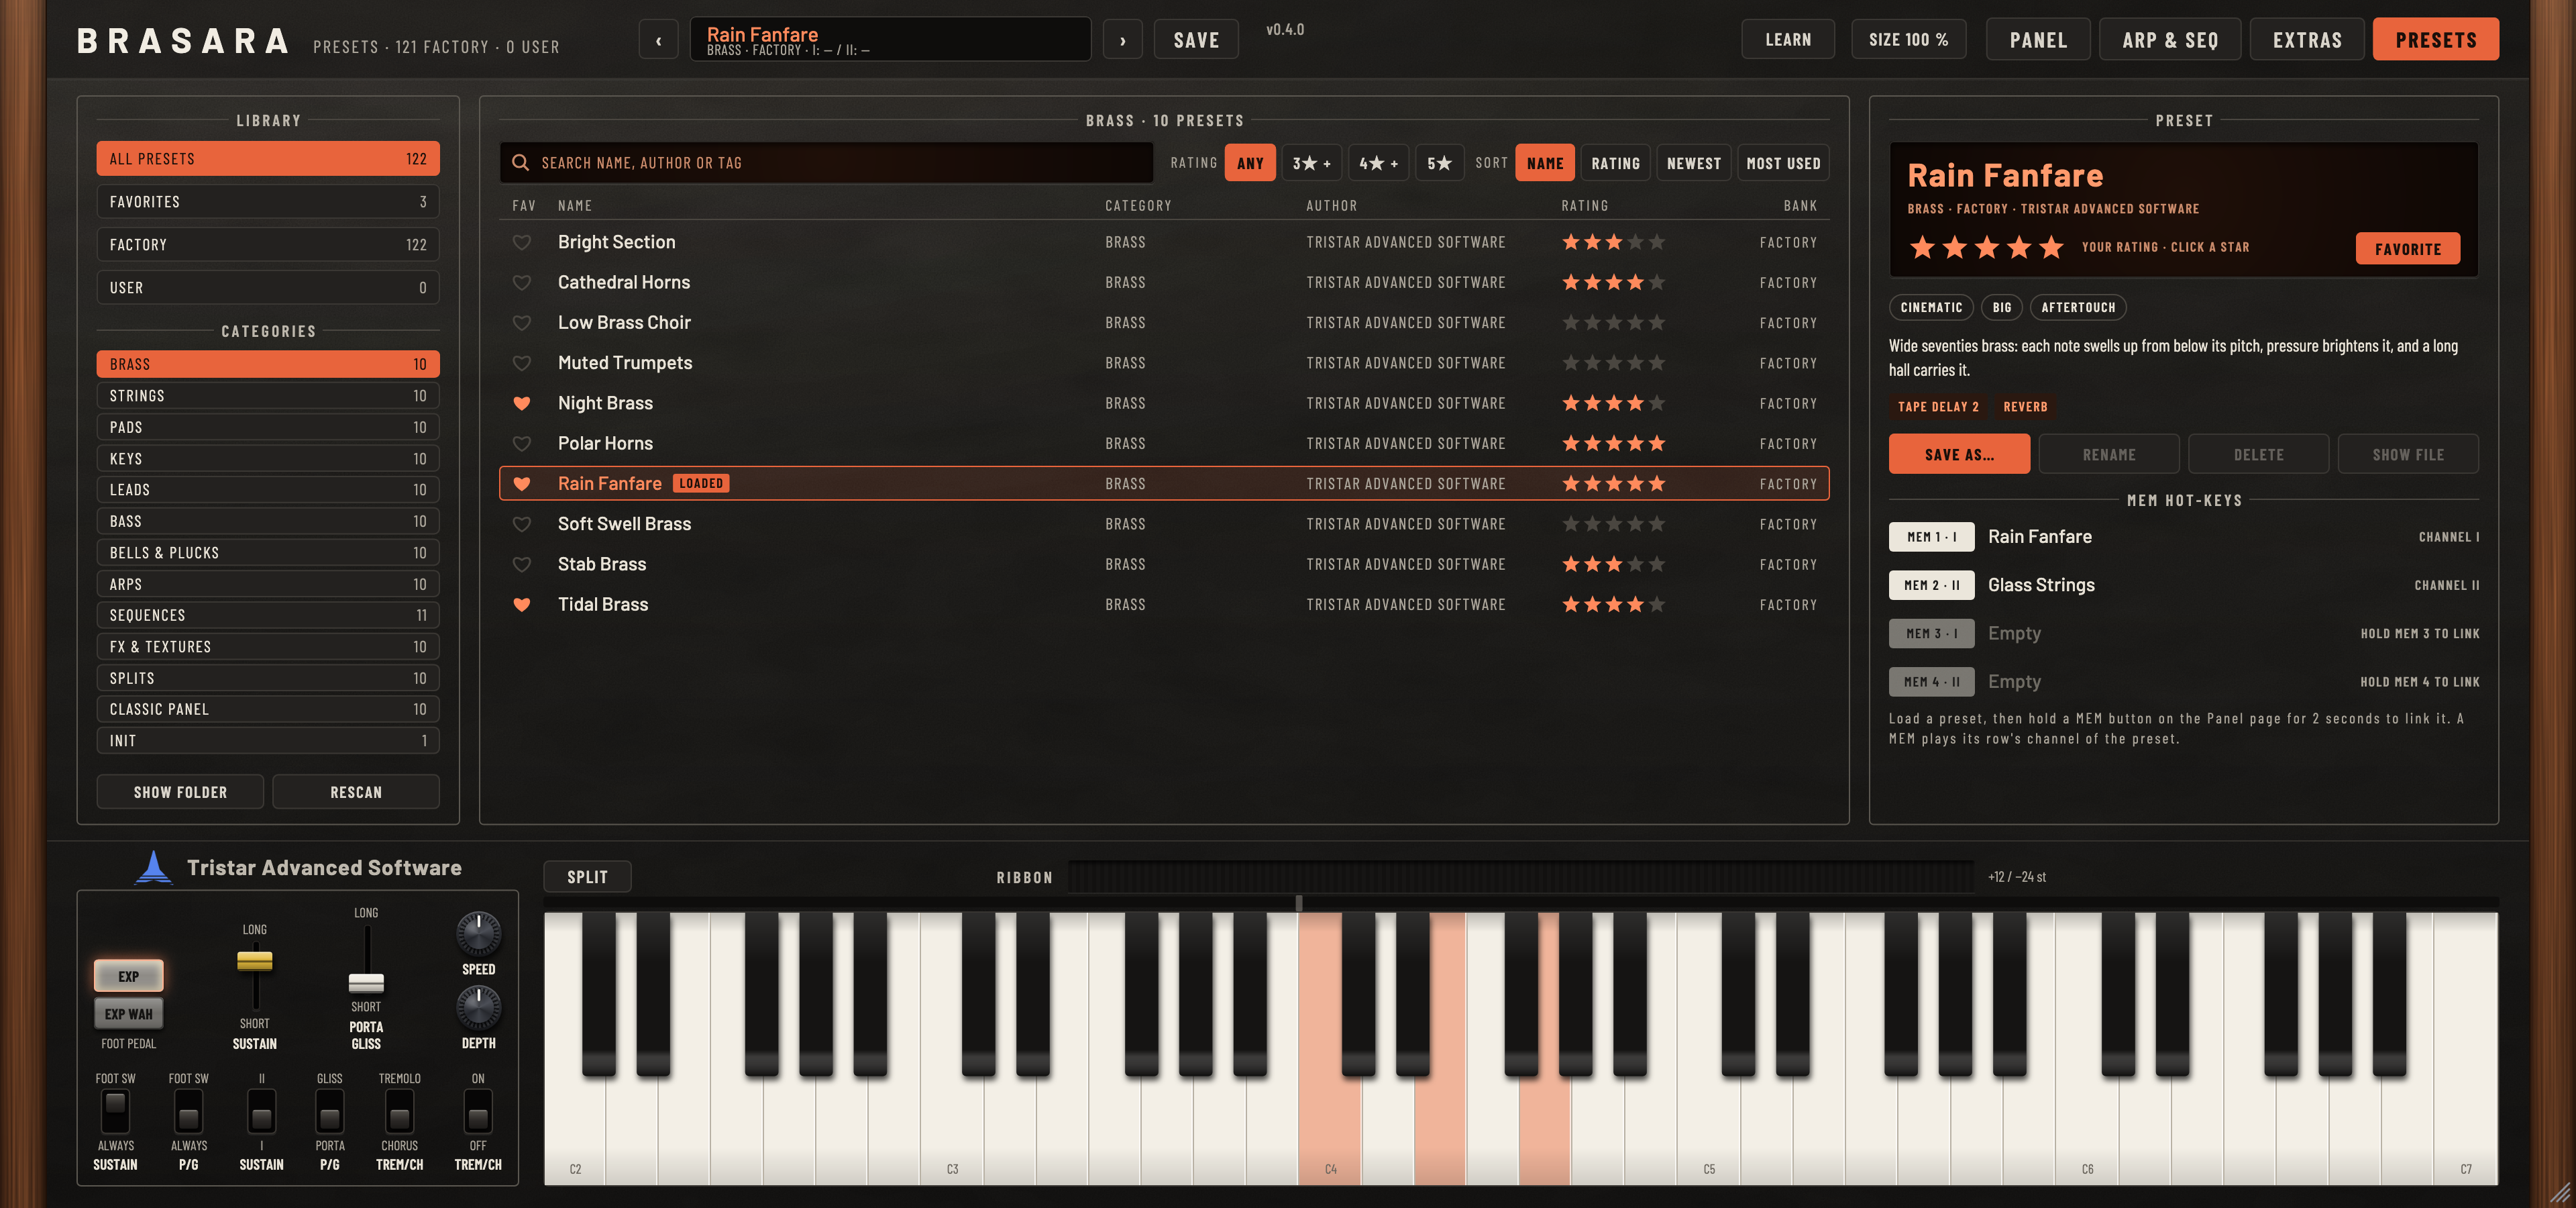
Browsing
The PRESETS page has three columns:
Library (left): all presets, your favorites, the factory presets or your own; and the categories, each with how many presets it holds. Click a category again to show them all. SHOW FOLDER opens your preset folder, and RESCAN reads it again, for example after you've copied presets in.
The list (middle): search by name, category, author or tag; show only presets you've rated 3, 4 or 5 stars; and sort by name, rating, newest or most used. Click a preset to load it. Click its heart to make it a favorite. Scroll for more.
The preset (right): the loaded preset, with its category, author, tags, description and what it uses (for example its tone buttons, effects, arpeggiators or sequence). Click the stars to rate it, and FAVORITE to mark it. Below, the MEM hot-keys show which preset each MEM button is linked to.
Use ‹ and › in the header to step through the presets in the list, in the order shown. The display shows (edited) once you've changed the sound since loading it.
Your ratings and favorites are yours: they're kept on your computer, for factory presets as well as your own, and they stay with a preset if you rename it.
Tips
To audition a category quickly, click it, click the first preset, then step through with › while you play.
Mark the presets you like with the heart as you go. Later, Favorites in the library gives you a shortlist for a session.
Read the description: many presets tell you how to play them, for example which hand plays what in a split, or that pressure brightens the sound.
The factory bank
Brasara comes with an original bank of 241 presets in twelve categories: brass, strings, pads, keys, leads, bass, bells and plucks, arpeggios, sequences, effects and textures, Splits, which divide the keybed between two sounds, and Classic Panel, which layers the tone selector's voicings. The presets are level-matched, so they play at similar volumes, with the basses a little hotter, as basses sit in a mix. Many respond to pressure: try pressing into the keys.
Init, in a category of its own, is the starting point for a sound of your own: a plain sawtooth on both channels, with every extra off. Loading it resets the sound and keeps your play settings.
The arpeggio and sequence presets set their channels to ARP or SEQ. Hold a chord for the arpeggios, and a key for the sequences (C4 plays them as written). In the Splits, each preset's description says where the split is and what each hand plays.
Tip: factory presets are a good way to learn. Load one, then open the PANEL, ARP & SEQ and EXTRAS pages and look at how it's built. Move a slider, listen, and double-click it to put it back.
Saving your own
Click SAVE in the header, or SAVE AS… on the PRESETS page, to save the current sound. Give it a name, and if you like an author, tags, a description and a category. If a preset with that name already exists, Brasara asks before replacing it.
On the PRESETS page, RENAME, DELETE (click it, then CONFIRM) and SHOW FILE work on your own presets.
User presets are standard VST3 preset files, so VST3 hosts list them too. The VST3, the Audio Unit, the AAX plug-in and the standalone app all use the same presets. They're kept in:
macOS: ~/Library/Audio/Presets/Tristar Advanced Software/Brasara/
Windows: Documents\VST3 Presets\Tristar Advanced Software\Brasara\
Linux: ~/.vst3/presets/Tristar Advanced Software/Brasara/
To share a preset, copy its file to the same folder on another computer. Don't edit preset files by hand: Brasara checks each file, and won't load one whose sound settings were changed outside the editor.
If saving a preset on macOS says you don't have permission to write in ~/Library/Audio/Presets, another company's installer has made that folder the administrator's. To take it back, open Terminal, run this command and enter your password:
sudo chown $USER ~/Library/Audio/Presets
Tip: fill in the tags and description when you save. Search finds presets by tag, so tags like pad, dark or aftertouch make your own sounds easy to find later.
What a preset contains
A preset saves the whole sound: everything on the PANEL, ARP & SEQ and EXTRAS pages, including which tone buttons are lit, the key split, where the mod wheel goes, and the sequence.
It doesn't save the play settings (BEND UP and BEND DN, VELOCITY, TUNING, MPE, SLIDE TO, OVERSAMPLE and UNIT) or the tempo, which belong to your project, or how you're playing: the ribbon, the mod wheel, pressure, the expression pedal and the sustain pedal. Loading a preset leaves those as they are.
Your DAW project saves everything, including which preset is loaded and any changes you've made since.
Try this: load Init, press BRASS 1 and STRING 2 in the tone selector, and click SAVE. Name it My First Layer, choose the Brass category, add the tag layer, and save. Click User in the library: your preset is there. Load another preset, then search for layer to find yours again.
MIDI and controllers
MIDI is how your keyboard or DAW tells Brasara what to play. Brasara responds to:
notes and velocity, through the VELOCITY setting;
polyphonic aftertouch (each key's own pressure) and channel pressure;
pitch bend, which moves the ribbon;
the mod wheel (CC 1), which adds vibrato from the sub oscillator, or what the sound's WHEEL TO chooses;
expression (CC 11), the foot pedal;
the sustain pedal (CC 64), the foot switch for SUSTAIN and PORTA GLISS;
with MPE on, each note's own pitch bend, pressure and slide (CC 74).
Brasara listens on every MIDI channel. Any other knob or slider on your controller can be assigned to a control with MIDI Learn.
In a DAW, every sound control can be automated, in the VST3, the Audio Unit and the AAX plug-in. Notes and automation are sample-accurate.
Tips
Not every keyboard sends aftertouch, and fewer send polyphonic aftertouch. Check your keyboard's manual: many sounds in the factory bank are made to respond to it.
If your keyboard has no sustain pedal input, set the SUSTAIN switch marked FOOT SW and ALWAYS to ALWAYS for sustain without a pedal.
Automating BRILL, a channel's LPF, or an effect's MIX in your DAW is an easy way to make a part develop over a song.
MPE
With an MPE (MIDI Polyphonic Expression) controller, an expressive keyboard or pad surface, each note can bend, swell and change its tone on its own. Turn on MPE on the EXTRAS page.
The channels: MIDI channel 1 carries what applies to every note: the ribbon (pitch bend), the mod wheel, the pedals and channel pressure. Channels 2 to 16 each carry one note. This is MPE's standard layout, which controllers use unless you set them otherwise.
Bend: a note's own pitch bend bends only that note, up to 48 semitones either way, MPE's standard range. The ribbon still bends every note, with its own range.
Pressure: a note's own pressure works like polyphonic aftertouch, through the AFTER controls and the Touch Response VCO and VCF. Where channel pressure is sent too, each note follows whichever is stronger.
Slide: moving your finger along a key (CC 74) moves what SLIDE TO chooses: BRILL opens that note's filters, LEVEL makes it louder, VIBRATO adds vibrato from the sub oscillator, and OFF does nothing. BRILL is the setting at first.
Arpeggios follow the bend and slide of the keys they come from. The sequencer's notes don't come from a key, so they don't bend. If two notes play the same pitch on different channels at once, they share one voice.
With MPE off, every channel plays as one keyboard, as with any other controller. Some DAWs, such as Cubase, Studio One and Bitwig Studio, pass an MPE controller's gestures to VST3 instruments as note expression: Brasara follows those whether MPE is on or not.
Tips
MPE is a play setting, saved with your project, not with presets. Turn it on once per project.
Sounds with AFTER BRILL, AFTER LEVEL or Touch Response VCO raised are the ones that come alive with MPE. Try the presets tagged for aftertouch.
If notes bend wildly, check that your controller's bend range is set to 48 semitones, the MPE standard.
Try this: with an MPE controller connected, turn MPE on and set SLIDE TO to BRILL. Load Init, set both channels' LPF to 3, and set AFTER LEVEL on both channels to 4. Hold a chord: slide one finger along its key to open that note alone, press harder on another to make it louder, and wiggle a third sideways for vibrato on that note only.
MIDI Learn
MIDI Learn connects the knobs and sliders on your MIDI controller to Brasara's controls, so you can play them by hand. Any control your DAW can automate can follow a knob, slider or pedal on your MIDI controller.
Click LEARN in the header. Every control you can assign gets an outline, and the ones already assigned show their CC number.
Click a control. It blinks while it waits, and the click doesn't move it.
Move a knob or slider on your controller. The control follows it from now on.
To unassign a control, double-click it while learning, or click it and press Delete.
Click LEARN again, or press Esc, when you're done. The page tabs and the keybed still work while you're learning.
Each controller moves one control, and each control follows one controller: assigning either again replaces the old assignment. Assignments work on every MIDI channel. The controllers Brasara uses itself (the mod wheel, CC 1; expression, CC 11; the sustain pedal, CC 64; and MPE's slide, CC 74) can't be assigned, and neither can bank select or the RPN, NRPN and channel-mode messages. The ribbon, the tone selector's buttons and the keybed can't be assigned either.
Your assignments are yours, not the project's: they're the same in every project, every plug-in format and the standalone app on your computer. Every Brasara on your computer shares them, so a knob you've assigned moves the same control in every instance.
In a VST3 host, moves you make with an assigned controller are recorded as automation, as if you'd moved the control on screen. In Logic Pro, GarageBand and Pro Tools, the sound and Brasara's editor follow the controller, but the host doesn't record the moves as automation.
Tips: good first assignments are the common BRILL and RES, the sub oscillator's VCO and SPEED, MIX, and the reverb's MIX. These change the sound musically across every preset.
Try this: click LEARN, click the common BRILL slider, and turn a knob on your controller. Click LEARN again to finish. Now turn the knob while you play: the whole sound darkens and brightens. Load another preset: the knob still controls BRILL.
Sound design recipes
These recipes go further than Your first sounds. Each starts from Init and uses only what's on Brasara's panel and pages. Treat the values as starting points, then adjust by ear.
Wind and surf
Noise through a resonant filter that moves slowly.
Load Init. On both channels, turn the sawtooth (⊿) off and set NOISE to 8.
On both channels, set LPF to 4 and RES L to 7, and in the VCA, A to 1.00 s and R to 3.00 s.
On the EXTRAS page, set both channel LFOs' TO to CUTOFF, DEPTH to 6, and RATE very slow, a little different on each channel.
Switch the reverb's ENABLE on, with SIZE at HALL and MIX at about half.
Hold a few keys: you'll hear a whistling wind that rises and falls. Higher keys whistle higher, because the filters follow the keyboard. Lower RES L for surf rather than wind.
Funky clavinet with a wah
Load Init. Press CLAVI 1 in the top row and FUNKY 2 in the bottom row.
Play short, rhythmic chords. Channel II's resonant filter "quacks" on every note.
To control the quack by hand, on the EXTRAS page set WHEEL TO to SUB VCF. Back on the panel, set the sub oscillator's FUNCTION to the sine and SPEED to about 3 Hz. Push the mod wheel up for a rhythmic wah.
If you have an expression pedal, choose EXP WAH instead and rock the pedal.
Rotary organ
Load Init. Press ORGAN 1 in the top row and ORGAN 2 in the bottom row.
Set FEET II to 4′, so channel II adds an octave above.
On the EXTRAS page, set FX 1's type to Rotary and switch its ENABLE on. Set DRIVE a little up from the bottom for some grit.
Play chords and move the Rotary's SPEED slowly from SLOW to FAST and back: you'll hear the speaker speed up and slow down.
Random bleeps
Load Init and set MIX to 0. On channel I, turn on ⊓ and turn off ⊿, and in the VCA set D to 150 ms and S to 0.
On the EXTRAS page, set channel I's LFO WAVE to S&H, TO to PITCH, DEPTH to 5, RETRIG off, and SYNC on with RATE at 1/16.
On the ARP & SEQ page, set channel I to ARP, MODE CHORD, RATE 1/16 and GATE 30%.
Set FX 1 to Delay with SYNC on, TIME at 1/8 D, and switch it on.
Hold one key: you'll hear a stream of random computer bleeps, in time, with echoes.
Huge unison lead
Load Init. On the EXTRAS page, set MODE to UNISON, UNISON to 6, DETUNE to about 15 cents and SPREAD two thirds of the way to WIDE.
Set channel I's LFO TO to PITCH, DEPTH to 1.5 and DELAY about a quarter of the way up, for a vibrato that comes in late. Do the same on channel II.
On the panel, set FEET II to 4′ and lower channel II's LEVEL to 3, for an octave on top.
On both channels, set LPF to 5 and INIT BRILL to 4. Raise PORTA GLISS slightly for a short slide between notes.
Switch on FX 1 as Tape Delay 2, synced at 1/4, with MIX low, and the reverb with a medium MIX.
Slowly evolving pad
Load Init. On both channels, set the VCA's A to 1.00 s, S to 10 and R to 3.00 s.
On both channels, set LPF to 4, RES L to 3, IL to −3, AL to 2, filter A to 1.00 s and filter D to 5.00 s. Each chord now opens slowly from dark to bright and settles.
On channel II, turn on ⊓, turn off ⊿, and set PWM to 4 and SPEED slow. Set DETUNE to about +7 ct.
On the EXTRAS page, set both LFOs to CUTOFF with DEPTH 3, at different slow RATEs, with RETRIG off so they run freely. Set voice character's AMOUNT to 50% and switch on the reverb with a long DECAY.
Set the SUSTAIN switch marked II and I to II, with SUSTAIN at ALWAYS, so each chord rings until you play the next.
Pressure swell
A sound that's one thing when you strike it and becomes another as you press in. You need a keyboard that sends aftertouch.
Load Init. Press HARPSI 1 in the top row: channel I is a plucked harpsichord.
Press STRING 4 in the bottom row, then set channel II's LEVEL to 1 and AFTER LEVEL to 10, and AFTER BRILL to 5.
Play a chord: you hear a harpsichord. Press into the keys: strings swell up under it, and fade as you ease off.
Bass sequence with an arpeggio over it
Load the factory preset Berlin Bass (Sequences). On the ARP & SEQ page you'll see both channels set to SEQ.
Set channel II's CHANNEL switch to ARP, with MODE UP/DN, OCTAVE 2 and RATE 1/16.
Click SPLIT (the split starts at C4). Your left hand now transposes the bass sequence on channel I, and chords in your right hand play as an arpeggio on channel II.
Set FEET II to 4′ to lift the arpeggio two octaves above the bass, and balance the two with MIX.
The factory preset Sequence And Lead (Splits) is a ready-made version of this idea.
Where next
Explore the factory bank with the pages open: each preset is a worked example of the techniques in this guide.
Start every new sound from Init, and change one thing at a time. You'll learn what each control does far faster than by tweaking finished presets.
Learn the words: the glossary explains every synthesizer term in this guide, with links between related ideas.
Play with expression: raise the AFTER and INIT sliders on your own sounds, set up MIDI Learn for BRILL and RES, and use the ribbon and mod wheel as part of your playing.
Save as you go: save versions of a sound as you build it, with tags, so you can always go back.
Troubleshooting
My DAW doesn't list Brasara
VST3: check that the plug-in was installed in your system's VST3 folder (see Installing), then rescan plug-ins in your DAW.
Audio Unit (macOS): check that Brasara.component is in /Library/Audio/Plug-Ins/Components. In Logic Pro, open Logic Pro > Settings > Plug-in Manager, select Brasara and click Reset & Rescan Selection. If it still doesn't appear, restart your Mac.
AAX (Pro Tools): check that Brasara.aaxplugin is in the AAX plug-in folder (see Installing), then restart Pro Tools. Pro Tools scans for new plug-ins when it starts.
There are short silences in the sound
Brasara isn't activated, so it's running as a demo. Click UNREGISTERED: ACTIVATE and enter your license key.
Activation says there are no seats left
Your license is active on two other computers. Deactivate one of them, or free its seat on the My licenses page of your account, then try again.
I hear clicks or dropouts in the standalone app
Open Settings and choose a larger buffer size. On the EXTRAS page, turn OVERSAMPLE off if it's on, and if you're using 16 voices, try 8.
I hear no sound
Check that something is coming in: notes you play light up on the keybed. If they do, check VOLUME, both channels' LEVEL and VCF LEVEL or ~, and MIX. If an expression pedal is connected, check that it isn't all the way back. In the standalone app, check the audio output in Settings. If you're on the ARP & SEQ page with a channel set to SEQ, check that the sequence has notes in it.
A note keeps sounding
Check whether a sustain pedal is down, whether SUSTAIN is set long, or whether an arpeggiator's LATCH is on, or a sequence's KEY is set to HOLD.
The ribbon doesn't bend notes after I let go of them
With the SUSTAIN switch at I, the ribbon bends only the keys you're holding, as on the classic instruments. Set it to II to bend ringing notes too.
Some notes don't play
Every voice is in use. Turn on STEAL on the EXTRAS page, choose 16 voices, or shorten the release and sustain. With the key split on, check that you're playing on the side of the channel you expect.
The pressure controls do nothing
Your keyboard may not send aftertouch, or may need it turned on in its own settings. The INIT sliders, which respond to velocity, work with any keyboard.
The sound wobbles or is out of tune
Check the mod wheel and the sub oscillator's VCO, and the voice character's AMOUNT, TUNING and DRIFT. To start from a clean sound, load Init from the preset browser: its voices are all identical, and its tone holds perfectly steady.
Getting help
If something isn't working, open a support ticket. Tell us your operating system, your DAW and its version, and what you did just before the problem. Support is provided in English only.
Brasara™ is a trademark of Tristar Advanced Software, LLC.