Astrel™ Polyphonic Synthesizer documentation
Welcome to Astrel™
Astrel™ is a five-voice, analog-style polyphonic synthesizer. It has two oscillators per voice, a filter that morphs from low-pass to high-pass, two envelopes, two LFOs, a 16-slot modulation matrix, an arpeggiator, a 64-step chord sequencer and built-in effects.
You can use Astrel in two ways:
As a plug-in instrument in your DAW (digital audio workstation): VST®3 on macOS, Windows and Linux, Audio Unit (AU) on macOS, and AAX for Pro Tools on macOS and Windows.
As a standalone app, with your own audio interface and MIDI keyboard, or the on-screen keyboard. You don't need a DAW for this.
All of them use the same sound engine and the same editor, so presets, sounds and everything in this guide apply to each.
How this guide is organized
This guide covers installing and activating Astrel, the standalone app, the Audio Unit, the AAX plug-in for Pro Tools and presets. If you're new to synthesizers, read The editor, Quick start and Your first sounds first: they walk you from an empty sound to a bass, a pad, a lead and a pluck, one knob at a time.
The guide then goes through each section of the synth in signal-flow order: oscillators, mixer, filter, envelopes, LFOs and the modulation matrix. After that come the performance controls, the arpeggiator, the sequencer, the effects and MIDI. Each section explains what the section is for, what every control does and what you'll hear, gives some practical tips, and ends with a short Try this exercise you can follow from the Init preset. Sound design recipes near the end puts everything together.
New to synthesizer words like cutoff, resonance or LFO? Terms are linked to our synthesizer glossary the first time each section uses them, so you can look them up as you go.
Installing
System requirements
macOS: Apple silicon or Intel (one universal installer).
Windows: 64-bit.
Linux: 64-bit x86_64. There's a .deb package for Debian, Ubuntu and their relatives, and a .tar.gz for other distributions.
To use Astrel as a plug-in, you need a VST3 host (macOS, Windows or Linux), an Audio Unit host (macOS), such as Logic Pro or GarageBand, or Pro Tools (AAX, macOS and Windows). The standalone app needs nothing else.
Download the installer for your system from the Astrel product page on our website (you need to be signed in, with a license). Each installer installs the standalone app and the plug-in formats for your system: VST3, Audio Unit and AAX on macOS, VST3 and AAX on Windows, and VST3 on Linux. The macOS and Windows installers show the license agreement, which you must accept. Astrel is installed for all users of the computer.
macOS
Open the .pkg file and follow the steps.
The app goes in Applications/Astrel, the VST3 plug-in in /Library/Audio/Plug-Ins/VST3, the Audio Unit in /Library/Audio/Plug-Ins/Components, and the AAX plug-in in /Library/Application Support/Avid/Audio/Plug-Ins.
Windows
Run the setup .exe and follow the steps.
The app goes in C:\Program Files\Tristar Advanced Software\Astrel (you can change this), the VST3 plug-in in C:\Program Files\Common Files\VST3, and the AAX plug-in in C:\Program Files\Common Files\Avid\Audio\Plug-Ins.
A Start menu shortcut opens the standalone app.
Linux
Debian, Ubuntu and similar: run sudo apt install ./Astrel-…-setup-linux-x64.deb, which also installs anything Astrel needs. The app goes in /opt/tristar-advanced-software/astrel, the plug-in in /usr/lib/vst3, and astrel starts the app.
Other distributions: unpack the .tar.gz and run sudo ./install.sh. The app goes in /opt/tristar-advanced-software/astrel and the plug-in in /usr/local/lib/vst3. The app also runs straight from the unpacked folder.
Installing on Linux means you agree to the license agreement, which is included with the package.
Updating
When a new version is out, an UPDATE button with the new version number appears beside the Astrel title in the editor. It opens the version's download page. Run the new installer over the old one: it replaces the installed version, and your presets and settings stay.
The installers never replace a newer version with an older one.
If you installed an earlier version just for yourself, the new installer replaces that copy with one for all users. Your presets, settings and activation stay.
Uninstalling
Deactivate Astrel first (see Activating your license). Uninstalling doesn't free your license's seat on this computer by itself.
macOS: run Uninstall Astrel in Applications/Astrel.
Windows: use Settings > Apps, as for any app.
Linux: run sudo apt remove astrel. If you installed from the .tar.gz, run sudo sh uninstall.sh in the install folder.
Uninstalling removes the app, the plug-ins (every format), the activation and the standalone app's settings. Your user presets are kept.
Activating your license
Astrel is activated per computer with a license key. You can find your keys on the My licenses page of your account.
Open Astrel, in your DAW or as the standalone app.
Click UNREGISTERED: ACTIVATE under the Astrel logo. This opens the license dialog.
Enter your license key in the LICENSE KEY field (PASTE pastes it from the clipboard), and click ACTIVATE. This needs an internet connection.
Once Astrel is activated, the line under the logo shows "5-Voice Analog Poly" and the version number instead. Click it to open the license dialog again, for example to see who the license belongs to, to go to your account with YOUR ACCOUNT, or to deactivate this computer.
Seats
A license can be active on two computers at a time.
You can make up to five new activations in any 12 months. Activating a computer that already holds a seat, for example after reinstalling the operating system, reuses its seat and doesn't count.
Replacing a disk or graphics card doesn't affect activation. Replacing the motherboard (logic board on a Mac) does, and so does reinstalling Linux.
Working offline
After activation, Astrel checks its license on your computer, without going online. It renews the activation in the background whenever it's online, and it keeps working for 30 days without a connection.
Moving to another computer
To free a seat, click DEACTIVATE THIS COMPUTER in the license dialog, then CONFIRM: DEACTIVATE. If you can no longer use a computer (it was lost, stolen or wiped), free its seat from the My licenses page of your account instead.
Demo mode
Until it's activated, Astrel runs as a demo. It inserts one second of silence once a minute, or every 10 seconds when your DAW renders offline. Nothing else is limited, so projects and presets you make in the demo keep working once you activate.
The editor
Astrel's editor looks like the front panel of a hardware synthesizer. Everything you need to make a sound is on one page, grouped into labeled sections.
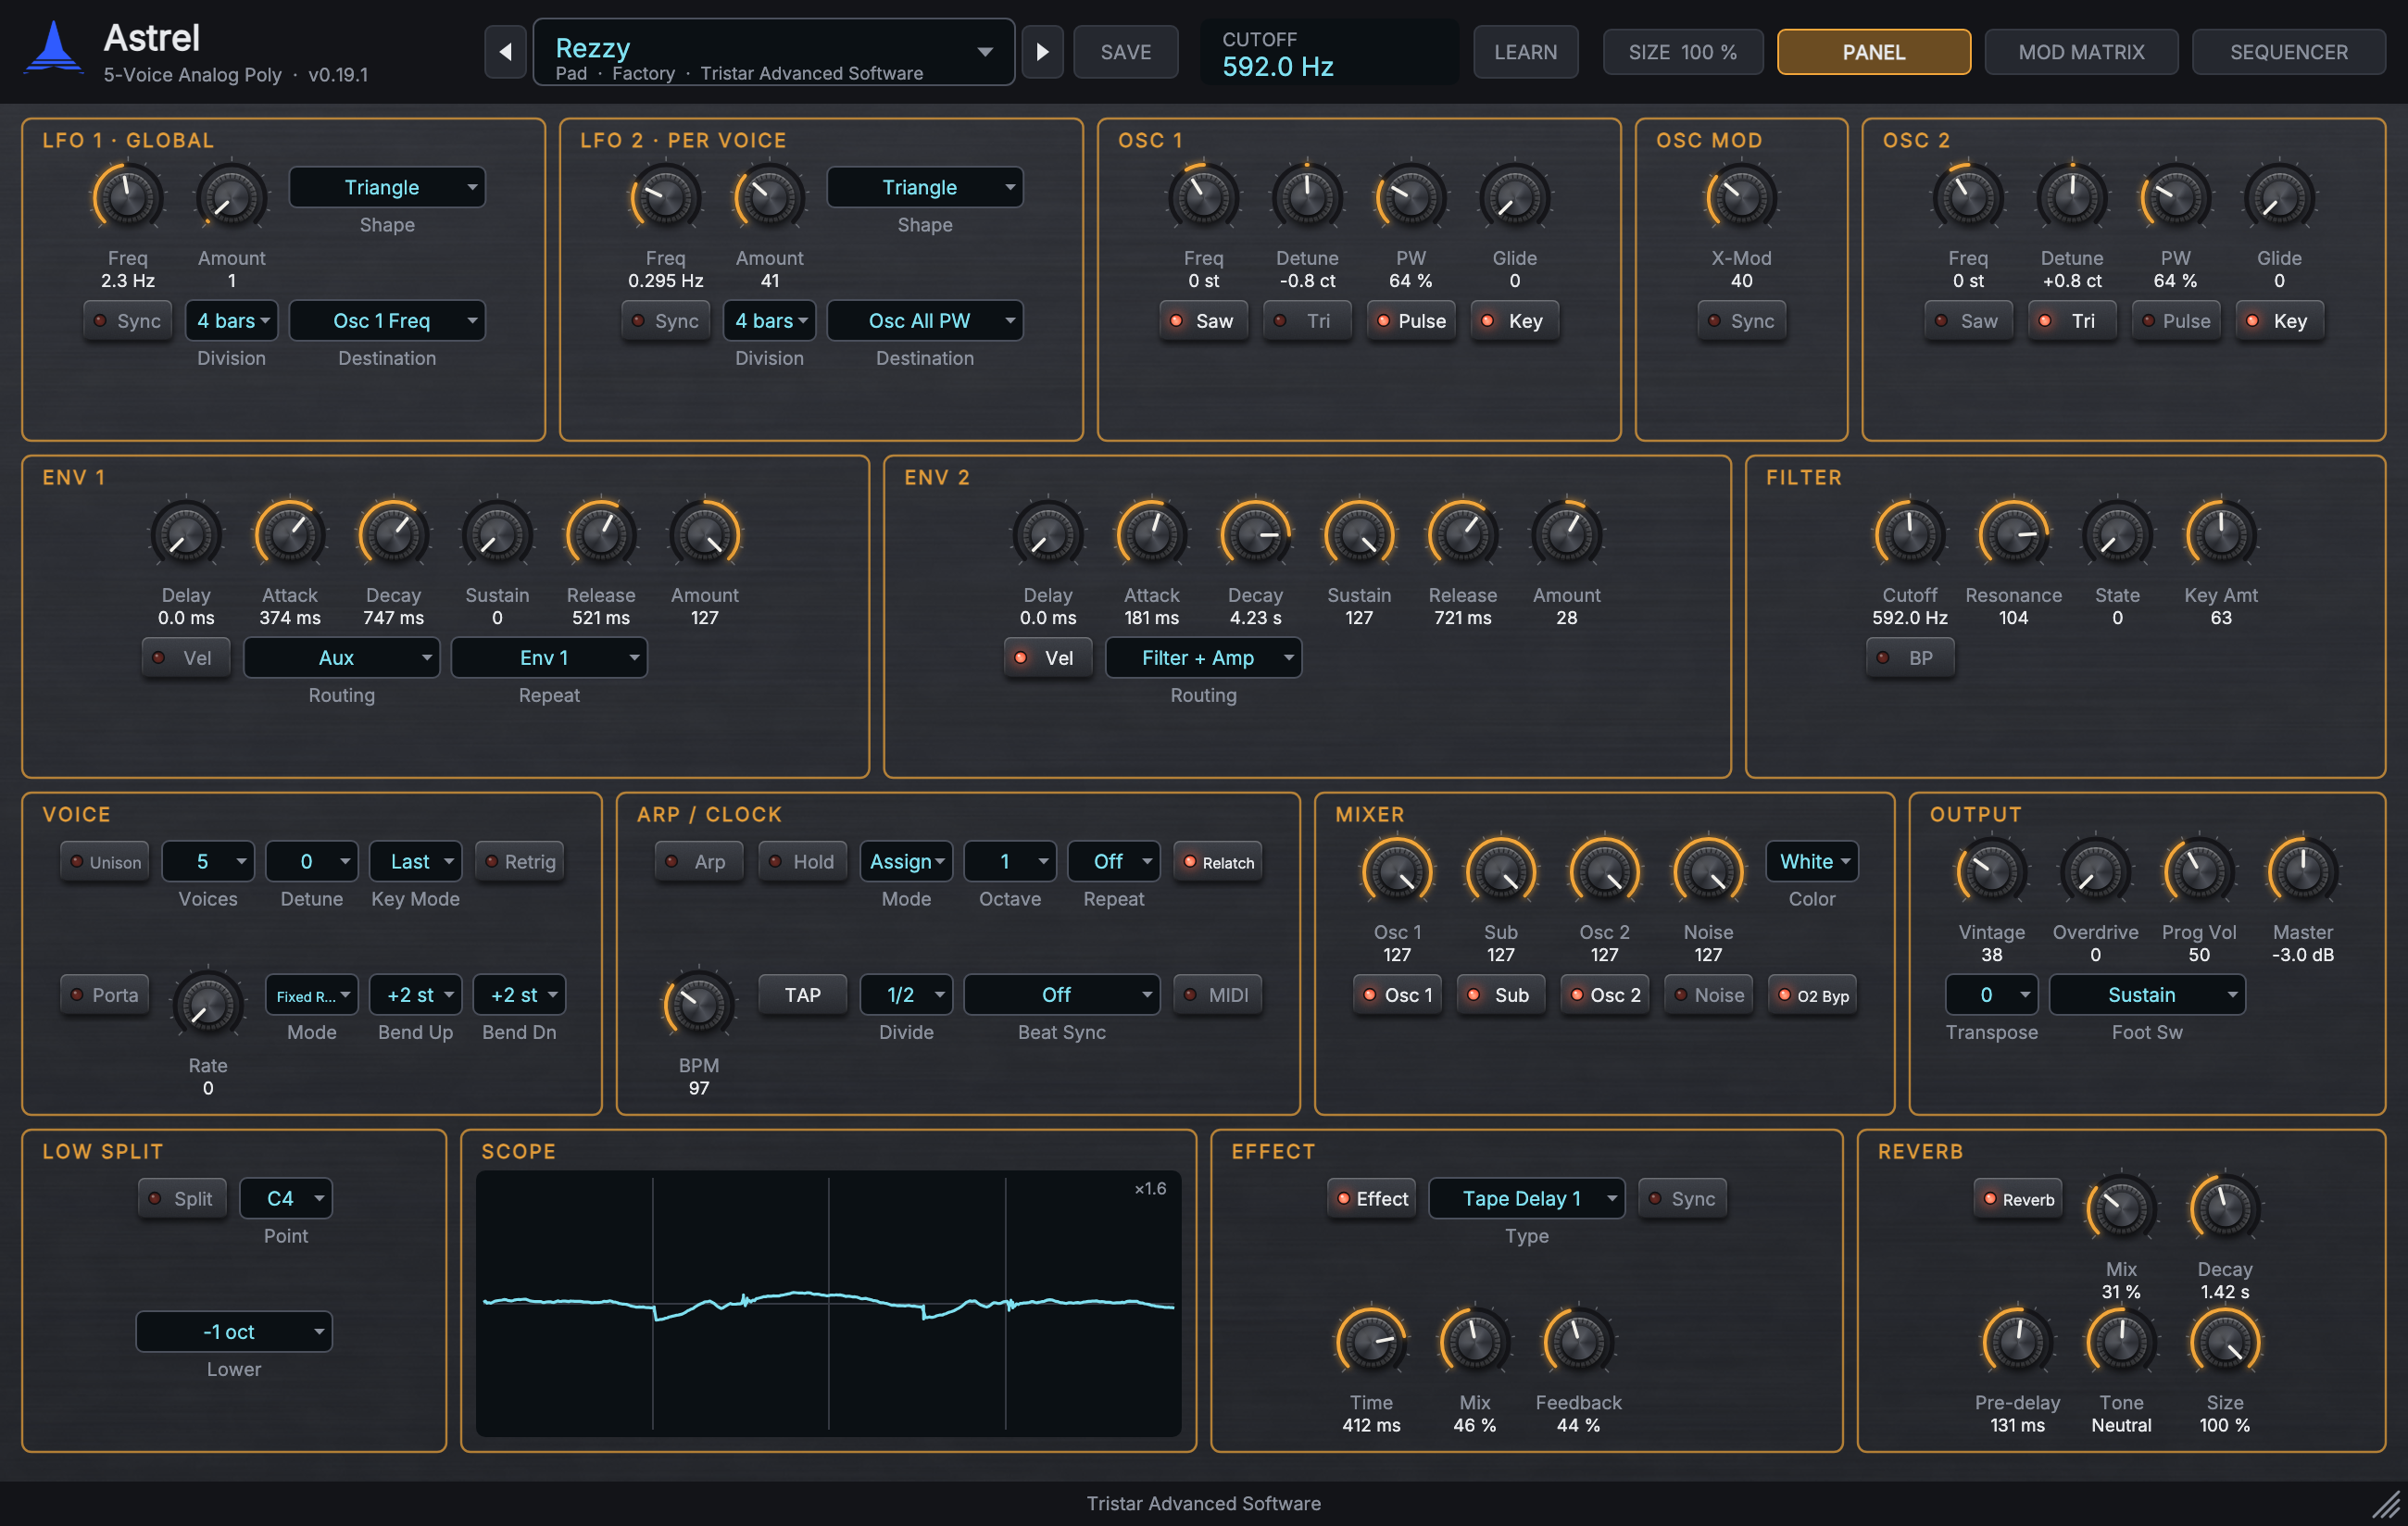
The header

Along the top, from left to right:
The title, with the version number under it (or UNREGISTERED: ACTIVATE, until you activate). When an update is available, an UPDATE button appears here too.
The preset bar: the current preset's name, category and author. Click the name to open the preset browser, and use ◀ and ▶ to step through presets. SAVE saves the current sound as a preset of your own (see Presets).
The display shows the name and exact value of the control under your mouse, or the one you're moving. It's the easiest way to set a knob to a value this guide gives you: hover over the knob and watch the display as you turn it.
LEARN starts MIDI Learn, for assigning knobs on your MIDI controller to Astrel's controls (see MIDI Learn).
SIZE sets the editor's size: 75%, 100%, 125%, 150% or 200%. Scrolling over it steps through the sizes. You can also drag the grip in the editor's bottom-right corner; the editor keeps its shape.
The page tabs: PANEL (the synth itself), MOD MATRIX (the 16 modulation slots) and SEQUENCER (the step sequencer).
The PANEL page
The PANEL page has the synth's sections, in four rows:
Top row: LFO 1 · GLOBAL, LFO 2 · PER VOICE, OSC 1, OSC MOD and OSC 2.
Second row: ENV 1, ENV 2, FILTER and HPF/LPF.
Third row: VOICE, ARP / CLOCK, MIXER and OUTPUT.
Bottom row: LOW SPLIT, SCOPE, EFFECT and REVERB.
The SCOPE has no controls: it draws the sound Astrel is making as a waveform, so you can see what a knob does as well as hear it. Try it while you turn the filter's Cutoff or an oscillator's PW knob.
Using the controls
Knobs: drag up to turn a knob up and down to turn it down, or scroll over it. Double-click a knob to put it back to its default value.
Buttons (with a light) switch something on and off. The light is lit when it's on.
Selectors (the dark boxes with an arrow) choose from a list. Click one to open its list and click an option, or drag up and down over it, or scroll, to step through the options. While a list is open, the arrow keys, Enter and Esc work too.
Mod matrix amounts are sliders: drag left or right, and double-click to reset.
Every knob shows its value underneath it in real units where it has them: Hz for frequencies, ms or s for times, st (semitones) and ct (cents) for pitch, % for pulse widths and effect mixes. Other knobs go from 0 to 127, the range of a MIDI controller. Bipolar knobs, such as the envelopes' Amount, go from −127 to +127, with 0 in the middle.
The Init preset
The Init preset is Astrel's blank page: one sawtooth oscillator, no modulation, no effects. Every Try this exercise and recipe in this guide starts from it, so you always know exactly what you're starting from.
To load it, click the preset name in the header to open the browser, click INIT at the bottom of the categories on the left, and click Init. Or type init in the search field. It's the first preset in the factory bank.
A new copy of Astrel that you add to a track starts as Init too.
Double-clicking a knob resets it to its Init value.
One thing to know about Init's filter. In Init, the filter's State knob is at 50, partway from low-pass toward high-pass, and Cutoff is at its lowest, 20 Hz. Together they let almost the whole sound through, so Init sounds bright and buzzy. To make the filter do the classic "warm, closing" low-pass sound, turn Cutoff up first, then turn State to 0. (If you turn State to 0 first, with Cutoff still at 20 Hz, you'll hear almost nothing, because a low-pass filter set to 20 Hz lets almost nothing through.) Most exercises below begin this way.
Two more things that surprise people in Init: it doesn't respond to how hard you play until you turn on an envelope's Vel button, and Porta (glide) does nothing until you turn up the oscillators' Glide knobs. Both are explained in their sections.
Quick start
In your DAW
Rescan your plug-ins if your DAW doesn't find Astrel on its own. It's listed under Tristar Advanced Software.
Add Astrel to an instrument track, and open its editor. On macOS, choose either the VST3 or the Audio Unit version if your DAW offers both. In Logic Pro and GarageBand, it's under AU Instruments > Tristar Advanced Software > Astrel. In Pro Tools, insert it on an instrument track. It's in the Instrument category of the insert menu.
Click the preset name in the header to browse the factory sounds, or step through them with ◀ and ▶.
Play. To start a sound from scratch, load the Init preset.
As the standalone app
Open Astrel from your Applications folder, the Start menu or your app launcher.
Open Settings (from the status line, or press Cmd+, on macOS or Ctrl+, elsewhere). Choose your audio output, and tick your MIDI keyboard.
Play your keyboard, or click the on-screen keyboard.
Exploring the factory sounds
Before you make your own sounds, spend a few minutes with the factory bank. Step through it with ◀ and ▶ and play each one. When you find one you like, look at the PANEL and MOD MATRIX pages to see how it's made: which oscillators are on, where the filter sits, how long the envelopes are. Changing one knob at a time on a factory preset is one of the best ways to learn what the controls do. You can't break anything: reloading the preset brings it back.
The Arp and Seq categories play patterns: hold a key or a chord to hear them.
Your first sounds
These four walkthroughs build a sound from Init, step by step. Do them in order if you can: each one introduces a few new controls. Set each knob by hovering over it and watching the display in the header. The values don't have to be exact: get close, then trust your ears.
When you like what you've made, click SAVE to keep it (see Saving your own).
A punchy bass
A bass usually plays one note at a time, has a quick, bright "bite" at the start of each note and settles to a rounder tone.
Load Init.
Make it play one note at a time. In VOICE, turn on Unison and set Voices to 1. Astrel is now monophonic: holding two keys plays only the last one you pressed (Key Mode is Last).
Add weight. In MIXER, turn on Sub and set its level to about 100. The sub-oscillator adds a square wave an octave below.
Darken it. In FILTER, set Cutoff to about 150 Hz, then State to 0. Set Resonance to about 50 and Key Amt to about 40. Play some low notes: you'll hear a dull, round thud.
Add the bite. In ENV 1, set Decay to about 250 ms, Sustain to 0 and Amount to about 50. Each note now starts bright and closes quickly: that's the envelope opening and closing the filter.
Make it respond to your playing. Turn on ENV 1's Vel and ENV 2's Vel. Play soft and hard: harder notes are louder and brighter.
Shape the volume. In ENV 2, set Decay to about 400 ms, Sustain to about 100 and Release to about 60 ms, so notes stop cleanly when you let go.
Add some grit. In OUTPUT, set Overdrive to about 40.
What you should hear: a tight, round bass with a short, bright "dow" at the start of every note, louder and brighter the harder you play.
Going further: for a slide between notes, turn on Porta in VOICE, set its Rate to about 30 and its Mode to Fixed Time A, and turn OSC 1's Glide up to 127. Now notes you play overlapping (legato) slide into each other, and notes you play detached don't.
A warm pad
A pad is a soft, sustained sound that fades in and out slowly, for chords in the background.
Load Init.
Two oscillators, slightly out of tune. In MIXER, turn on Osc 2. Set OSC 1's Detune to about −8 ct and OSC 2's Detune to about +8 ct. Hold a chord: the two oscillators drift against each other and the sound becomes wide and moving.
Soften it. In FILTER, set Cutoff to about 2.5 kHz, then State to 0, and Resonance to about 15.
Fade in and out. In ENV 2, set Attack to about 700 ms and Release to about 2 s. Chords now swell in and fade away after you let go.
Let the tone open slowly. In ENV 1, set Attack to about 1.4 s, Decay to about 2 s, Sustain to about 75, Release to about 2 s and Amount to about 15.
Analog character. In OUTPUT, set Vintage to about 50, so each voice is slightly different.
Stereo width. Open the MOD MATRIX page. Slot 2 already connects Voice Spread to Panning with an amount of 0. Drag its amount to about 90. Each of the five voices now sits in a different place across the stereo field.
Effects. Back on the PANEL page, in EFFECT, turn on Effect and set the Type to Chorus. In REVERB, turn on Reverb, set Mix to about 30% and Decay to about 3 s.
What you should hear: slow, wide chords that bloom in, shimmer gently and leave a long tail when you let go.
A singing lead
A lead plays the melody: one note at a time, thick enough to stand out, with glide between notes and vibrato you can bring in with the mod wheel.
Load Init.
A thick single note. In VOICE, turn on Unison, set Voices to 3 and Detune to 2. Every note now plays three slightly detuned voices at once.
An octave above. In MIXER, turn on Osc 2 and set its level to about 70. In OSC 2, turn Saw off and Pulse on, and set Freq to +12 st.
Tone. In FILTER, set Cutoff to about 2 kHz, then State to 0, and Resonance to about 35. In ENV 1, set Decay to about 600 ms, Sustain to about 40 and Amount to about 25, for a little brightness at the start of each phrase.
Glide. In VOICE, turn on Porta, set Rate to about 25 and Mode to Fixed Time A. Turn both oscillators' Glide knobs to 127. Play overlapping notes to slide between them.
Vibrato on the mod wheel. In LFO 1 · GLOBAL, set Destination to Osc All Detune and Freq to about 5.5 Hz. Leave its Amount at 0. In Init, mod matrix slot 1 already sends the Mod Wheel to LFO 1 Amt, so now pushing the mod wheel up brings in vibrato.
Echo. In EFFECT, turn on Effect, set Type to Delay, Time to about 375 ms, Mix to about 30% and Feedback to about 35%.
Edge. In OUTPUT, set Overdrive to about 30.
What you should hear: a fat, bright lead that slides between connected notes, with echoes trailing behind, and vibrato when you push the mod wheel.
A pluck
A pluck starts sharply and dies away on its own, like a plucked string, even while you hold the key.
Load Init.
Two oscillators. In MIXER, turn on Osc 2 and set its level to about 50. In OSC 2, set Freq to +12 st and Detune to about +4 ct.
Filter. Set Cutoff to about 300 Hz, then State to 0. Set Resonance to about 40 and Key Amt to about 64, so high notes stay bright.
The "pluck". In ENV 1, set Decay to about 250 ms, Sustain to 0, Amount to about 70, and turn on Vel.
Let it die away. In ENV 2, set Decay to about 600 ms, Sustain to 0 and Release to about 500 ms. Hold a key: the note fades out by itself.
Space. In REVERB, turn on Reverb and set Mix to about 20%.
What you should hear: a short, bright, plucked note that fades on its own, with a little room around it. Try it with the arpeggiator (see Arpeggiator and clock).
Using the Audio Unit (macOS)
On macOS, Astrel is also an Audio Unit (AUv2) instrument, for Logic Pro, GarageBand and other hosts that load Audio Units. The macOS installer installs it next to the VST3. It has the same sound engine, editor and factory bank as the VST3, so everything in this guide applies to it too.
Activation
Your license is activated per computer, not per format. Once you've activated Astrel in the Audio Unit, the VST3 and the standalone app are activated too, and the other way round.
Presets
The factory bank is the Audio Unit's list of factory presets, so you can also choose them from your host's preset menu.
Presets you save with SAVE in Astrel's editor go in the same folder as the VST3's (see Saving your own), so the VST3, the Audio Unit and the standalone app all share them.
Settings you save with your host's own preset menu (for example, Save As… in the plug-in window header in Logic Pro) belong to the host. They're listed in the host's menu, not in Astrel's preset browser.
Automation and tempo
Every sound control can be automated, and moving a knob in Astrel's editor records automation as usual. Pitch bend, the mod wheel and the other playing controls come from MIDI, as in the VST3. The clock follows your host's tempo and transport (see The clock).
MIDI Arp Notes
MIDI Arp Notes sends the arpeggiator's and sequencer's notes to your host, but only if the host accepts MIDI from instruments. Logic Pro and GarageBand don't, so the setting has no effect there.
VST3 and Audio Unit in the same DAW
If your DAW loads both formats, it treats them as two different plug-ins. A project made with one keeps using that one. To move a sound to the other format, save it as a preset with SAVE, then load it from Astrel's preset browser.
Using the AAX plug-in (Pro Tools)
On macOS and Windows, Astrel is also an AAX instrument for Pro Tools. The installer installs it next to the other formats. It has the same sound engine, editor and factory bank as the VST3, so everything in this guide applies to it too.
Activation
As with the Audio Unit, your license is activated per computer, not per format. Activating Astrel in Pro Tools also activates the other formats and the standalone app, and the other way round.
Presets
Choose factory presets and your own from Astrel's preset browser. The Pro Tools preset menu doesn't list the factory bank.
Presets you save with SAVE in Astrel's editor are shared with the VST3, the Audio Unit and the standalone app (see Saving your own).
Settings you save with the Pro Tools preset menu belong to Pro Tools. They're listed in its menu, not in Astrel's preset browser.
Automation and tempo
Every sound control can be automated in Pro Tools, and moving a knob in Astrel's editor records automation as usual. Pitch bend, the mod wheel and the other playing controls come from MIDI. The clock follows the tempo and transport in Pro Tools (see The clock).
Pro Tools can't resize plug-in windows by dragging, so use Astrel's SIZE button to make the editor larger or smaller.
MIDI Arp Notes
The AAX plug-in doesn't send MIDI to Pro Tools, so MIDI Arp Notes has no effect there.
The standalone app
The standalone app is a small host that loads the same Astrel plug-in, so it sounds and behaves exactly as it does in a DAW. It's handy for practicing, designing sounds and quick ideas, without opening a project.
The window
The window has three parts:
the Astrel editor;
a status line, showing the sample rate, buffer size, tempo and recording time;
an on-screen keyboard.
Drag the window's edge to resize it, from 50% to 200%. Everything scales together, and the app remembers the size.
The on-screen keyboard
Click a key to play it. Clicking higher up on a key plays it more softly.
Drag across the keys to glide from note to note.
Notes you play on a MIDI keyboard light up too.
The keyboard spans five octaves, C2 to C7 at first.
To shift it by up to two octaves either way, use ◀ and ▶ in the status line, or Keyboard > Octave Down/Up (Cmd/Ctrl+[ and Cmd/Ctrl+]).
Click the range shown in the status line to reset it.
Settings
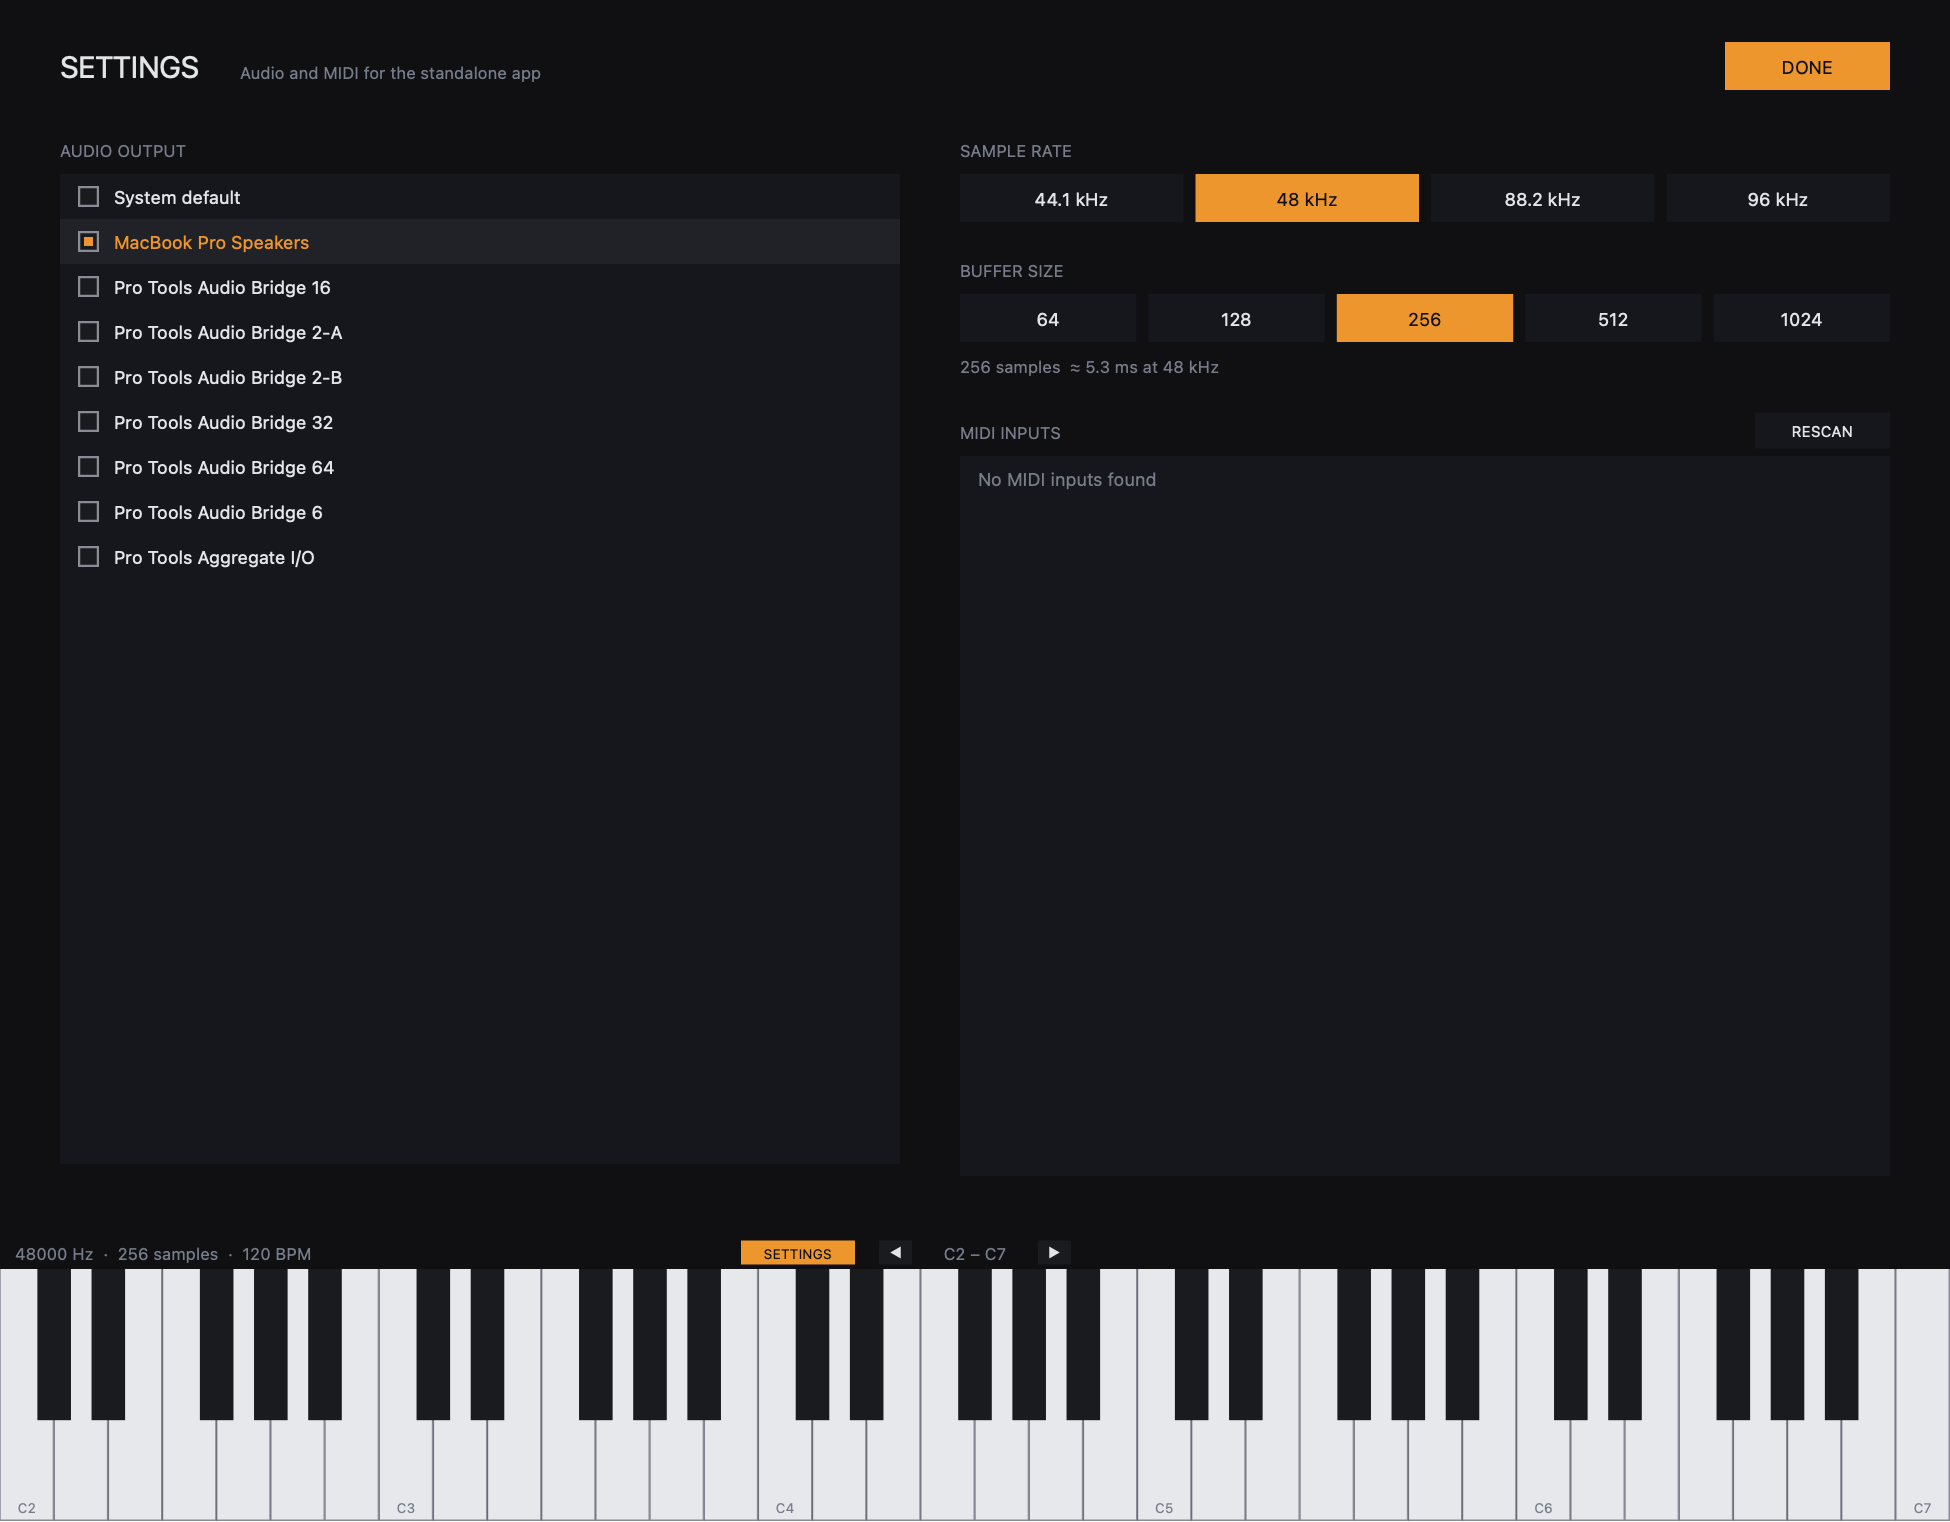
Open the settings page in any of these ways:
choose File > Settings… (on macOS, Astrel > Settings…);
press Cmd+, on macOS, or Ctrl+, elsewhere;
click SETTINGS in the status line.
The page replaces the editor in the same window, and the keyboard stays playable. Changes apply at once and are remembered. Click DONE to go back to the editor.
Driver (Windows): WASAPI, Windows' own audio, or ASIO®, the driver your audio interface's maker supplies, for the lowest latency. With ASIO, CONTROL PANEL opens the driver's own settings; if you change its buffer size there, the app picks the change up.
Audio output: System default (follows your system's choice), or a specific device. With ASIO, the list shows your ASIO drivers.
Outputs: for a device with more than two outputs, the pair Astrel plays through (for example outputs 3 + 4 of an audio interface). The other outputs stay silent.
Sample rate: 44.1, 48, 88.2 or 96 kHz.
Buffer size: 64 to 1024 samples, with the latency each gives. Smaller buffers respond faster but need more processing power. Choose a larger one if you hear clicks. With ASIO, the sizes are the ones your driver allows; many drivers set it only in their control panel.
MIDI inputs: a checkbox for each input. All are on the first time you open the app. If you connect a device later, click RESCAN.
A good starting point is 48 kHz and a buffer of 256 samples. If you play live and the sound feels late, try 128; if you hear clicks or crackles, go back up.
ASIO is a registered trademark of Steinberg Media Technologies GmbH.
Tempo
In the standalone app there's no DAW to set the tempo, so the BPM knob and TAP in ARP / CLOCK set it (see The clock). The status line shows it.
Recording
Choose File > Record to WAV… to record what you play to a 24-bit WAV file, and File > Stop Recording when you're done. The status line shows the recording time.
When you reopen the app
The app restores your settings and the last sound you played. Sustain, pitch bend and pressure are reset, so no notes come back stuck on.
Presets
A preset is a saved sound: the position of every knob, button and selector, plus the step sequence. Astrel comes with a factory bank of presets, and you can save as many of your own as you like.
Browsing
The header's preset bar shows the current preset. Use ◀ and ▶ to step through the presets in the browser's list, in the order it shows them. An asterisk (*) after the name means you've changed the sound since loading it.
Click the preset name to open the browser. It has three columns:
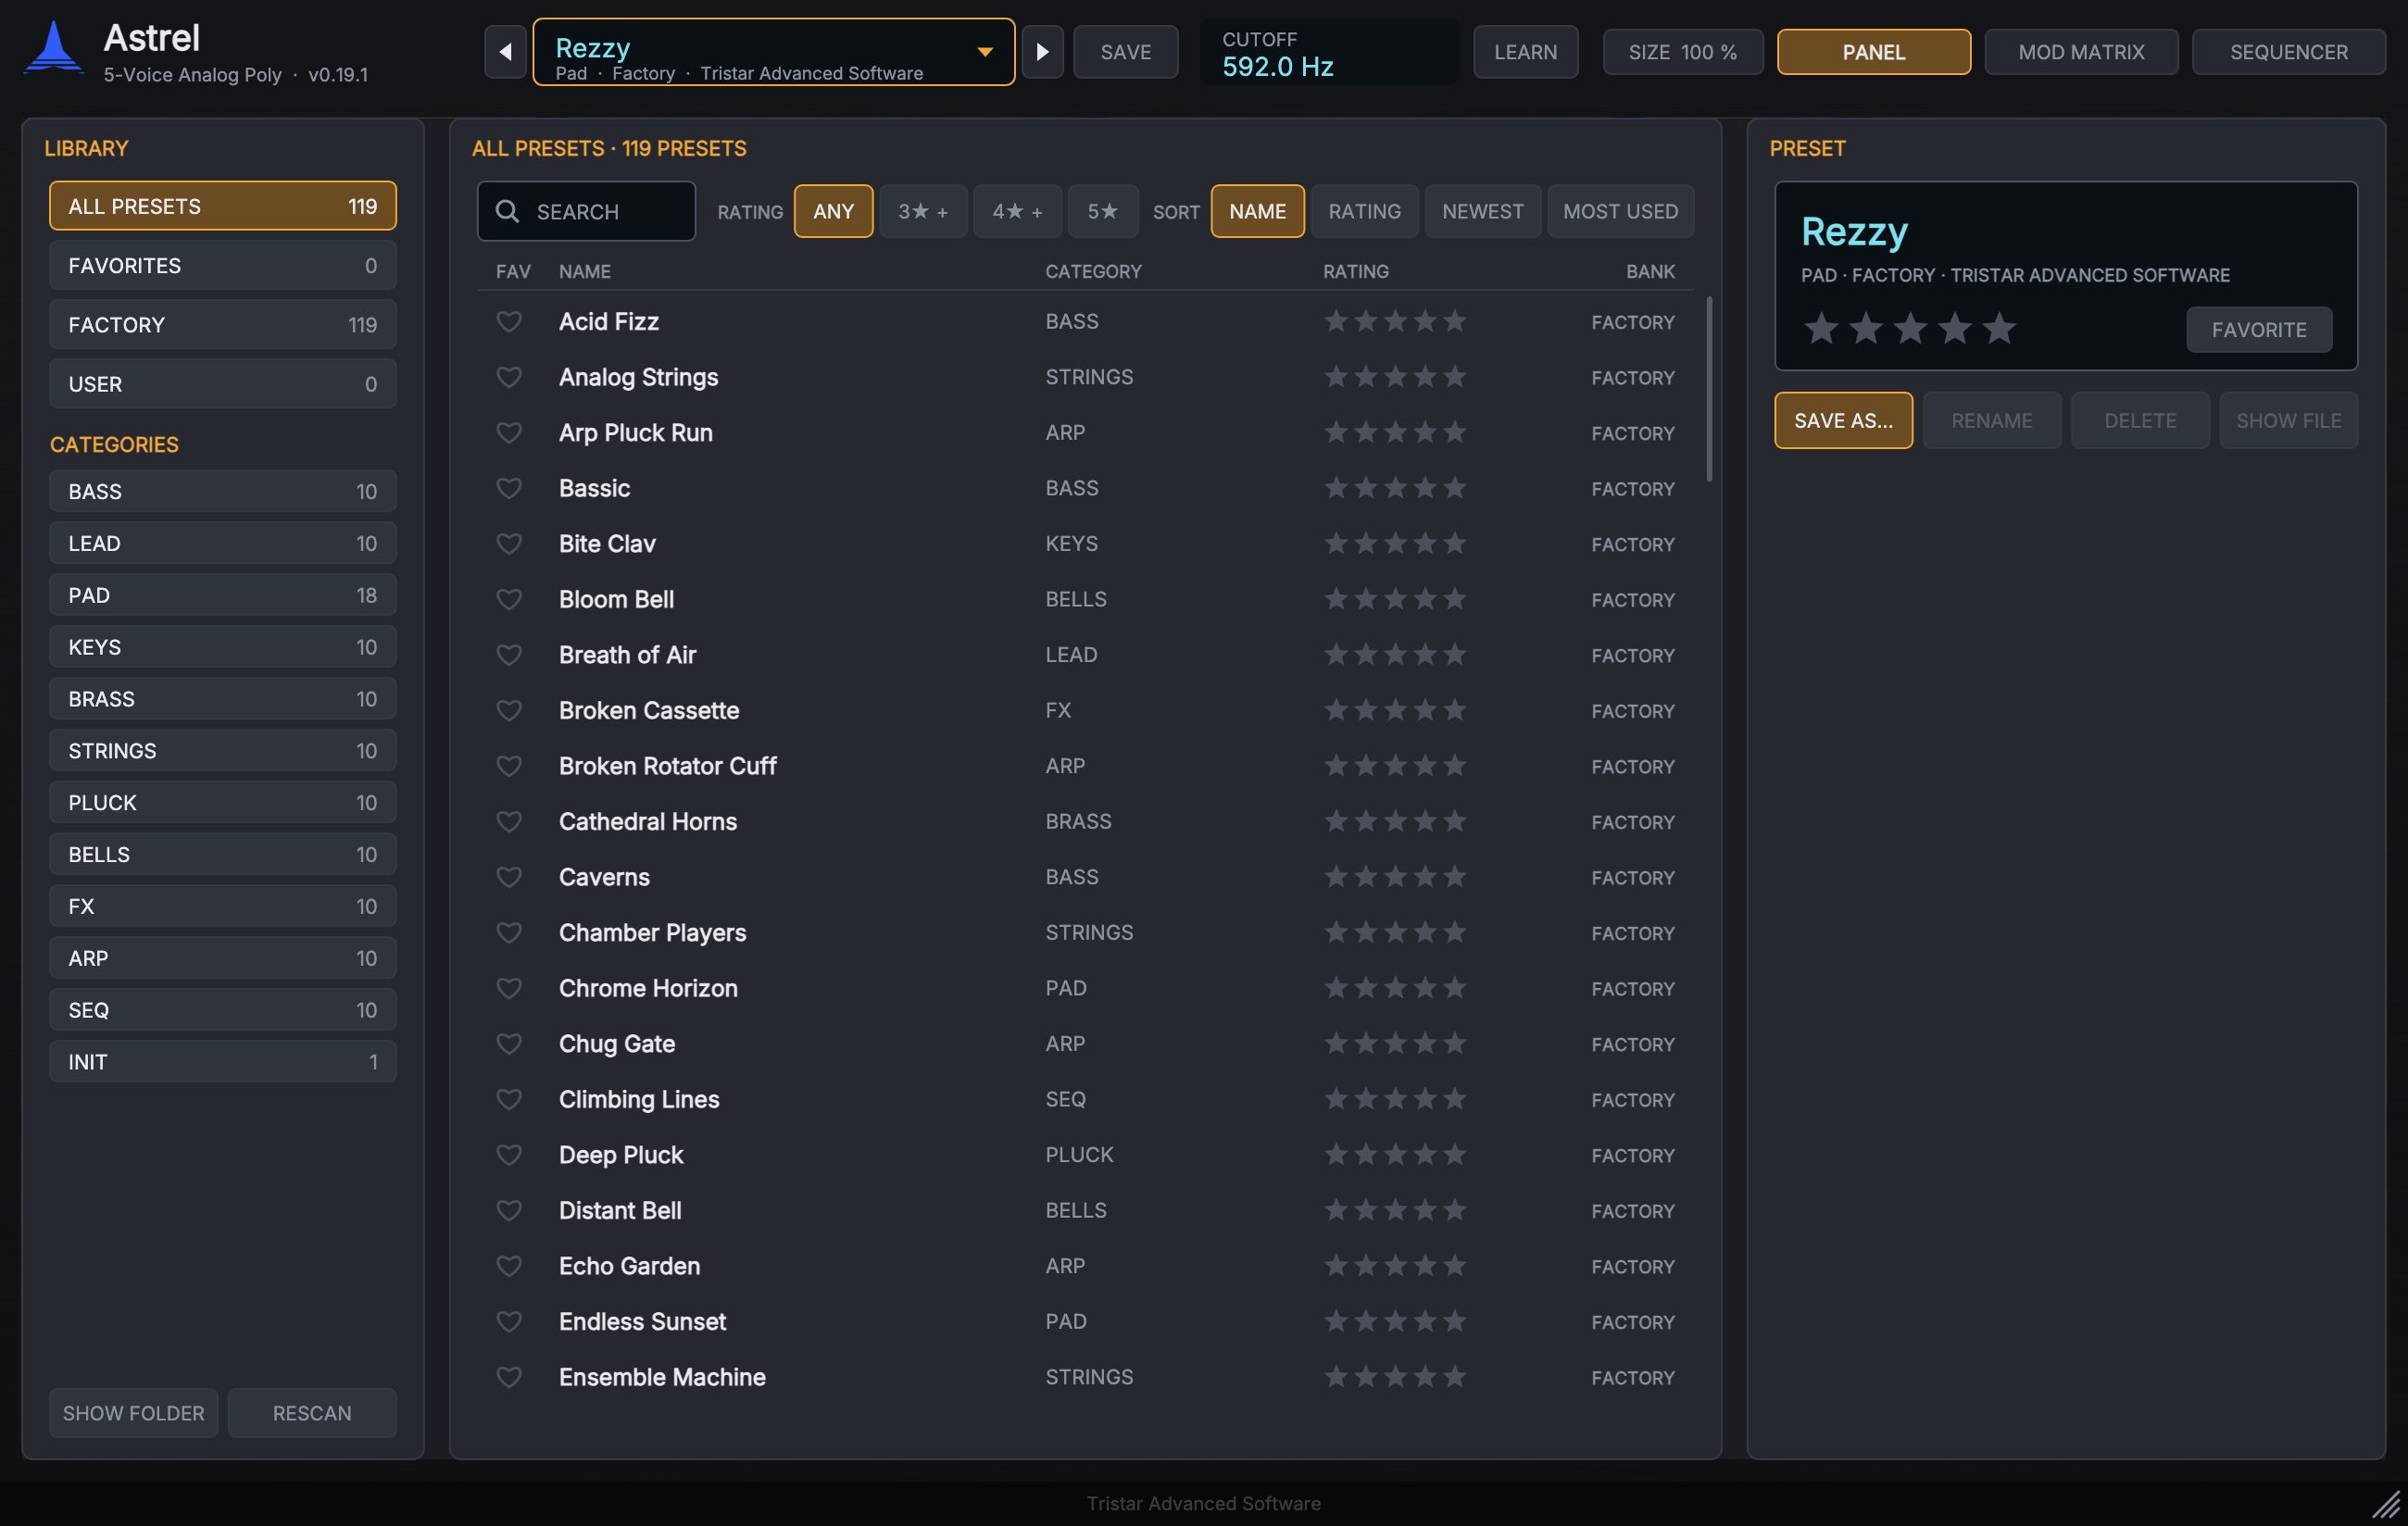
Library (left): all presets, your favorites, the factory presets or your own; and the categories, each with how many presets it holds. Click a category again to show them all. SHOW FOLDER opens your preset folder, and RESCAN reads it again, for example after you've copied presets in.
The list (middle): search by name, category, author or tag; show only presets you've rated 3, 4 or 5 stars; and sort by name, rating, newest or most used. Click a preset to load it. Click its heart to make it a favorite.
The preset (right): the loaded preset, with its category and author, and its description and tags when it has them. Click the stars to rate it, and FAVORITE to mark it. SAVE AS… saves the current sound; RENAME, DELETE (click it, then CONFIRM) and SHOW FILE work on your own presets.
When the browser opens, you can type straight away: your typing goes to the search field. Press Esc to clear the search, press it again or click outside the browser to close it.
Your ratings and favorites are yours: they're kept on your computer, for factory presets as well as your own, and they stay with a preset if you rename it.
The factory bank
Astrel comes with an original bank of 305 presets in eleven categories: basses, leads, pads, keys, brass, strings, plucks, bells, sound effects, arpeggios and sequences. The presets are level-matched, so they play at similar volumes.
The factory bank is also your DAW's program list for Astrel (the factory presets of the Audio Unit), so you can choose presets with MIDI program change messages. New factory presets are always added at the end, so the program numbers in your projects keep their sounds after an update.
Many factory presets use the mod wheel, pressure (aftertouch) or velocity. If a preset seems to do less than its name suggests, try moving the mod wheel, pressing harder on the keys, or look at its MOD MATRIX page to see what it responds to.
Saving your own
Click SAVE to save the current sound. You can give it a name, author, category, tags and a description. If a preset with that name already exists, Astrel asks before overwriting it.
Tags and a short description make your presets easier to find later: for example tags like "mono" or "glide", and a description that says how to play it ("push the mod wheel for vibrato").
User presets are standard VST3 preset files, so VST3 hosts list them too. The VST3, the Audio Unit, the AAX plug-in and the standalone app all use the same presets. They're kept in:
macOS: ~/Library/Audio/Presets/Tristar Advanced Software/Astrel/
Windows: Documents\VST3 Presets\Tristar Advanced Software\Astrel\
Linux: ~/.vst3/presets/Tristar Advanced Software/Astrel/
To share a preset, copy its file to the same folder on another computer, then click RESCAN in the browser.
If saving a preset on macOS says you don't have permission to write in ~/Library/Audio/Presets, another company's installer has made that folder the administrator's. To take it back, open Terminal, run this command and enter your password:
sudo chown $USER ~/Library/Audio/Presets
What a preset contains
A preset saves every sound setting and the step sequence. It doesn't save how you're playing: pitch bend, mod wheel, pressure, breath, foot and expression controllers, and the sustain pedal. Loading a preset leaves those as they are.
A few settings belong to your project (or the standalone app) rather than to presets, so loading a preset doesn't change them: Foot Sw, Beat Sync and MIDI (MIDI Arp Notes). See Global settings.
Your DAW project saves everything, including which preset is loaded and any changes you've made since.
Try this: save a variation
Load the factory preset you like best.
Change one thing: for example, turn the filter's Cutoff down, or the reverb's Mix up.
Notice the asterisk (*) after the name in the preset bar.
Click SAVE, give it a new name, your name as the author and a category, and save.
Open the browser and choose your own presets in the Library column: your variation is there, and the factory preset is unchanged.
How Astrel™ makes sound
Astrel is a subtractive synthesizer, like the classic analog polysynths. The idea is simple: start with a sound rich in harmonics (a buzzy oscillator), take some of it away with a filter, and shape the result over time with envelopes. Almost everything else is about making those three things move.
Astrel has five voices, so it can play up to five notes at once. Each voice runs the same chain:
Oscillators: two oscillators, a sub-oscillator one octave below Osc 1, and noise.
Mixer: sets the level of each source.
Filter: a 2-pole (12 dB per octave) filter that shapes the tone.
Amplifier: shapes each note's volume over time.
Overdrive: adds analog-style grit to each voice.
The voices are then mixed in stereo, and pass through Effect 1 and the plate reverb.
Two envelopes, two LFOs and the modulation matrix move almost every control over time. The arpeggiator and the step sequencer play notes for you, and the sequencer can also be a modulation source.
A useful way to think about it: the oscillators decide what kind of sound it is (buzzy, hollow, soft), the filter decides how bright it is, the envelopes decide how it changes while a note plays, and the LFOs and the matrix add movement and let your playing control the sound.
Oscillators
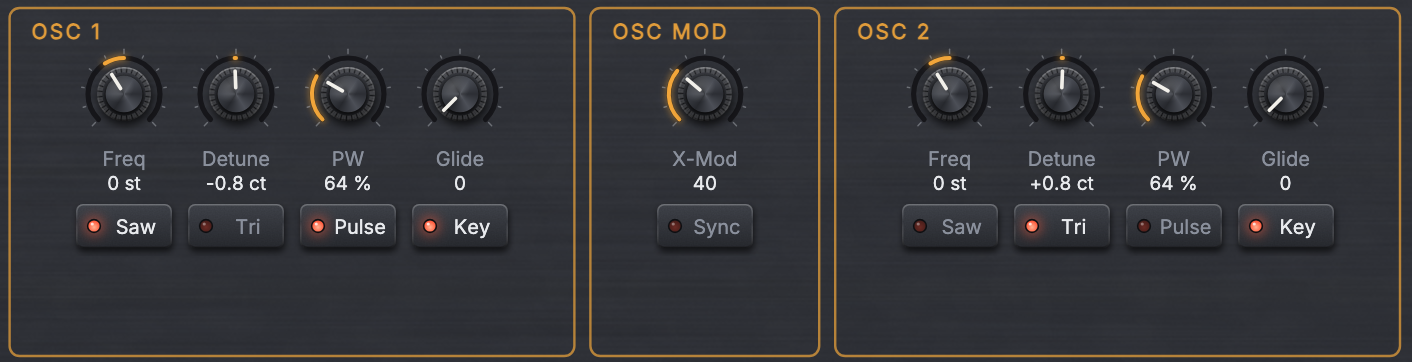
An oscillator makes the raw tone that everything else shapes. Each voice has two analog-style oscillators, Osc 1 and Osc 2. They're carefully band-limited, so they stay clean even at extreme pitches and with sync and FM.
Use two oscillators to thicken a sound (by detuning them slightly), to add an octave or a fifth above, or to make one oscillator modulate the other (with Sync and X-Mod).
The controls
OSC 1 and OSC 2 have the same controls:
Freq: the oscillator's pitch, −24 to +39 semitones, in semitone steps (0 st at first). +12 is an octave up, +7 a fifth up, −12 an octave down.
Detune: fine-tuning, ±49 cents (about half a semitone). A few cents between two oscillators make them slowly "beat" against each other, which sounds warm and wide. Larger amounts sound out of tune, sometimes usefully so.
Saw, Tri and Pulse: the waveform. Each switches on and off separately, and any combination plays at once. In Init, only Saw is on.
Saw (sawtooth) is bright and buzzy, with every harmonic. It's the classic sound for basses, brass, strings and leads.
Tri (triangle) is soft and pure, close to a flute or a whistle.
Pulse is hollow and reedy at 50% (a square wave), and gets thinner and more nasal as its width grows.
PW: the pulse width, from 50% (a square wave) to 100%. It only affects the Pulse waveform. The sound thins as the width grows, and 100% is silent. This makes pulse width modulation very expressive.
Glide: scales the portamento for each oscillator, from 0 to 127 (see Voice and performance). It's 0 in Init, so turn it up when you want an oscillator to glide.
Key: key tracking for each oscillator, on at first. Turn it off for a fixed pitch whatever key you play, useful for drones and effects.
Sync and X-Mod
The OSC MOD section between the two oscillators makes Osc 2 shape Osc 1.
Sync (Sync 2-1): hard sync. Osc 2 restarts Osc 1's waveform every cycle, so Osc 1 plays at Osc 2's pitch and changing Osc 1's Freq changes its tone instead of its pitch. Sweep Osc 1's frequency for classic sync leads, with their tearing, vocal sound.
X-Mod: through-zero FM from Osc 2's triangle to Osc 1's frequency, 0 to 127. It gives bells, metallic tones and growls. The effect is subtle in the lower half of the knob and grows quickly toward the top. You can also move it with the matrix destination X-Mod Level.
Osc 2 keeps running when it's off in the mixer, so it still drives Sync and X-Mod. Turning Osc 2 off in the mixer is the usual way to hear only the synced or modulated Osc 1.
Osc 2 filter bypass
Osc 2 Filter Bypass (the O2 Byp button in MIXER) sends Osc 2 straight to the amplifier, past the filter. This lets you keep a bright layer while you filter the rest.
Tips
For thickness, detune the two oscillators in opposite directions by the same amount, for example −7 ct and +7 ct, rather than detuning one of them.
Osc 2 at +12 or +19 st (an octave, or an octave and a fifth) adds brightness without sounding like a second note. +7 st gives a "power chord" fifth.
Saw and Pulse together in one oscillator give a thick, slightly hollow saw.
For pulse width modulation, set PW to about 65–75% and let an LFO move it (see LFOs).
X-Mod is most bell-like when Osc 2's Freq isn't a whole number of octaves from Osc 1's, for example +17 or +19 st.
Try this: two oscillators
Load Init and hold a note around middle C. You hear one bright sawtooth.
In MIXER, turn on Osc 2. The sound gets louder but not much richer: both oscillators play exactly the same thing.
Set OSC 2's Detune to about +10 ct. The sound starts to swirl and widen as the two oscillators drift in and out of phase.
Set OSC 2's Freq to +7 st. Now you hear a fifth: an instant "power chord".
In OSC 1, turn off Saw and turn on Pulse. Turn PW slowly from 50% toward 100% and listen to the tone go from hollow to thin and nasal, then fade out.
Try this: a sync sweep
Load Init.
In OSC MOD, turn on Sync.
Hold a note and slowly turn OSC 1's Freq up from 0 st to about +24 st.
What you should hear: the pitch stays the same while the tone changes dramatically, with a hard, vocal "tearing" sound at each step. That's hard sync. To sweep it smoothly, use an envelope or the mod wheel (see Sound design recipes).
Try this: X-Mod bells
Load Init. In OSC 1, turn Saw off and Tri on.
In OSC 2, set Freq to +19 st. Leave Osc 2 off in the mixer.
In FILTER, turn Cutoff all the way up, then State to 0, so the filter is fully open.
Turn X-Mod up slowly to about 70 while you play.
In ENV 2, set Decay to about 1.5 s, Sustain to 0 and Release to about 1.5 s.
What you should hear: a metallic, ringing bell tone that fades away. Try other Osc 2 Freq values: each gives a different metal.
Mixer
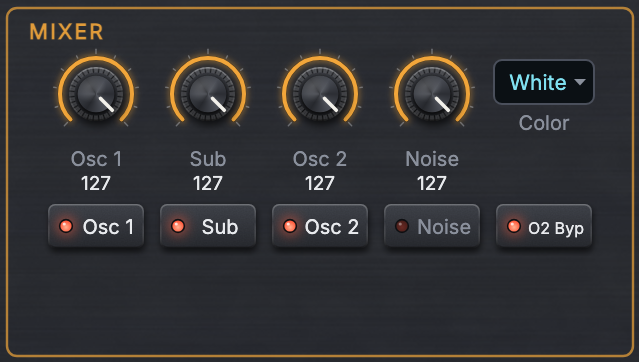
The mixer sets how much of each sound source goes into the filter. The mixer has four sources: Osc 1, Sub, Osc 2 and Noise. Each has an on/off button and a level knob from 0 to 127 (127 at first). In Init, only Osc 1 is on.
Osc 1 and Osc 2: the two oscillators.
Sub is a square wave one octave below Osc 1. It follows Osc 1's pitch, so if you change Osc 1's Freq, the sub moves with it. It's useful for weight under basses and leads.
Noise is a hiss with no pitch: white (bright and hissy) or pink (darker and softer), chosen with the Color selector. Use a little for breath in pads and leads, and more for percussion, wind and sound effects.
O2 Byp sends Osc 2 past the filter (see Osc 2 filter bypass).
Tips
The filter has gentle saturation at its input. With several sources at full level, it starts to drive, which adds warmth and grit. If a sound is too rough, turn the levels down a little; if it's too polite, turn them up.
When you add Osc 2 or the sub, you may want to bring Osc 1's level down a bit to keep the balance.
A level knob can be modulated (destinations Osc 1 Level, Osc 2 Level, Sub Level and Noise in the matrix), for example to fade noise in with an envelope.
Try this: weight and breath
Load Init and play a few notes in the middle of the keyboard.
Turn on Sub. Each note gets a solid low octave underneath. Turn its level down to about 60 for a subtler effect.
Turn on Noise, set its level to about 25 and the Color to Pink. You hear a soft breath behind the notes.
Switch Color to White: the breath becomes a brighter hiss.
Filter
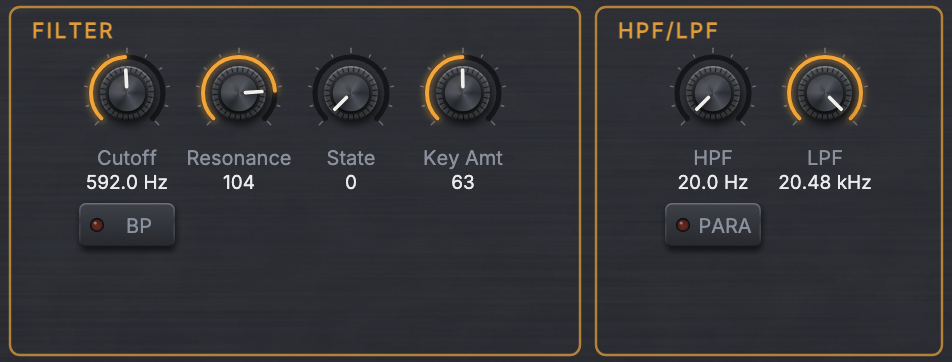
The filter is the most important tone control on a synthesizer. It removes part of the sound: a low-pass filter takes away the highs (darker, warmer), a high-pass filter takes away the lows (thinner, airier). Moving the filter while a note plays is what makes the classic "wow" of a synthesizer.
Astrel's filter is a 2-pole (12 dB per octave) state-variable filter with gentle built-in saturation. A 12 dB slope is smooth and open, rather than the steeper, darker 24 dB kind. It doesn't self-oscillate, so high resonance stays musical rather than screaming.
The controls
Cutoff: the filter's cutoff frequency, from 20 Hz to about 20 kHz. With a low-pass filter, turning it down makes the sound darker and duller, and turning it up makes it brighter.
Resonance: resonance, emphasis at the cutoff, from 0 to 127. A little adds a vocal edge; a lot gives a sharp, whistling peak that's very audible when the cutoff moves.
State: morphs smoothly from low-pass (0), through notch (in the middle), to high-pass (127). In between you get blends of them. Turn on BP (Filter Bandpass) to put a band-pass in the middle instead of the notch.
Key Amt: how much the cutoff follows the keys you play (0 to 127). At 127, the cutoff moves up an octave for every octave you play, so every note has the same tone; at about 64, it moves half as much. Middle C (C4) is the center: notes above it get brighter, notes below it darker. Higher values keep high notes bright.
HPF and LPF (in the HPF/LPF section, to the right of FILTER): a separate high-pass and low-pass filter, each from 20 Hz to about 20 kHz. They're clean 12 dB per octave filters, with no resonance or saturation, and they don't follow the keys or the envelopes. The HPF starts at 20 Hz and the LPF at 20 kHz: fully open, they do nothing, so the sound is exactly as it was. Turn the HPF up to thin out the lows; turn the LPF down to take off the top.
PARA (Filter Parallel): where the HPF and LPF go. Off (at first), the sound goes through the HPF, then the LPF, then the main filter. The HPF takes away lows before they reach the main filter, so the main filter's saturation stays clean on a bright, thin sound. On, the mixer's sound is split: one copy goes through the main filter, the other through the HPF and LPF, and the two are mixed together, each at about −3 dB. That gives you two bands at once, for vowel and formant sounds, or a blend of the dry sound (HPF and LPF open) with the filtered one.
Envelope 1, and Envelope 2 in its filter modes, move the cutoff (see Envelopes). An envelope Amount of 127 moves the cutoff up by ten octaves, the whole range of the knob, so about 13 of Amount is one octave. The LFOs and the matrix can move Cutoff, Resonance and State too, and the HPF and LPF (destinations HPF and LPF, on the same scale as Cutoff).
Tips
Set Cutoff with State at 0 first, then explore State: a notch in the middle sounds hollow and phase-like, a band-pass sounds thin and telephone-like.
With an envelope opening the filter, set Cutoff to where you want the sound to end up, and the envelope's Amount for how far it opens above that.
Resonance on a bass makes it "squelchy"; resonance on a pad makes slow filter sweeps easy to hear.
Sweeping State with an LFO (destination Filter State) gives a moving, phaser-like sound that's different from sweeping Cutoff.
Use Key Amt on plucks, keys and bells, so high notes don't sound muffled.
The HPF around 100 to 300 Hz keeps a pad or a string sound from crowding the bass in a mix.
In PARA mode, where the two paths overlap, they can partly cancel each other: a main low-pass and an HPF set to about the same frequency, for example, leave a dip there. Move one of them away for a full sound, or use the dip on purpose.
Try this: hear the filter
Load Init. Set Cutoff to about 1 kHz, then State to 0.
Hold a chord and slowly turn Cutoff down to about 150 Hz and back up. The sound goes from bright to muffled and back.
Set Resonance to about 90 and sweep Cutoff again. Now there's a whistling peak that follows the knob.
Leave Cutoff around 1 kHz and turn State slowly from 0 to 127. You hear the low-pass blend into a hollow notch, then into a thin high-pass.
Turn on BP and turn State to the middle (about 64): now it's a narrow, nasal band-pass.
Turn BP off and State back to 0, and set Cutoff to about 500 Hz. Turn on PARA, then set HPF to about 2 kHz and LPF to about 3 kHz. Now you hear two bands at once, a low one from the main filter and a high one from the HPF and LPF, like a vowel. Move the LPF and HPF together to change the vowel.
Envelopes

An envelope is a shape that plays once each time you press a key: it rises, falls to a level, holds there while you hold the key, and falls away when you let go. Envelopes are what make a sound start sharply or swell in slowly, and die away quickly or ring on.
Astrel has two DADSR envelopes: Delay, Attack, Decay, Sustain and Release. That's the familiar ADSR with a delay at the start. Their curves charge and discharge like analog circuits, so they sound natural. A new note starts its envelope from wherever it is, rather than from zero, as analog envelopes do.
In Init, Env 2 shapes the volume and Env 1 is free to shape the filter.
The stages
Delay: 0 to 5 seconds of waiting before the envelope starts. Useful for vibrato or a filter swell that comes in after the note has started.
Attack: 1 ms to 10 seconds. How long the envelope takes to rise to full. Short for plucks, basses and keys; long for pads and swells.
Decay: 2 ms to 20 seconds. How long it then takes to fall to the Sustain level.
Sustain: the level held while the key is down, 0 to 127. At 0 the sound (or the filter opening) dies away even while you hold the key, like a plucked string; at 127, it holds at full, like an organ.
Release: 2 ms to 20 seconds after the key is released. Short for staccato sounds, long for sounds that ring on.
Each envelope also has:
Amount: bipolar, −127 to +127, so a negative amount closes the filter instead of opening it. It sets how far the envelope moves the cutoff: 127 is ten octaves. Env 2's Amount only matters when Env 2 shapes the filter; it doesn't change the volume.
Vel: velocity, on or off. When it's on, harder playing gives more envelope; the softest notes get about a fifth of it. It's off in Init, so Init plays at the same volume however hard you press: turn on ENV 2's Vel to make the volume respond to your playing.
Routing
Envelope 1 goes to the filter, or to Aux. In Aux mode it leaves the filter alone and is free for the modulation matrix. Aux is meant for when Envelope 2 controls the filter (Filter + Amp or Filter + Gate). Envelope 1 is a matrix source whichever routing you choose.
Envelope 2 has three modes:
Amp: it shapes the volume.
Filter + Amp: it shapes the volume and the filter, with one shape for both. This frees Env 1 for something else.
Filter + Gate: it shapes the filter, and the volume is simply on while you hold the key (an organ-like on/off).
When Envelope 2 controls the filter, its velocity setting affects only the filter.
Init's Env 2 Amount is 127. If you switch Env 2 to a filter mode, turn its Amount down first, or the filter will open all the way.
Envelope Repeat
Env Repeat (the Repeat selector in ENV 1) loops the Delay, Attack and Decay stages while you hold a key, then Release runs as usual. You can turn it on for Env 1, Env 2 or Env 1 + 2, which turns an envelope into a rhythmic or LFO-like modulator.
Each loop restarts once the decay has nearly reached the Sustain level, so Sustain sets the low point of each pulse: at 0 the pulses are deepest. The speed comes from the Delay, Attack and Decay times, not the tempo.
Tips
A short Env 1 decay with Sustain at 0 and a high Amount gives the "pluck" or "bite" at the start of a note. Make the decay longer for a slower "wow".
If notes click at the start or end, lengthen Env 2's Attack or Release a little (a few milliseconds).
Pads usually want a slower Env 2 attack and a long release; give Env 1 a slightly slower attack than Env 2 so the tone opens after the volume.
Turn on Vel on Env 1 too: harder notes then sound brighter as well as louder, which feels natural.
A negative Env 1 Amount with Cutoff set high makes the filter close at the start of each note and open as it decays, an unusual, "reversed" sound.
Try this: shape a note
Load Init. Set Cutoff to about 200 Hz, then State to 0.
In ENV 1, set Amount to about 60. Play staccato notes: each one starts bright and closes quickly, because Env 1's Decay is 300 ms and its Sustain is 0.
Set ENV 1's Decay to about 1.5 s. The "wow" becomes slow and sweeping.
In ENV 2, set Attack to about 1 s and Release to about 2 s. Notes now fade in and fade out.
Set ENV 2's Sustain to 0 and Decay to about 800 ms, and Attack back to its lowest (double-click it). Hold a key: the note dies away on its own.
Try this: pulsing with Env Repeat
Load Init. Set Cutoff to about 300 Hz, then State to 0, and Resonance to about 60.
In ENV 1, set Attack to about 5 ms, Decay to about 150 ms, Sustain to 0 and Amount to about 60.
Set Repeat to Env 1 and hold a chord.
What you should hear: the filter "plucks" over and over while you hold the keys. Turn ENV 1's Decay up and down to change the speed.
LFOs
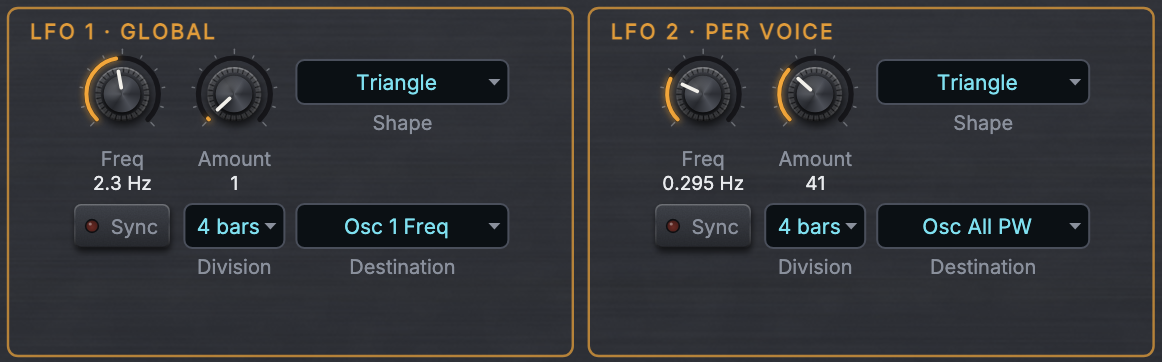
An LFO (low-frequency oscillator) is an oscillator too slow to hear as a note. Instead, it moves another control up and down, over and over. That's how you get vibrato (moving pitch), tremolo (moving volume), wobbling filters and slowly evolving pads.
There are two LFOs:
LFO 1 is global: one LFO shared by all voices, so they all move together. Use it for vibrato, tempo-synced wobbles and anything that should move the whole sound in step.
LFO 2 runs separately in each voice, so each note moves on its own. Use it for pulse width modulation and slow drifting on pads, where notes moving out of step sound richer.
The controls
Each LFO has these controls:
Shape: Triangle, Saw, Rev Saw (reverse saw), Square or S&H (sample-and-hold, a new random level each cycle). The triangle swings above and below zero, so it moves the destination both up and down from the knob's position; the others only go up from zero.
Freq: 0.022 Hz (one cycle every 45 seconds) to 500 Hz (5 Hz at first). Around 5 to 6 Hz suits vibrato; under 1 Hz suits slow sweeps; the fastest settings give rough, buzzing effects.
Sync: Clock Sync, locks the rate to the tempo (see The clock). The Division selector then sets the length of one cycle: 4 bars, 2 bars, 1 bar, 1/2, 1/2 T, 1/4, 1/8 D, 1/4 T, 1/8, 1/16 D, 1/8 T, 1/16, 1/16 T, 1/32 or 1/64 (D is dotted, T is triplet). It's 1/4 at first.
Amount and Destination: a quick way to send the LFO to a modulation destination without using a matrix slot. Amount is 0 to 127, and the destination list is the same as the matrix's (see Modulation matrix). To modulate another modulation's amount (Mod 1 Amt to Mod 16 Amt, or an LFO Amt), use a matrix slot instead.
Slew: smooths the shape's sharp edges, for example to soften a square or S&H. At 127 it smooths over about half a second.
Note Reset: restarts LFO 1 when you play a note while no other note is held, so a phrase always starts the LFO from the same point. On LFO 2 it restarts the LFO for each new note.
Slew and Note Reset aren't on the panel. They're saved with presets, and you can set them from your DAW, which lists them with Astrel's other parameters (LFO 1 Slew, LFO 1 Note Reset and so on) for automation.
The LFO Amount uses the same scale as the matrix (see How much is "full"?), so small amounts go a long way on pitch. For vibrato, the destination Osc All Detune with an Amount of 10 to 20 is a good start. On Cutoff, about 13 of Amount is an octave either way.
In Init, mod matrix slot 1 sends the Mod Wheel to LFO 1 Amt (with an amount of 30), so once you choose a Destination for LFO 1, the mod wheel brings it in.
Tips
Leave LFO 1's Amount at 0 and use the mod wheel to bring vibrato in only when you want it.
For pulse width modulation, use LFO 2 (per voice) on Osc All PW: every note of a chord moves at its own pace, which sounds lusher.
The S&H shape on Cutoff, synced to 1/16, gives the classic random "bubbling" filter.
Square on Osc All Freq with a small amount makes a trill between two pitches.
LFO 1 and LFO 2 can modulate each other's speed: use the matrix destinations LFO 1 Freq, LFO 2 Freq or LFO All Freq.
Try this: vibrato on the mod wheel
Load Init.
In LFO 1 · GLOBAL, set Destination to Osc All Detune. Leave Amount at 0 and Freq at 5 Hz.
Hold a note and push the mod wheel up slowly.
What you should hear: vibrato fading in as the wheel goes up. If you don't have a mod wheel, set LFO 1's Amount to about 15 instead.
Try this: a slow filter sweep
Load Init. Set Cutoff to about 800 Hz, then State to 0, and Resonance to about 70.
In LFO 2 · PER VOICE, set Destination to Cutoff, Freq to about 0.3 Hz and Amount to about 25.
Play a chord, one note at a time.
What you should hear: each note's filter sweeping slowly up and down, out of step with the others, because LFO 2 runs separately in each voice. Now set LFO 1 the same way instead (and LFO 2's Amount back to 0): all the notes sweep together.
Modulation matrix
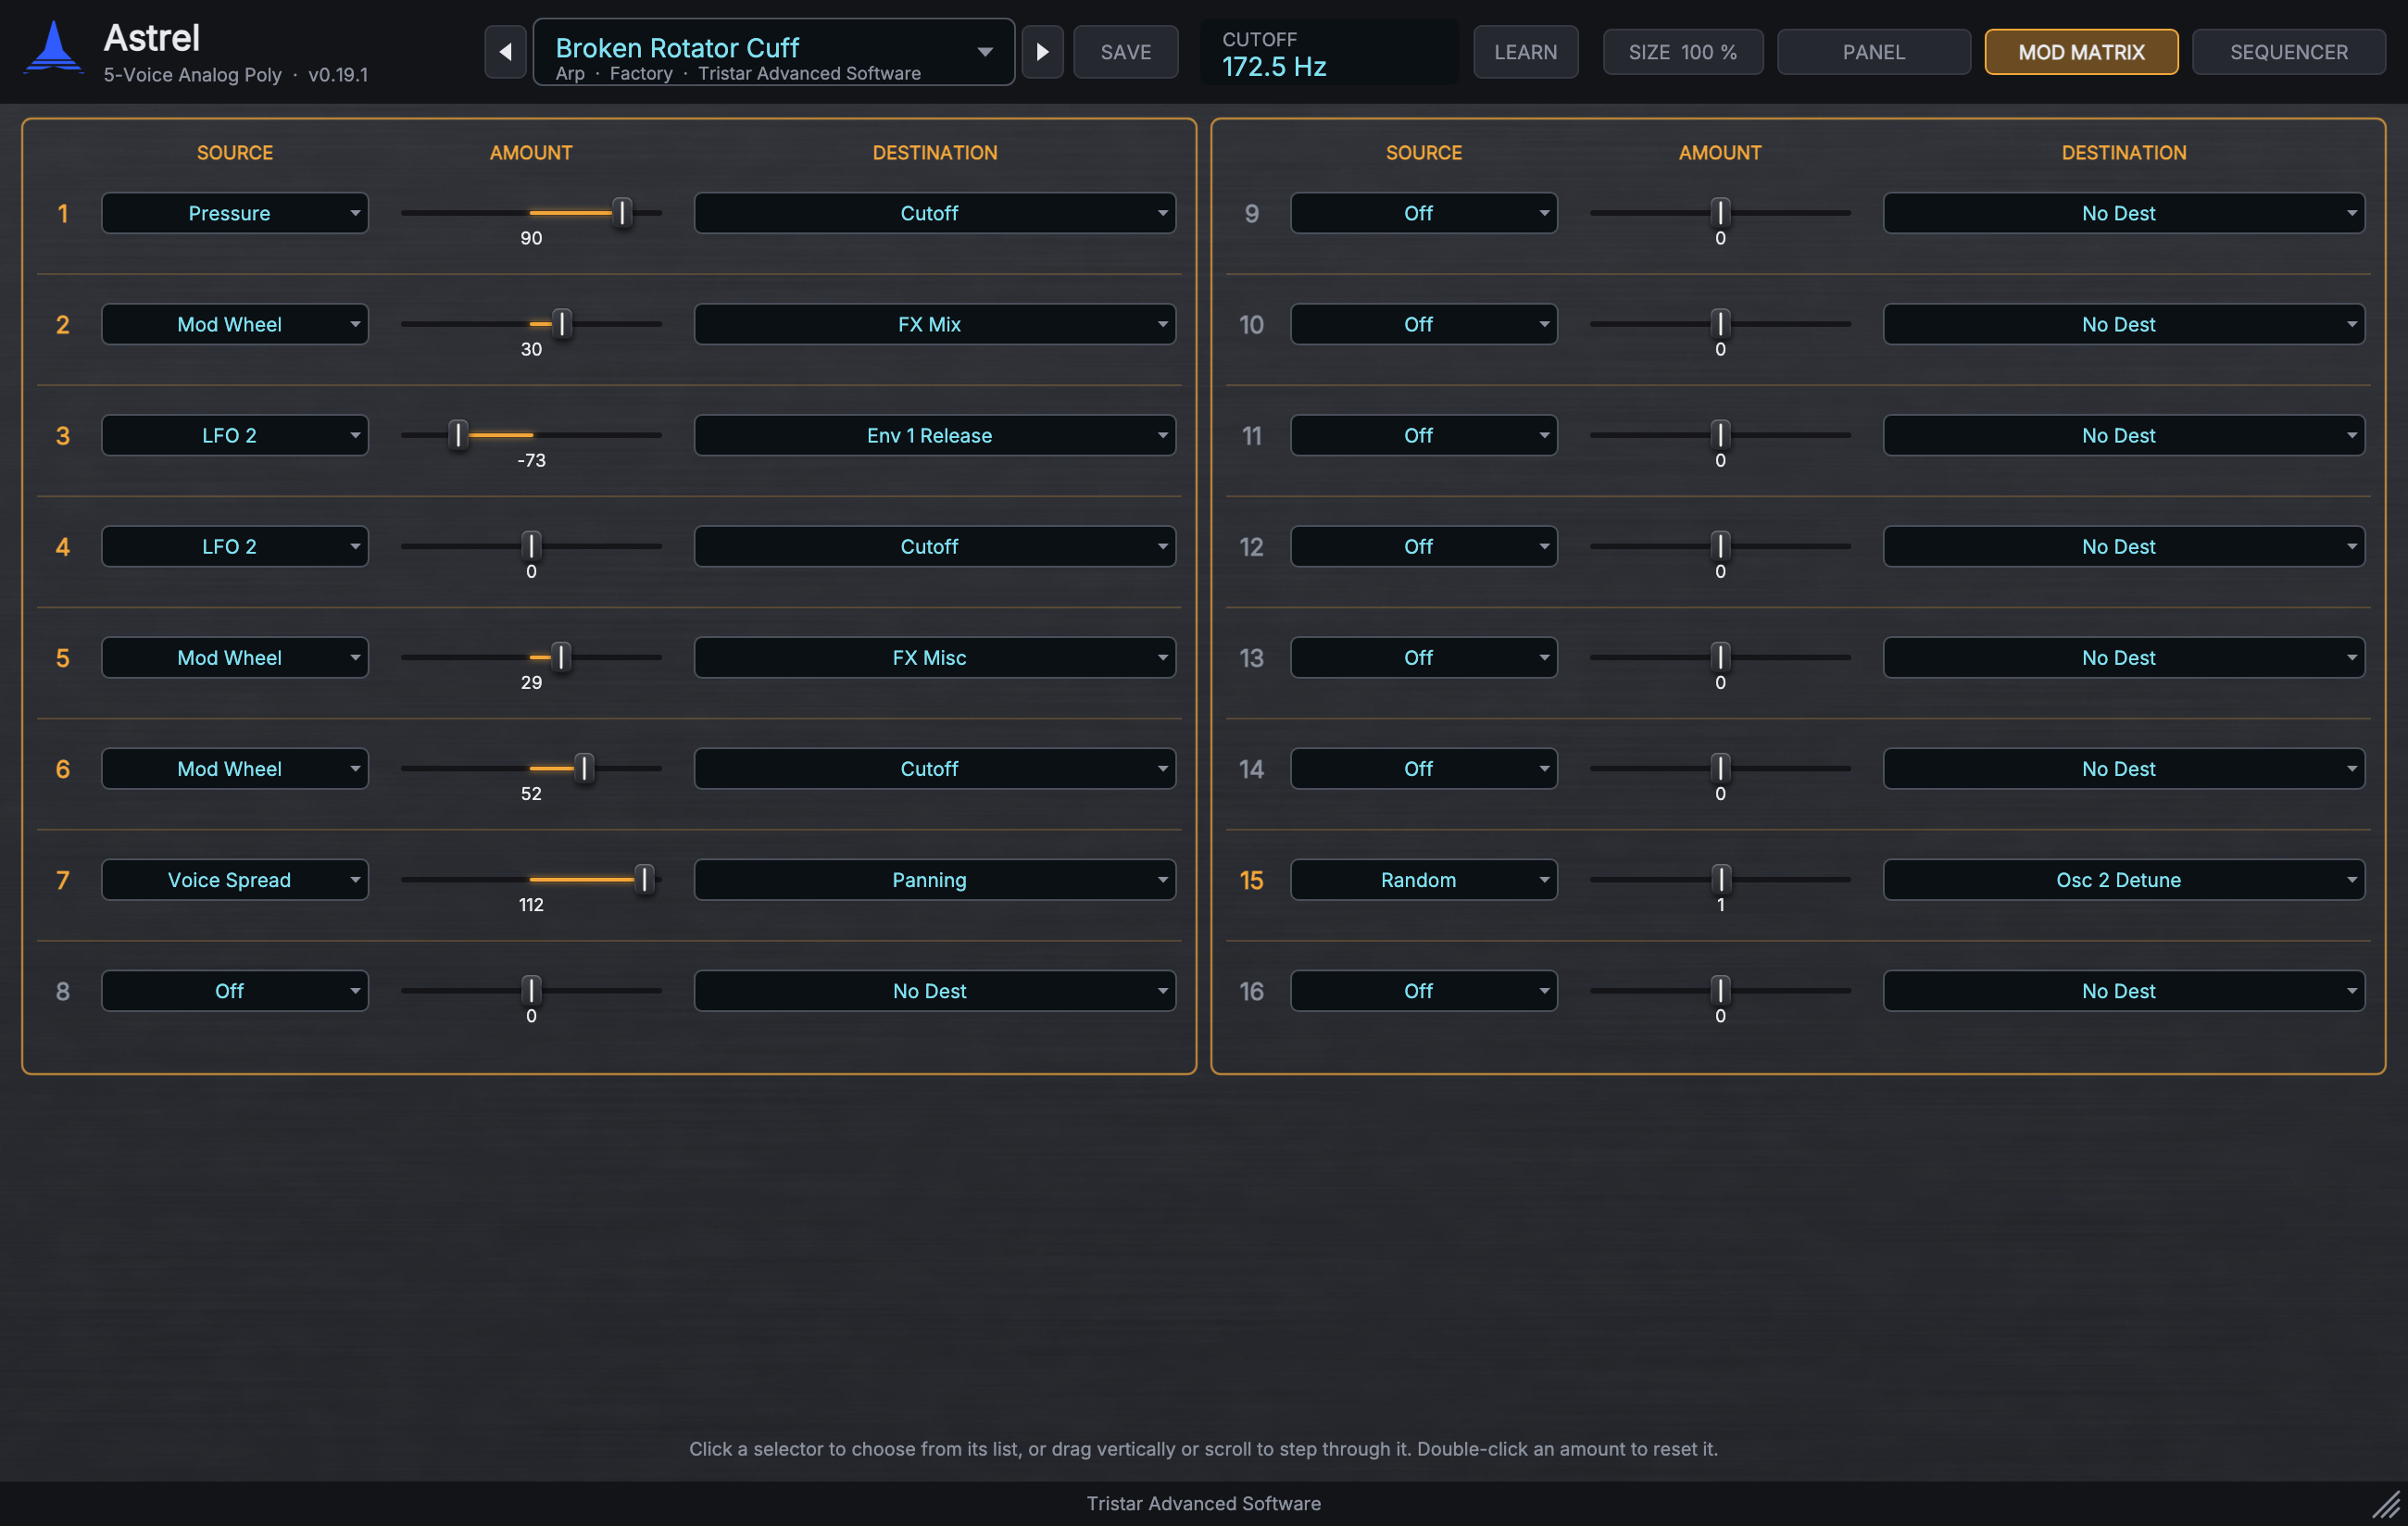
Modulation means one thing controlling another: an LFO moving the pitch, the mod wheel opening the filter, velocity changing the attack. The envelopes and LFOs have their own quick routings on the panel; the modulation matrix is where you make any other connection.
Open it with the MOD MATRIX tab. It has 16 slots. Each connects a source to a destination, with a bipolar amount from −127 to +127. A slot's number lights up when it has both a source and a destination.
Click a source or destination to choose from its list, or drag up and down over it, or scroll, to step through it. Drag an amount slider left or right; double-click it to reset it. A negative amount turns the modulation upside down: for example, the mod wheel closing the filter instead of opening it.
In Init, two slots are already set up: slot 1 sends the Mod Wheel to LFO 1 Amt (amount 30), and slot 2 sends Voice Spread to Panning (amount 0, so it does nothing until you raise it).
Sources
Modulators: LFO 1, LFO 2, Env 1, Env 2, Random (a new random value for each note, different for each voice) and DC (a constant, at full).
Playing: Velocity, Note Number (the key you play, centered on middle C: higher keys up, lower keys down), Pitch Bend, Mod Wheel, Pressure (aftertouch), Breath, Foot Pedal and Expression (the expression pedal).
Voice: Voice Spread, a different value for each voice, from −1 for the first voice to +1 for the fifth. It's useful for stereo spread and subtle variation.
Sequencer: Seq, the value of the step sequencer's playing step, from −1 to +1 (see Step sequencer). It's at the end of the list, after Audio Out.
Audio rate: Osc 2, Noise, Filter Out and Audio Out. These modulate at audio rate, for FM-like and ring-mod-like effects on pitch, pulse width, levels, X-Mod, cutoff and volume (the destinations Osc 1/2/All Freq, Osc 1/2/All PW, the mixer levels, X-Mod Level, Cutoff and Voice Volume). On other destinations they work more slowly.
The playing controls, LFO 1, DC and Seq are the same for every voice; the others are worked out separately for each voice. With no expression pedal connected, Expression stays at full.
Destinations
There are 66 destinations:
oscillator frequencies, detune and pulse widths, separately or together: Osc 1 Freq, Osc 2 Freq, Osc All Freq, Osc 1 Detune, Osc 2 Detune, Osc All Detune, Osc 1 PW, Osc 2 PW and Osc All PW;
mixer levels and X-Mod: Osc 1 Level, Osc 2 Level, Sub Level, Noise and X-Mod Level;
Cutoff, Resonance, Filter State, HPF and LPF (HPF and LPF are at the end of the list, after Mod 16 Amt);
LFO rates and amounts (LFO 1 Freq, LFO 2 Freq, LFO All Freq, LFO 1 Amt, LFO 2 Amt, LFO All Amt), and every envelope stage and amount (Env 1 Amt, Env 1 Delay, Env 1 Attack and so on, for both envelopes);
voice volume, panning, overdrive, vintage amount and unison detune: Voice Volume, Panning, Overdrive, Vintage Amt and Unison Detune;
all the effect and reverb knobs: FX Time, FX Mix and FX Misc (Effect 1's three knobs, whatever they're called for the selected type), and Reverb Mix, Reverb Size, Reverb PreDelay, Reverb Decay and Reverb Tone;
the amounts of the other 15 slots (Mod 1 Amt to Mod 16 Amt), so one modulation can control another. For example, the mod wheel can control how much vibrato an LFO adds.
The effects are shared by all the voices, so modulation of the effect knobs comes from the most recently played note.
How much is "full"?
An amount of ±127 moves the destination over its whole range, exactly as if you turned the knob from end to end. Smaller amounts move it proportionally. The modulation is added to the knob's position, so set the knob where you want the modulation to start.
Some ranges to keep in mind, with a source at full (the mod wheel all the way up, for example):
Osc Freq destinations cover 63 semitones, so about 2 of amount is a semitone, and 24 is an octave.
Osc Detune destinations cover about 98 cents, so 13 of amount is about 10 cents: good for vibrato.
Cutoff covers ten octaves: about 13 of amount is one octave.
PW destinations cover 50% to 100%: 127 sweeps the whole range.
Panning: 64 is enough to reach hard left and right from the center.
Sources like the LFO triangle, Pitch Bend, Note Number, Voice Spread and Seq go both ways (down and up); the mod wheel, pedals, velocity, envelopes, Random and the other LFO shapes only go up from zero.
Tips
Make a sound expressive with three slots: Velocity to Cutoff, Pressure to Cutoff (or to LFO 1 Amt, with LFO 1 on Osc All Detune, for vibrato when you press harder), and Mod Wheel to something dramatic.
Random to Osc All Detune with a small amount (2 to 4) makes every note slightly differently tuned, like an old analog synth.
Velocity to Env 2 Attack with a negative amount: soft notes swell in, hard notes start at once.
Note Number to Env 2 Decay with a negative amount: high notes die away faster, as on a piano.
DC is a constant. Sent to a slot's amount (Mod n Amt), it works like a second, fine amount knob; sent anywhere else, it simply offsets the destination.
Try this: playing controls
Load Init. On the PANEL page, set Cutoff to about 400 Hz, then State to 0, and Resonance to about 40.
Open the MOD MATRIX page. In slot 3, set the source to Velocity, the destination to Cutoff and the amount to about 40. Play soft and hard: harder notes are brighter.
In slot 4, set the source to Mod Wheel, the destination to Resonance and the amount to about 60. Push the wheel: the filter gets sharper and more vocal.
In slot 2 (Voice Spread to Panning), set the amount to about 80. Play a chord: the notes spread across the stereo field.
Try this: modulating a modulation
Load Init. In LFO 2 · PER VOICE, set Destination to Cutoff and leave Amount at 0. Set Cutoff to about 600 Hz, then State to 0.
In the matrix, set slot 3 to Env 1, amount about 40, destination LFO 2 Amt.
In ENV 1, set Attack to about 2 s and Sustain to 127.
What you should hear: each note starts steady, and the filter wobble grows over two seconds as Env 1 rises and turns up LFO 2's Amount.
Voice and performance
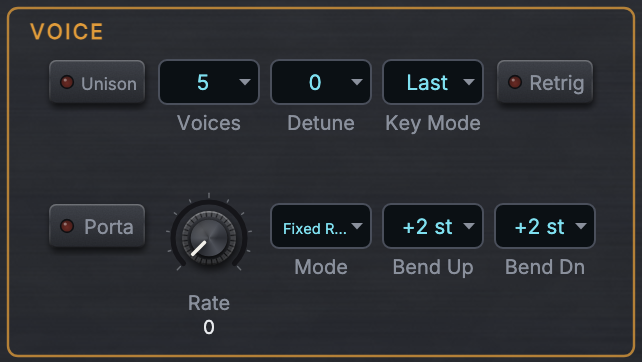
The VOICE section decides how Astrel plays your notes: as chords or one at a time, stacked or single, jumping between notes or gliding. The OUTPUT section next to it adds analog character and sets the levels.
Polyphony and unison
Astrel has five voices. In normal (poly) mode:
Playing a note that's still sounding reuses its voice.
Otherwise a new note takes the voice that has been free longest.
When all five voices are in use, a new note takes over one that's playing.
Unison stacks 1 to 5 voices on each note. With Unison on, Astrel plays one note at a time (it's monophonic), which is what you want for most basses and leads. Its controls:
Voices (1 to 5, 5 at first): how many voices play each note. With 1, Astrel is a simple monophonic synth; with 3 to 5, the stacked voices make a thick, wide sound.
Detune (Unison Detune, 0 to 7, 3 at first) spreads the stacked voices' pitches. Low values thicken, high values sound like a detuned chorus of synths.
Key Mode chooses which note plays when you hold several: Low, High or Last (the most recent; Last at first).
Retrig (Env Retrig) restarts the envelopes on each new note. Turn it off for smooth legato lines: a note played while you're still holding another just changes pitch, without restarting the envelopes.
Portamento
Portamento (also called glide) slides the pitch from one note to the next instead of jumping. Turn on Porta to use it. Rate sets how long it glides: 0 is no glide, and higher values glide more slowly, up to about 3 seconds. Each oscillator's Glide control scales it, from 0 (that oscillator doesn't glide) to 127 (the full Rate). Both Glide knobs are at 0 in Init, so turn them up, or Porta has no effect.
The Mode selector has four modes:
Fixed Rate: the glide takes longer for bigger intervals. Rate sets the time per octave.
Fixed Time: every glide takes the same time, whatever the interval.
Fixed Rate A and Fixed Time A: the same, but they glide only between overlapping (legato) notes, in unison. That lets you choose, as you play, which notes slide: play notes overlapping to glide, and detached to jump.
In poly mode, each voice glides from the last note it played, so chords slide in interesting, slightly unpredictable ways.
Setting the two oscillators' Glide differently makes them glide at different speeds, so they briefly pull apart and meet again on the new note.
Pitch bend
Bend Up (0 to 12 semitones) and Bend Dn (0 to 24 semitones) set how far your pitch bend wheel moves the pitch, separately for each direction. Both are 2 semitones at first, and they're saved with the preset. 2 is usual for keyboard parts, 12 for dramatic dives, and different values (for example up 2, down 12) let you play small bends up and big drops down.
Character and output
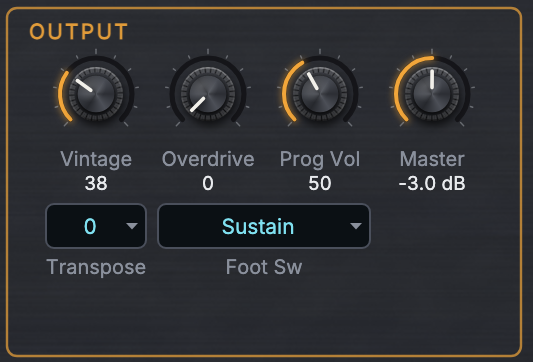
Vintage: gives each voice its own small differences in filter, pitch and envelopes, plus slow drift, the way analog hardware behaves. Turn it up gradually: around 20 to 50 adds life to pads and polyphonic sounds; high values sound like a synth that needs servicing.
Overdrive: analog-style drive on each voice, before the effects. A little adds warmth and makes a sound cut through; more adds grit and growl. Because it works on each voice separately, chords stay clearer than with the Distortion effect.
Prog Vol: the preset's volume, 0 to 127 (100 in Init). The factory presets use it to play at similar levels; use it to balance your own presets.
Master: Astrel's overall output level, in decibels, up to +3 dB (−3 dB at first).
Transpose: ±2 octaves, saved with the preset. Handy for bass presets, so you can play them in the middle of a small keyboard.
Foot Sw: what the sustain pedal does (see Global settings).
Hold
Hold (in ARP / CLOCK, and on the SEQUENCER page) latches the notes you play, as if you kept the keys down. With the arpeggiator or sequencer on, it latches the pattern instead (see Arpeggiator and clock).
Low Split
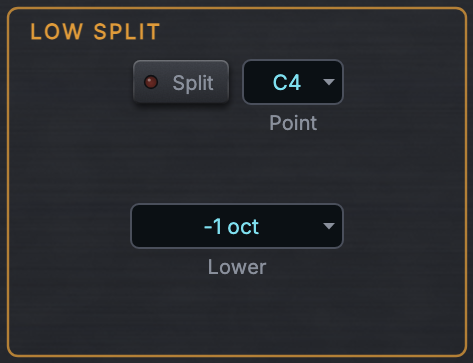
Low Split (the Split button) drops the keys below the Split Point by one or two octaves, chosen with Lower (−1 oct or −2 oct), so you can play bass with your left hand and the lead with your right. It's a simple split: the same sound in two ranges.
The split point (Point) can be anywhere from C1 to C7. It starts at middle C (C4).
Both halves share the same sound and voices.
The split also applies to the notes the arpeggiator and sequencer receive.
Tips
For a classic monophonic bass or lead: Unison on, Voices 1, Retrig off, Porta on with a Fixed Time A or Fixed Rate A mode, and both Glide knobs at 127.
For a huge lead: Unison on, Voices 5, Detune 3 or 4, and a little Vintage.
Modulate Unison Detune from the mod wheel in the matrix to thicken a lead as you play.
If chords lose notes, you're playing more than five at once (or the sustain pedal is holding old ones), so new notes take over sounding voices.
Try this: a gliding mono line
Load Init. Set Cutoff to about 1.5 kHz, then State to 0.
In VOICE, turn on Unison and set Voices to 1.
Turn on Porta, set Rate to about 40 and Mode to Fixed Time A.
Turn OSC 1's Glide to 127.
Play a melody, sometimes holding the previous key while you press the next, sometimes letting go first.
What you should hear: overlapping notes slide into each other; detached notes start cleanly on their own pitch. Now set Voices to 4 and Detune to 3 for the same line, much fatter.
Try this: bass and lead on one keyboard
Load the pluck or the bass you made in Your first sounds, or any factory preset that plays chords.
In LOW SPLIT, turn on Split. Leave Point at C4 and Lower at −1 oct.
Play a low line with your left hand below middle C and chords or a melody above it.
What you should hear: your left hand sounds an octave lower than the keys you press, so a small keyboard covers a bass line and a melody. Set Lower to −2 oct for a deeper bass.
Arpeggiator and clock
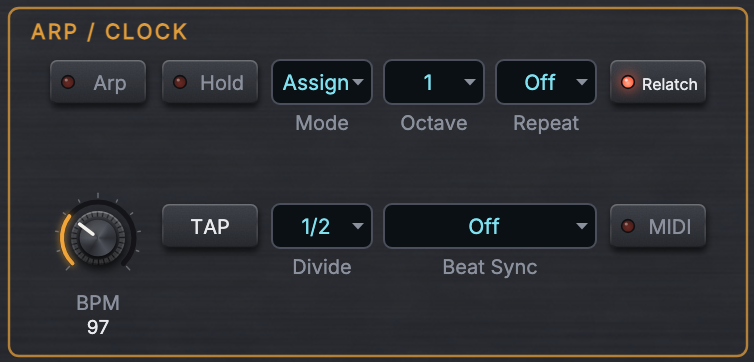
An arpeggiator turns a held chord into a pattern of single notes, played in time. Hold C, E and G and it plays C-E-G-C-E-G… over and over. It's an easy way to get a moving part from simple chords.
Turn on Arp and hold a chord: Astrel plays its notes one at a time, in time with the clock.
Mode:
Up: lowest to highest.
Down: highest to lowest.
Up+Down: up and back, without repeating the top and bottom notes.
Random: never the same note twice in a row, unless you hold just one.
Assign: the order you pressed the keys.
Octave: 1 to 3. The whole chord plays, then repeats one (and two) octaves up.
Repeat: Off, 1, 2 or 3: plays each note one to four times.
Hold: latches the arpeggio, so it keeps playing after you let go.
Relatch: when it's on (as it is at first), playing new keys after letting go of all of them starts a new arpeggio. When it's off, new keys are added to the held ones, so you can build up a pattern a note at a time.
Probability (Step Probability, on the SEQUENCER page) is the chance that each note of the arpeggio plays: 100% at first, so every note plays. Lower it and some notes drop out at random, while the pattern keeps its place, so the rhythm stays in time. It works the same way for the sequencer.
Each note lasts half a step and keeps the velocity you played it with. When you press a chord all at once, its first note in the pattern is the one the mode says, not whichever key happened to arrive first. If you turn the arpeggiator off while holding keys, they simply keep sounding.
The arpeggiator and the step sequencer play from the same keys, so they can't run at the same time: turning one on turns the other off.
The clock
The clock drives the arpeggiator, the sequencer, synced LFOs and synced delays.
In a DAW, the clock always follows your DAW: its tempo whether it's playing or stopped, and its beat grid while its transport plays, so arpeggios and sequences land on the DAW's beats. The BPM knob shows the DAW's tempo, with "(DAW)" after it, and can't be turned there. Change the tempo in your DAW instead.
In the standalone app, set the tempo with BPM, 30 to 250 (120 at first), or tap it with TAP (four taps).
Divide (Clock Divide) sets the length of each step: 1/2, 1/4, 1/8, 1/8 T, 1/16, 1/16 T, 1/32 or 1/64 (T is triplet). It's 1/16 at first.
Global settings
These settings are saved with your project or the standalone app, not with presets:
Foot Sw (Foot Function, in OUTPUT): what the sustain pedal does.
Sustain: the usual sustain.
Arp Hold: each press toggles Hold: press once to latch the arpeggio, and again to stop it.
Arp Hold Mom (momentary): holds while the pedal is down, and stops when you let it up.
With the arpeggiator and sequencer off, the arp settings work as an ordinary sustain pedal.
Beat Sync: Off, or Quantize, which starts notes only on the beat of the clock division: the first note waits for the next step instead of playing at once. Use it to keep arpeggios in time when you play a little early or late.
MIDI (MIDI Arp Notes): sends the arpeggiator's and sequencer's notes out of the plug-in, so you can record them or play other instruments with them. This needs a host that accepts MIDI from instruments: Logic Pro and GarageBand don't, and neither does the AAX plug-in in Pro Tools.
Tips
Arpeggios love short, plucky sounds: an Env 2 with Sustain at 0 and a short decay keeps the notes separate.
Add a delay synced to the tempo (see Effects), for example 1/8 D (dotted eighth) against 1/16 arpeggio steps, for a rolling, interlocking rhythm.
Assign mode with Relatch off lets you build melodic patterns: hold Hold, then add notes in the order you want them.
Move the filter while the arpeggio runs: by hand, from the mod wheel, or with a slow LFO on Cutoff.
Try this: a first arpeggio
Make the pluck from Your first sounds, or load Init and set ENV 2's Sustain to 0 and Decay to about 300 ms.
In ARP / CLOCK, turn on Arp and Hold.
Play a chord, for example C-E-G, and let go. The arpeggio keeps playing.
Set Mode to Up+Down and Octave to 2.
Try Divide 1/8, then 1/16 T, then 1/16.
Play a different chord: because Relatch is on, it replaces the old one.
Turn Hold off to stop.
What you should hear: the chord's notes running up and down over two octaves, in time with the tempo, changing chord whenever you play a new one.
Step sequencer
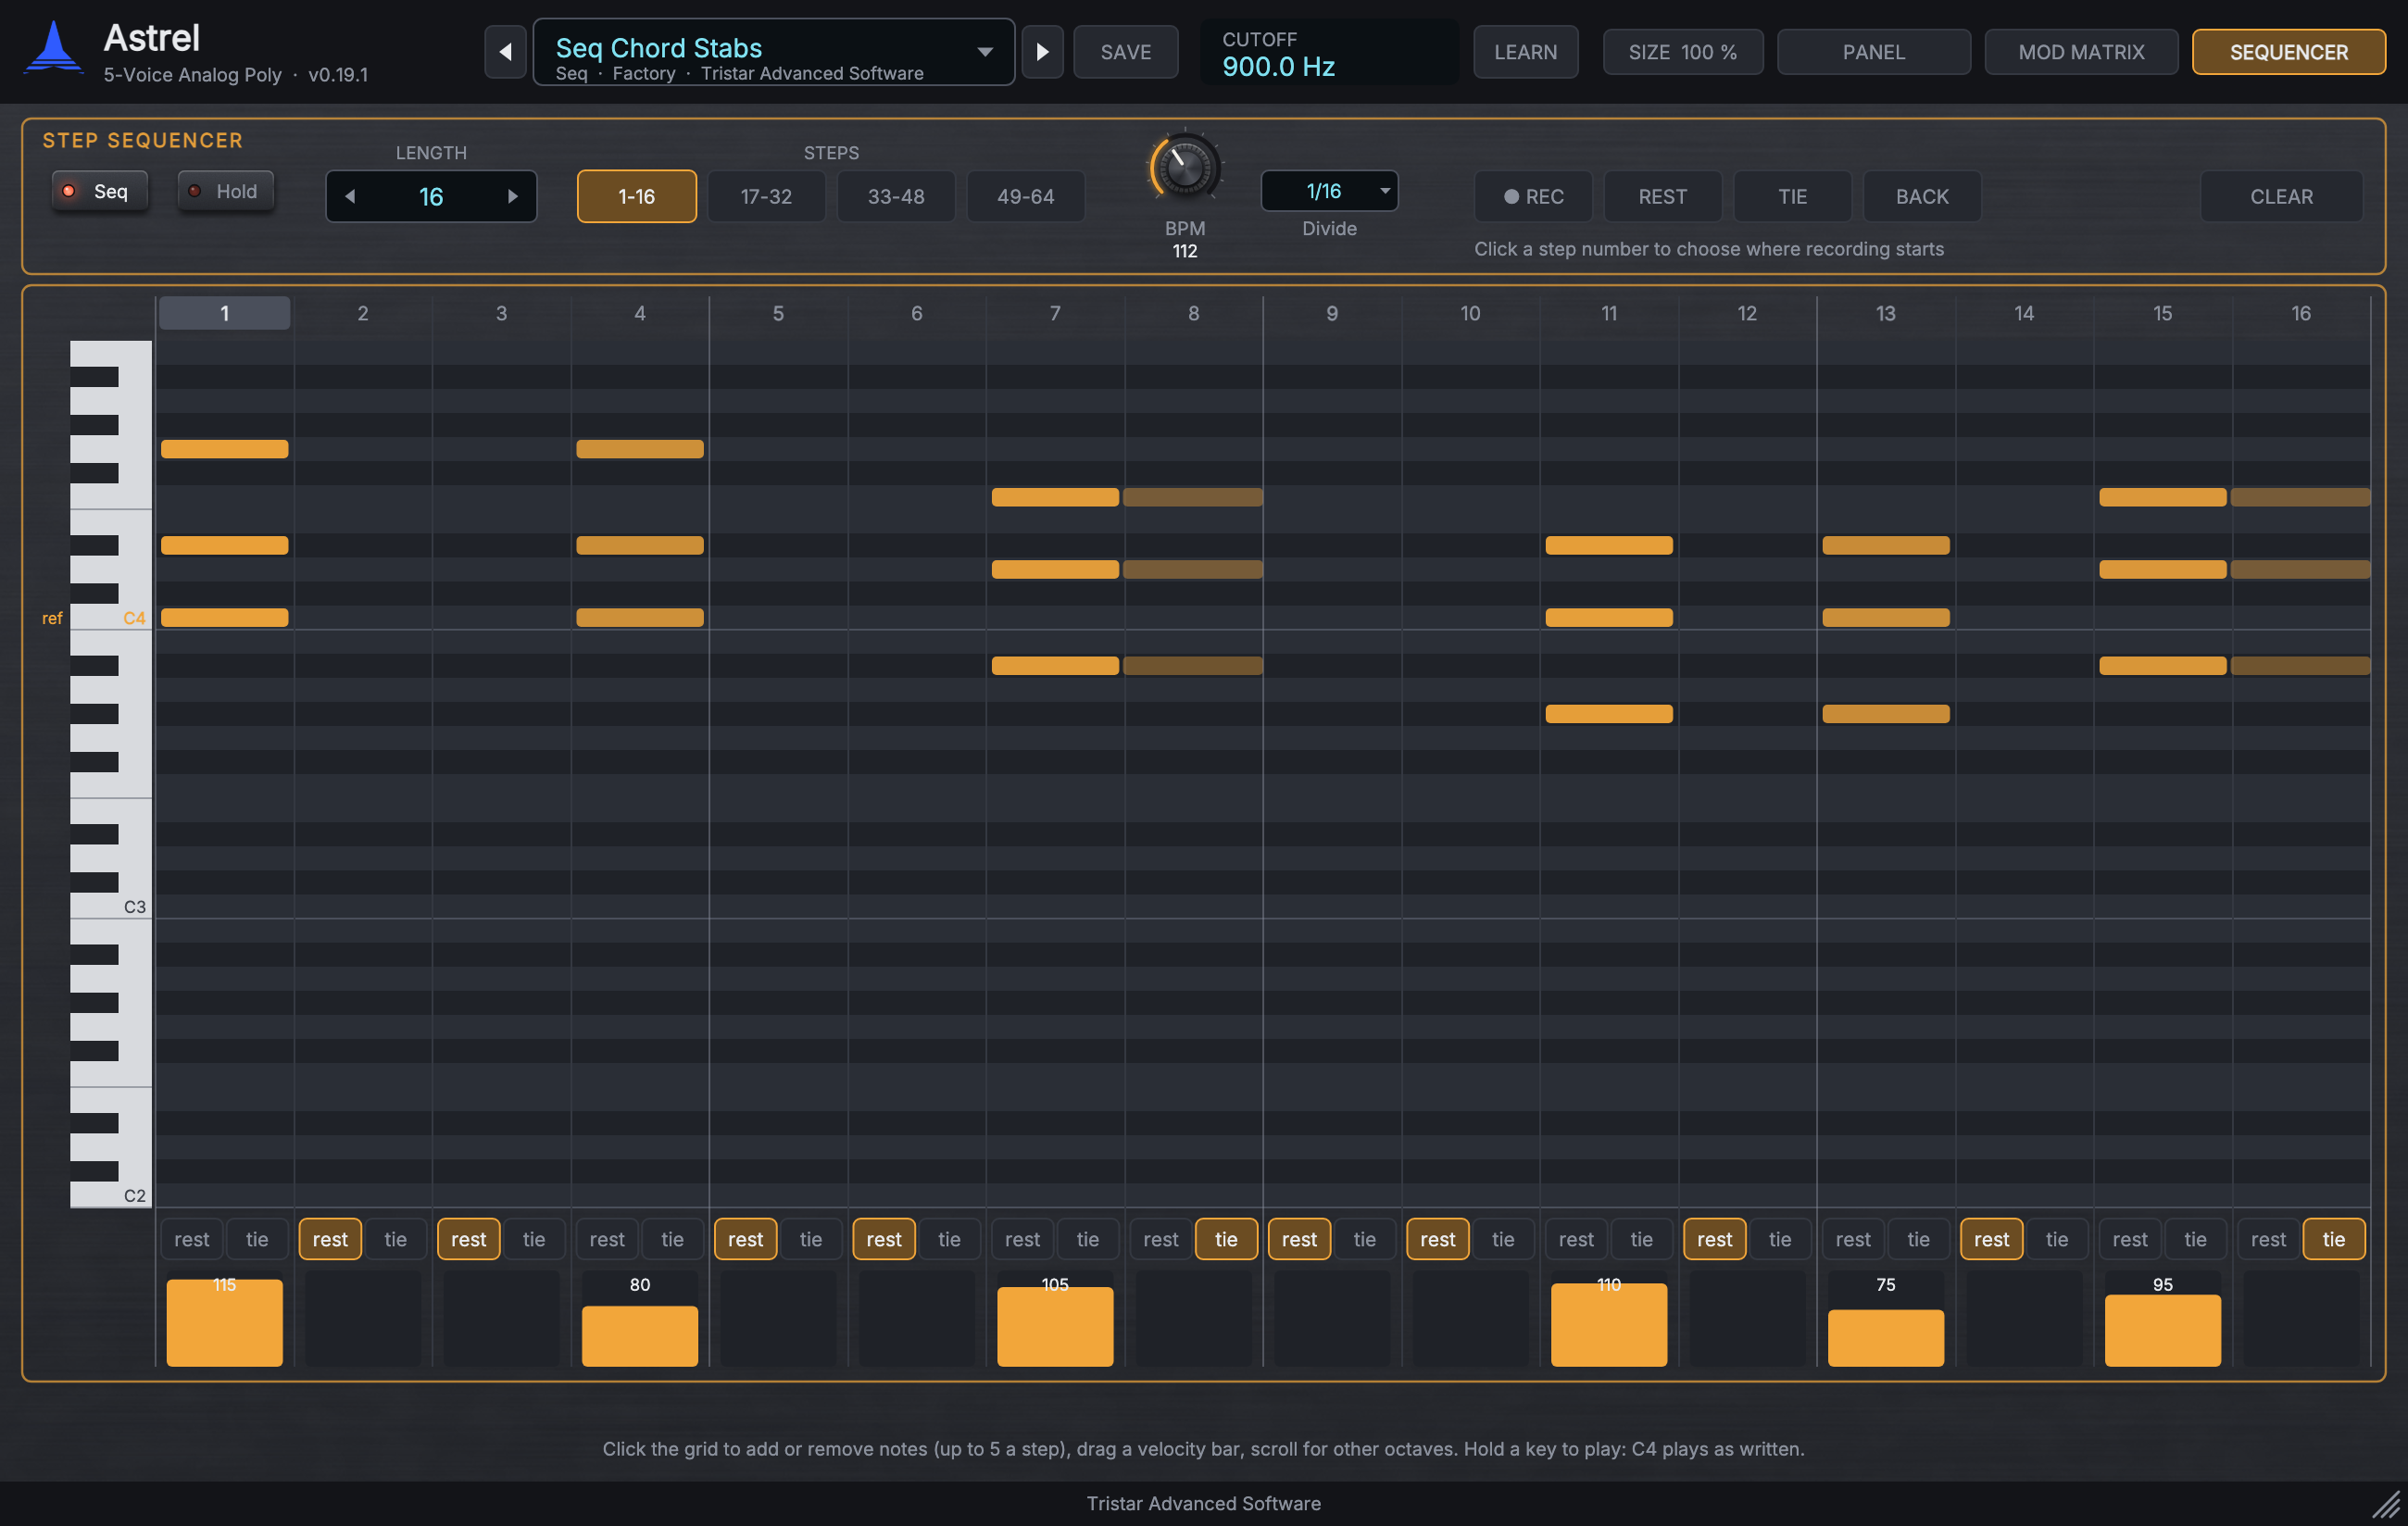
A step sequencer plays a pattern you've written, step by step, in time with the clock. Astrel's sequencer plays a pattern of up to 64 steps, and each step can be a whole chord. It's saved with each preset, so a preset can carry its own riff, bass line or chord progression.
It can play its steps in five directions, skip or vary them at random as it goes, and give each step a modulation value for the matrix's Seq source. Turn its notes off and it becomes a pure modulation source: a rhythmic, stepped modulator that follows the clock while you play the keys as usual.
Steps
Each step is one of:
a chord of up to five notes, each with its own velocity (a single note is a chord of one);
a rest, which plays nothing;
a tie, which holds the previous step's notes on without playing them again.
Any step, rests and ties included, can also have a mod value from −100 to +100 for the Seq source (see The MOD lane and the Seq source).
A chord plays for half a step. To hold it longer, follow it with ties: it ends half-way through the last tie.
Playing a sequence
Turn on Seq (on the SEQUENCER page).
Hold a key. The sequence plays from step 1 (from the last step when Direction is Backward), transposed by that key relative to C4, so C4 plays it as written. C4 is marked "ref" on the grid's keyboard.
Play another key to transpose it from the next step. The newest key counts.
Let go of every key to stop it, unless Hold is on.
The sequencer uses the arpeggiator's clock (BPM, Divide and Beat Sync, or your DAW's tempo), Hold and Relatch. The sequencer and the arpeggiator can't run at the same time: turning one on turns the other off.
Editing

Open the SEQUENCER page in the editor. It shows a grid of 16 steps at a time against three octaves of notes, with a piano keyboard down the left.
Click the grid to add or remove notes, up to five in a step.
Scroll over the grid to see other octaves. When a preset loads, the grid moves to its notes.
Set each step's velocity by dragging its velocity bar (1 to 127; it sets all the step's notes), and make it a rest or a tie with the rest and tie buttons under it. New notes in a step take its velocity, or 100 in an empty step.
The VEL and MOD buttons to the left of the bars switch them between the steps' velocities and their mod values.
Set the Length from 1 to 64 with its ◀ and ▶, or by scrolling over it. Steps past the length are dimmed.
The STEPS buttons (1-16, 17-32, 33-48 and 49-64) show the other pages of steps.
The playing step is highlighted.
CLEAR empties the sequence: click it, then click CLEAR ALL? to confirm.
The page also has Seq, Hold, BPM and Divide, the same controls as on the PANEL page, so you can work on a sequence without switching pages. The controls along the bottom of the page, Direction, Notes, Mutate and Probability, change how the sequence plays (see Playback).
Step recording
Click REC, and choose the step to start from by clicking its number above the grid.
Play a note or chord on your keyboard (or the standalone's on-screen keyboard). When you let go, it becomes the next step. A chord keeps its lowest five notes.
Use REST and TIE to fill a step with a rest or a tie, and BACK to go back a step.
Click REC again when you're done.
Recording past the end makes the sequence longer. While you're recording, the keys play normally, so you hear what you record. Recorded steps have no mod value.
Playback

Four controls change how the sequence plays, without changing the steps themselves. They're saved with each preset, and at first they play the sequence exactly as written.
Direction (Seq Direction): the order the steps play in, within the Length.
Forward: step 1 to the last step, then from step 1 again (as at first).
Backward: the last step to step 1, then from the last step again.
Ping-pong: forward, then backward, without repeating the first and last steps.
Random: any step, but never the same one twice in a row.
Random Walk: one step forward or one step back at random, going round from the last step to step 1 and back.
A tie holds whichever chord played just before it, so in other directions ties may join different steps than they do going forward.
Notes (Seq Notes): on at first. Turn it off and the sequence plays no notes: it keeps running and moving through its steps while you hold keys (or with Hold on), but only for its mod values, and the keys play Astrel as usual. See Modulation only.
Mutate (Seq Mutate): 0% to 100%, 0% at first. The chance that each chord plays a little differently: an octave up, an octave down, louder or softer (by up to 40 of velocity). The stored sequence never changes, and the mod values aren't affected. Small amounts, 10% to 25%, keep a loop from sounding mechanical.
Probability (Step Probability): 0% to 100%, 100% at first. The chance that each chord plays. A chord that doesn't play becomes a rest, and a tie straight after it holds nothing. The sequence keeps its place, so it stays in time, and the mod values still change on every step. With Notes off, Probability has no effect on the sequencer. The same control sets the arpeggiator's probability.
The MOD lane and the Seq source

Each step can have a mod value from −100 to +100. The matrix source Seq follows the playing step's value, from −1 to +1, so a slot from Seq to Cutoff, FX Mix or any other destination moves it in time with the sequence.
Click MOD to the left of the bars to see the values: bars up from the center line for positive values, down for negative ones.
Drag a step's bar up or down to set its value. Rests and ties can have values too, so the modulation can keep moving between notes.
Double-click a bar to clear its value.
Click VEL to go back to the velocities.
A step without a value still modulates:
a chord uses its loudest note's velocity, from 0 to +1 (a faint bar shows it), so a sequence you already have works as a source straight away: the accents become the modulation;
a rest or tie keeps the value from the step before.
Seq is the same for every voice. It changes at the start of each step, in jumps rather than glides, and keeps its last value when the sequence stops. While Seq is off, it's 0.
Modulation only
With Notes off, the sequencer is a modulation source and nothing else:
Turn on Seq and turn off Notes.
Play as usual. The keys play Astrel's voices directly, with Low Split if it's on, and while any key is held (or with Hold on) the sequence runs, from its first step, sending its values to the Seq source.
Let go of every key to stop it, unless Hold is on. With Hold on, it keeps running between phrases.
MIDI Arp Notes sends nothing while Notes is off, as the sequencer plays no notes.
Tips
Write the sequence in C (around C4), then transpose it live with your left hand: one key per chord of your song.
Use velocities to make accents: a few loud steps among quieter ones make a pattern groove. Turn on ENV 1's Vel so accents are brighter too.
Short sounds (Env 2 Sustain at 0) make sequences tight; with ties, longer notes and chords hold through.
Combine with Low Split: keys below the split point transpose the sequence an octave or two lower.
The Seq category of the factory bank has sequences to learn from: load one and look at its SEQUENCER page.
Send Seq to Cutoff for a filter pattern that follows the notes, or to FX Mix or Reverb Mix for rhythmic effect throws.
With Notes off, try an odd Length such as 7 or 12 steps: the modulation pattern drifts against the bar instead of repeating with it.
Random Walk with a smooth ramp of mod values wanders gently up and down; Random with large jumps gives sample-and-hold effects locked to the clock.
Try this: a four-step riff
Make the bass from Your first sounds, or load Init and set Cutoff to about 400 Hz, then State to 0, and ENV 1's Amount to about 50.
Open the SEQUENCER page and set Length to 8.
Click C4 (the "ref" row) in steps 1 and 4, G3 in step 6, and A#3 in step 7. Click tie under step 8 and rest under steps 2, 3 and 5.
Turn on Seq and hold C4.
While it plays, hold F3 instead, then G3.
What you should hear: a syncopated riff that loops while you hold a key, and moves down to F and up to G as you change keys, starting from the next step each time.
Try this: a rhythmic filter pad
Make the pad from Your first sounds, or load Init and set ENV 2's Attack to about 400 ms and Release to about 1 s, and Cutoff to about 500 Hz.
Open the SEQUENCER page, click CLEAR and then CLEAR ALL?, and set Length to 8.
Click MOD, and drag the eight steps' bars to +100, 0, +60, 0, +100, +30, +80 and 0. (The steps are empty, which is fine: they're there for their values.)
Turn on Seq, turn off Notes, and set Divide to 1/16.
On the MOD MATRIX page, choose Seq as a free slot's source and Cutoff as its destination, with an amount of about +50.
Hold a chord. Then set Direction to Random.
What you should hear: your chord, played normally, with the filter opening and closing in a sixteenth-note rhythm; in Random, the same values in a new order every bar.
Effects
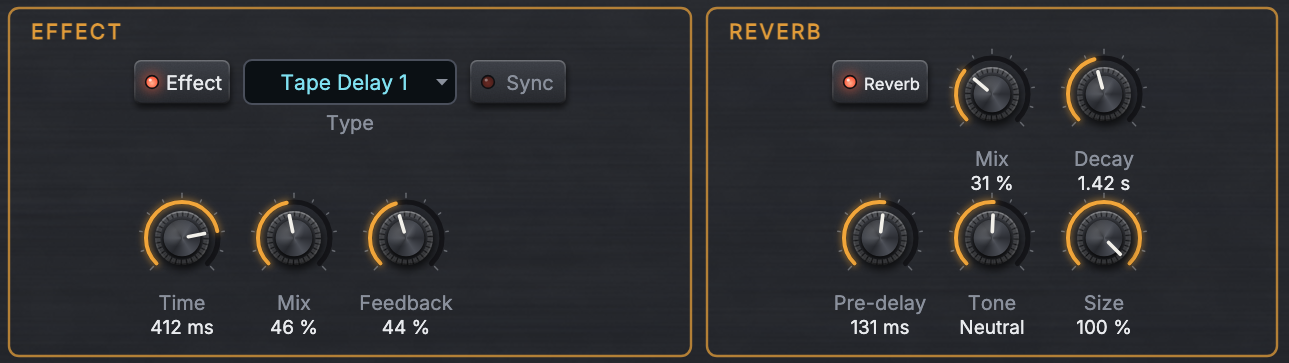
Effects process the finished sound of all the voices together: echoes, movement, distortion and space. Each preset has two effects after the voices: Effect 1 (the EFFECT section), then a plate reverb (the REVERB section). Turn each on with its button (Effect and Reverb). Every effect knob is also a modulation destination.
Effect 1
Effect 1 has twelve types, chosen with Type. Its three knobs change meaning with the type, and the editor shows their names and values in real units:
Delay, BBD, Tape Delay 1, Tape Delay 2: delays (echoes), with Time (1 ms to 2 seconds, or a tempo-synced division), Mix and Feedback (0 to 100%, how many times the echo repeats).
Delay is clean: every echo sounds like the original.
BBD darkens as the delay gets longer, like a bucket-brigade delay, with soft saturation and a little hiss.
The tape delays add wow, flutter and tape saturation. Tape 2 is darker and more driven.
Turn on Sync (it appears only for the delays) to set Time in divisions of the tempo instead: turning Time up steps through 1/64 to 4 bars, including dotted (D) and triplet (T) values. Long divisions at slow tempos are limited to about 4 seconds.
Chorus: Rate (0.05 to 8 Hz), Depth and LPF (a low-pass on the effect, 1 to 16 kHz). It has two BBD-style lines for a wide, classic chorus sound.
Flanger: Rate (0.02 to 5 Hz), Depth and Feedback (−90% to +90%, none in the middle). It's a through-zero flanger, for the deep "jet" sweep.
Phaser: Rate (0.03 to 8 Hz), Depth and Feedback (up to 90%). It's a 6-stage phaser.
HP Filter: Frequency (20 Hz to 10 kHz), Mix and Resonance. A high-pass filter on the whole sound, for thinning it out or for sweeps.
Distortion: Gain (1 to 100×), Output (the level) and Tone (800 Hz to 18 kHz, darker to brighter).
Ring Mod: Pitch, Mix and Track (pitch tracking). A ring modulator for metallic, clangorous tones.
With Track off (the knob below its middle), Pitch sets the carrier from 20 Hz to 5 kHz. Every note gets the same carrier, so the result is inharmonic.
With Track on (the knob at or above its middle), the carrier follows the note you play, and Pitch sets the interval (±24 semitones), so the result stays in tune with your playing.
Rotary (a rotating speaker): Speed, Drive (1 to 8×) and Mic Dist (mic distance, the depth of the effect and the stereo spread). Speed goes from Slow (chorale) to Fast (tremolo). The horn and drum speed up and slow down at their own pace, like the real thing, so moving Speed gives the classic ramp.
Lo-Fi: Frequency (bandwidth, 1 to 16 kHz), Wow/Flutter and Drive. It sounds like a worn tape or a cheap radio, with a little hiss.
For effects with a Mix knob, the center position (50%) gives the full dry and full wet sound. Turn it up for less dry, and down for less wet. Below the center is usually what you want for delays: the original stays at full level and the echoes are quieter. Chorus, Flanger and Phaser have a fixed 50/50 balance, and Lo-Fi is fully wet.
Reverb
The plate reverb puts the sound in a space. It has five controls:
Mix: how much reverb you hear, in %.
Decay: 0.3 to 10 seconds, how long the reverb rings.
Pre-delay: 0 to 250 ms of silence before the reverb starts. A little pre-delay keeps the start of each note clear.
Tone: darker below the center, and thinner above it. The value shows as Dark, Neutral or Bright.
Size: the size of the plate, in %. Larger sounds bigger and smoother.
Switching an effect on or off, or changing its type, crossfades smoothly, so it doesn't click.
Tips
Effects are shared by all the voices, so a distortion on a chord sounds harsher than Overdrive, which works on each voice separately.
Use the matrix to make effects play along: Mod Wheel to FX Mix for more echo on demand, or Mod Wheel to FX Time with Rotary to switch the speaker from slow to fast.
For a long, dark ambient tail, combine a BBD or tape delay with high feedback and a reverb with a long decay and the Tone toward Dark.
Keep the reverb's Mix low (15 to 25%) on basses and fast parts, so they stay clear.
Try this: a tempo-synced echo
Make the pluck from Your first sounds.
In EFFECT, turn on Effect and set Type to Tape Delay 1.
Turn on Sync and turn Time until it shows 1/8 D.
Set Mix to about 35% and Feedback to about 40%.
Play short notes.
What you should hear: dotted-eighth echoes, each one slightly darker and more wobbly than the last, in time with the tempo.
Try this: a rotary organ
Load Init. In OSC 1, turn Saw off and Pulse on (PW stays at 50%). In MIXER, turn on Sub at about 80 and Osc 2 at about 60. In OSC 2, turn Saw off, Tri on, and set Freq to +12 st.
In FILTER, set Cutoff to about 4 kHz, then State to 0.
In EFFECT, turn on Effect, set Type to Rotary, Speed all the way down (Slow) and Drive to about 3×.
On the MOD MATRIX page, set slot 3 to Mod Wheel, amount 127, destination FX Time.
Play chords and push the mod wheel up, then back down.
What you should hear: an organ through a rotating speaker that speeds up from a slow swirl to a fast tremolo when you push the wheel, and slows down again, each rotor at its own pace.
MIDI and controllers
Astrel responds to:
notes and velocity;
pitch bend and the mod wheel;
channel pressure (aftertouch);
breath, foot and expression controllers;
the sustain pedal;
program change, which chooses a factory preset.
Astrel listens on every MIDI channel. The controllers it uses itself are the mod wheel (CC 1), breath (CC 2), foot (CC 4), expression (CC 11) and the sustain pedal (CC 64).
Use them as sources in the modulation matrix to make any sound respond to your playing. Any other knob or slider on your controller can be assigned to a control with MIDI Learn.
In a DAW, every sound control can be automated, in the VST3, the Audio Unit and the AAX plug-in. Notes and automation are sample-accurate.
Tips
The mod wheel, pressure, breath and pedals do nothing by themselves (apart from the mod wheel's vibrato slot in Init): they need a matrix slot. Look at a factory preset's MOD MATRIX page to see what it uses them for.
If your keyboard has aftertouch, Pressure to Cutoff or to LFO 1 Amt makes held notes come alive when you press harder.
An expression pedal on Expression to Cutoff gives you hands-free filter sweeps. Breath and foot controllers work the same way, through Breath and Foot Pedal.
Try this: aftertouch brightness
Load Init. Set Cutoff to about 300 Hz, then State to 0, and Resonance to about 40.
On the MOD MATRIX page, set slot 3 to Pressure, amount about 50, destination Cutoff.
Hold a chord, then press harder into the keys.
What you should hear: the sound opens up as you press, and closes again as you ease off. Without aftertouch on your keyboard, use Mod Wheel as the source instead.
MIDI Learn
MIDI Learn lets any control your DAW can automate follow a knob, slider or pedal on your MIDI controller.
Click LEARN in the header. Every control you can assign gets an outline, and the ones already assigned show their CC number.
Click a control. It blinks while it waits, and the click doesn't move it.
Move a knob or slider on your controller. The control follows it from now on.
To unassign a control, double-click it while learning, or click it and press Delete.
Click LEARN again, or press Esc, when you're done. The page tabs still work while you're learning, so you can assign controls on the MOD MATRIX and SEQUENCER pages too.
Each controller moves one control, and each control follows one controller: assigning either again replaces the old assignment. Assignments work on every MIDI channel. The controllers Astrel uses itself (the mod wheel, CC 1; breath, CC 2; foot, CC 4; expression, CC 11; and the sustain pedal, CC 64) can't be assigned, and neither can bank select or the RPN, NRPN and channel-mode messages.
Your assignments are yours, not the project's: they're the same in every project, every plug-in format and the standalone app on your computer.
In a VST3 host, moves you make with an assigned controller are recorded as automation, as if you'd turned the knob on screen. In Logic Pro, GarageBand and Pro Tools, the sound and Astrel's editor follow the controller, but the host doesn't record the moves as automation.
Try this: a hands-on filter
Click LEARN.
Click the filter's Cutoff knob, then turn a knob on your controller.
Click Resonance, then turn a second knob on your controller.
Click LEARN again to finish.
What you should hear: your controller's two knobs now sweep the filter and its resonance, in every preset and every project.
Sound design recipes
These recipes combine several sections. Each starts from Init. Treat the values as starting points, and adjust them by ear.
PWM string pad
Pulse width modulation on every voice, each at its own pace, gives the lush, shimmering strings of classic analog polysynths.
In OSC 1, turn Saw off and Pulse on, and set PW to about 70%.
In MIXER, turn on Osc 2 at about 100. In OSC 2, turn Saw off and Pulse on, set PW to about 70% and Detune to about +6 ct.
In LFO 2 · PER VOICE, set Destination to Osc All PW, Freq to about 0.4 Hz and Amount to about 30.
In FILTER, set Cutoff to about 3 kHz, then State to 0, and Resonance to about 10.
In ENV 2, set Attack to about 500 ms and Release to about 1.5 s.
In OUTPUT, set Vintage to about 40.
In EFFECT, turn on Effect with Type Chorus; in REVERB, turn on Reverb with Mix about 30% and Decay about 2.5 s.
On the MOD MATRIX page, set slot 2's amount (Voice Spread to Panning) to about 90.
What you should hear: warm, slowly shimmering string chords, each note moving on its own, spread across the stereo field.
Sync lead
A hard-sync lead that "screams" at the start of each note, and that you can sweep further with the mod wheel.
In OSC MOD, turn on Sync. In OSC 1, set Freq to +7 st.
In MIXER, turn on Osc 2 at about 60.
In FILTER, set Cutoff to about 2 kHz, then State to 0, and Resonance to about 35.
In ENV 1, set Decay to about 900 ms and Sustain to about 20. Leave its Amount at 0, so it doesn't move the filter.
On the MOD MATRIX page, set slot 3 to Env 1, amount about 30, destination Osc 1 Freq. Set slot 4 to Mod Wheel, amount about 40, destination Osc 1 Freq.
In VOICE, turn on Unison, set Voices to 3 and Detune to 2. Turn on Porta with Mode Fixed Time A and Rate about 25, and both oscillators' Glide to 127.
In OUTPUT, set Overdrive to about 45. In EFFECT, turn on a Delay with Mix about 35%.
What you should hear: each note starts with a bright, tearing sweep that settles as Env 1 decays; pushing the mod wheel sweeps the sync tone up further.
Arpeggiated sequence
A rhythmic pattern from held chords, with echoes that interlock with it.
In MIXER, turn on Osc 2 at about 50. In OSC 2, set Freq to +12 st and Detune to about +4 ct.
In FILTER, set Cutoff to about 480 Hz, then State to 0. Set Resonance to about 45 and Key Amt to about 64.
In ENV 1, set Decay to about 200 ms, Amount to about 70 and turn on Vel.
In ENV 2, set Decay to about 350 ms, Sustain to about 25 and Release to about 300 ms.
In ARP / CLOCK, turn on Arp and Hold, set Mode to Up, Octave to 2 and Divide to 1/16.
In EFFECT, turn on Effect, set Type to Delay, turn on Sync, set Time to 1/8 D, Mix about 30% and Feedback about 40%.
On the MOD MATRIX page, set slot 3 to Mod Wheel, amount about 50, destination Cutoff.
Play a chord, let go, and push the mod wheel slowly up and down. Play new chords to change the pattern.
What you should hear: a driving sixteenth-note pattern over two octaves, with dotted-eighth echoes filling the gaps, opening up as you push the wheel.
Tempo-synced wobble bass
A bass whose filter wobbles in time with the song, deeper as you push the mod wheel.
Make the bass from Your first sounds (or: Unison on with Voices 1, Sub on).
In FILTER, set Cutoff to about 250 Hz, State to 0 and Resonance to about 70. Set ENV 1's Amount to about 20.
In LFO 1 · GLOBAL, turn on Sync, set Division to 1/8, Shape to Triangle and Destination to Cutoff. Set Amount to about 20.
Slot 1 of the matrix already sends the Mod Wheel to LFO 1 Amt: set its amount to about 40.
In OUTPUT, set Overdrive to about 60.
Hold low notes and move the mod wheel. Try Division 1/4 T or 1/16, and Shape Square.
What you should hear: a growling bass whose filter opens and closes in eighth notes at the tempo, from a gentle pulse with the wheel down to a deep wobble with it up.
Random bubbling filter
The classic sample-and-hold sound: the filter jumps to a new random place on every step.
In MIXER, turn on Osc 2. In OSC 2, turn Saw off and Pulse on, set PW to about 70% and Detune to about +7 ct.
In FILTER, set Cutoff to about 600 Hz, then State to 0, and Resonance to about 100.
In LFO 1 · GLOBAL, set Shape to S&H, turn on Sync, set Division to 1/16, Destination to Cutoff and Amount to about 45.
In EFFECT, turn on a Delay with Sync on, Time 1/8 and Mix about 30%.
What you should hear: a held chord bubbles and chirps as the resonant filter jumps to a new random cutoff every sixteenth note.
Wind
Noise through a resonant band-pass filter, slowly swept, sounds like wind.
In MIXER, turn off Osc 1 and turn on Noise (leave the Color on White).
In FILTER, turn on BP, set Cutoff to about 800 Hz, State to about 64 and Resonance to about 110.
In LFO 1 · GLOBAL, set Destination to Cutoff, Freq to about 0.1 Hz and Amount to about 30.
In ENV 2, set Attack to about 1 s and Release to about 3 s.
In REVERB, turn on Reverb with Mix about 40% and Decay about 5 s.
What you should hear: a howling, rising and falling wind. Play higher or lower keys for higher or lower gusts if you set Key Amt to 127.
Swelling brass
Brass-like sounds come from saws with a filter that opens a little slower than the volume.
In MIXER, turn on Osc 2. Set OSC 1's Detune to about −5 ct and OSC 2's to about +5 ct.
In FILTER, set Cutoff to about 500 Hz, then State to 0, and Key Amt to about 64.
In ENV 1, set Attack to about 120 ms, Decay to about 600 ms, Sustain to about 60, Amount to about 40, and turn on Vel.
In ENV 2, set Attack to about 40 ms, Release to about 300 ms, and turn on Vel.
In OUTPUT, set Vintage to about 30. In REVERB, turn on Reverb with Mix about 20%.
What you should hear: chords that "blat" into a bright, brassy tone, stronger and brighter the harder you play.
Where next
Take factory presets apart. Load a preset you like, and change one control at a time to hear what each part contributes. Look at its MOD MATRIX page to see how it responds to your playing.
Make variations. Start from one of your sounds from Your first sounds and change one section: swap the waveform, reverse the envelope Amount, try another effect type. Save the ones you like.
Add expression. Give every preset you make at least one slot for velocity, the mod wheel or pressure.
Look up words you don't know in the synthesizer glossary.
Write sequences on the SEQUENCER page, and transpose them live while your DAW plays.
Troubleshooting
My DAW doesn't list Astrel
VST3: check that the plug-in was installed in your system's VST3 folder (see Installing), then rescan plug-ins in your DAW.
Audio Unit (macOS): check that Astrel.component is in /Library/Audio/Plug-Ins/Components. In Logic Pro, open Logic Pro > Settings > Plug-in Manager, select Astrel and click Reset & Rescan Selection. If it still doesn't appear, restart your Mac.
AAX (Pro Tools): check that Astrel.aaxplugin is in the AAX plug-in folder (see Installing), then restart Pro Tools. Pro Tools scans for new plug-ins when it starts.
There are short silences in the sound
Astrel isn't activated, so it's running as a demo. Click UNREGISTERED: ACTIVATE and enter your license key.
Activation says there are no seats left
Your license is active on two other computers. Deactivate one of them, or free its seat on the My licenses page of your account, then try again.
I hear clicks or dropouts in the standalone app
Open Settings and choose a larger buffer size.
A note keeps sounding
Check whether Hold is on, or a sustain pedal is down. In the standalone app, sustain is reset when you reopen it.
I hear nothing after changing the filter
If State is near 0 (low-pass) and Cutoff is very low, the filter lets almost nothing through. Turn Cutoff up. This often happens from Init, whose Cutoff is at 20 Hz.
Porta doesn't glide
Turn up the oscillators' Glide knobs: at 0, an oscillator doesn't glide. Also check that Rate isn't at 0. With a Fixed Rate A or Fixed Time A mode, glide happens only in unison and only between overlapping notes.
The sound doesn't respond to how hard I play
Turn on Vel in ENV 2 (for volume) and ENV 1 (for brightness), or use Velocity as a source in the modulation matrix.
Only one note plays at a time
Unison is on. Turn it off to play chords.
I can't change the BPM
In a DAW, the clock follows the DAW's tempo, and the BPM knob shows it. Change the tempo in your DAW.
Step recording isn't available
A few hosts run Astrel's sound engine apart from its editor. There, the editor says step recording isn't available in this host; you can still edit the sequence by clicking the grid.
Getting help
If something isn't working, open a support ticket. Tell us your operating system, your DAW and its version, and what you did just before the problem. Support is provided in English only.
Astrel™ is a trademark of Tristar Advanced Software, LLC.